The Advanced Viewer
![]() Can display point values from the
OPC Server through the Point Control Panel.
Can display point values from the
OPC Server through the Point Control Panel.
![]() Enables you to use the Select a
Point browser to find and select points from the OPC Server.
Enables you to use the Select a
Point browser to find and select points from the OPC Server.
The Point Control Panel can be opened to display points using a:
|
CimEdit/CimView screen. |
|
|
Point Control Panel (.ppl) file. |
|
|
List a Point browser. |
|
|
Point Control Panel file sections. |
CimEdit/CimView screen
A Point Control Panel can be opened for the Advanced Viewer the same way it is opened for a CIMPLICITY project through a CimEdit or CimView screen.
Right-click the CimEdit or CimView screen.
Select Point Control Panel on the Popup menu.
Result: The Point Control Panel opens.
![]() The router
is running:
The router
is running:
Item ID's being used by the selected object are listed in the Point Control Panel.
The tag values display.
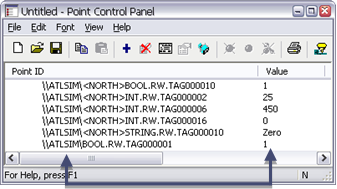
Note: The Advanced Viewer supports array point set points in the Point Control Panel; they are not supported in CimView.
![]() The router
is not running.
The router
is not running.
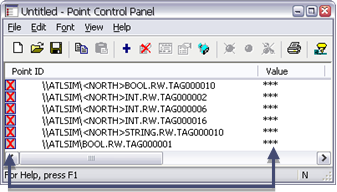
Item ID's associated with the selected object are listed in the Point Control Panel.
The tag values do not display.
Point Control Panel File
You can open a Point Control Panel file (.ppl) to view Advanced Viewer points.
The .ppl file:
![]() Defines the Point Control
Panel
Defines the Point Control
Panel
![]() Can optionally include specified
point ID's.
Can optionally include specified
point ID's.
Note: You can enter the point ID's manually or save a Point Control file that displays the points you want.
Double-click a Point Control Panel file (.ppl) when the Router is running.
Result: Point ID's that are listed in the .ppl file display when the Point Control Panel opens.
![]() No point
ID's are listed.
No point
ID's are listed.
The Point Control Panel is initially blank.
![]()
![]() Point ID's
are listed in a Point ID section.
Point ID's
are listed in a Point ID section.
The Point Control Panel initially displays the points that are listed in the .ppl file.

List a Point Browser
Click the Open Browser button on the Point Control Panel toolbar.
The List a Point browser opens.
Note: If the OPC Server does not display in the Project field, you can select it in the drop down list.
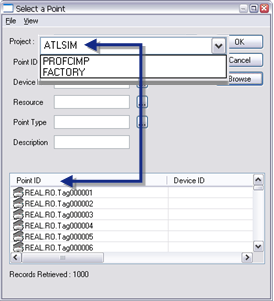
Select the point ID's that you need.
Note: The Select a Point browser operates for the Advanced Viewer the same as it does for point ID's in any CIMPLICITY project.
Result: The selected points display in the Point Control Panel; you have the option to save the .ppl file for future use.
Point Control Panel File Sections
The .ppl file sections are as follows.
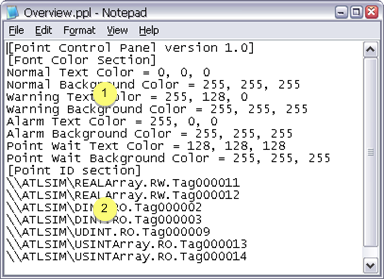
|
1 |
Basic Point Control Panel display definition. |
|
2 |
Point ID section. The entry syntax is: \\<Project Name>\<item ID> Where <Project Name> is a project name entered in the ptopc_config.xml file. <item ID> is an item ID accepted by your OPC Server. |
|
|
Ptopc_config.xml specifications. |
|
|
Step 2. Configure user interfaces for the Advanced Viewer. |