|
Add an alarm. |
|
|
Remove an alarm. |
|
|
Modify an alarm. |
Add an alarm
You can enter the name of an Alarm ID in the Alarm ID field in the Alarm Blocking dialog box in any of the following ways:
![]() Click Add to open the Browser dialog box and
browse for the Alarm ID you want.
Click Add to open the Browser dialog box and
browse for the Alarm ID you want.
![]() Click the Browser button to the right of the
input field to open the Browser dialog box and browse for the
Alarm ID you want.
Click the Browser button to the right of the
input field to open the Browser dialog box and browse for the
Alarm ID you want.
![]() Click the Popup menu button to the right of the
input field to create a new Alarm ID, modify the current Alarm ID
or browse for an Alarm ID.
Click the Popup menu button to the right of the
input field to create a new Alarm ID, modify the current Alarm ID
or browse for an Alarm ID.
Enter the priority of the Alarm ID in the Priority field. This can be a number from 0 to 32767. The higher the number you enter, the higher the blocking priority for the alarm. For example, if you have alarm XXX with priority set to 10 and alarm YYY with priority set to 100 in the same group, when alarm YYY generates, it blocks alarm XXX.
If the Alarm ID does not have a Point ID, you must assign a Resource ID to the alarm. You can click the Browser button to the right of the input field to open the Browser dialog box and browse for the Resource ID you want. You can also use the Pop-up menu button to create a new Resource ID, modify the current Resource ID or browse for a Resource ID. Remember that each Alarm ID/Resource ID combination must be unique within a group and across all groups.
Remove an alarm
Select the alarm from the list in the group's Alarm Blocking dialog box.
Click Delete.
Modify an alarm
To modify an alarm's name, priority and Resource ID in the list:
Select the alarm ID you want to edit in the selected group's Alarm Blocking dialog box.
Type in your changes.
If you are changing an Alarm ID or Resource ID, you can also use the Browser and Popup Menu buttons in the field to search for a new one.
To set a number of alarms to the same priority and/or Resource ID at the same time:
Select the alarms whose priority and/or Resource ID you want to set. You can use the Shift and Ctrl keys while making your selection.
Click .
The Set Attributes dialog box opens.
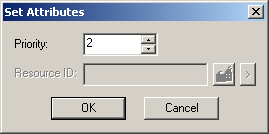
Enter the new priority and/or Resource ID for the alarms.
Click .
Result: All the selected alarms will be assigned the new priority. Non-point alarms will be assigned the new Resource ID.
|
|
Alarm blocking configuration. |