![]() Important: The arc object first uses the visual
properties of the object that was created last. Therefore, make
sure that an object that includes a line was created so a line will
display when you create the arc.
Important: The arc object first uses the visual
properties of the object that was created last. Therefore, make
sure that an object that includes a line was created so a line will
display when you create the arc.
|
Place a shape on the screen. |
|
|
Configure the shape. |
|
|
Object angles/direction and style example |
Place a Shape on the Screen
Click one of the following in the Drawing tab>Shapes group on the CimEdit Ribbon bar.
![]() Arc
Arc
![]() Chord
Chord
![]() Pie
Pie

The cursor changes to a crossbar.
Move the cursor to the starting position for the object.
Hold down the left mouse button.
The cursor location becomes the starting location of the arc.
Result: The shape that represents what you drew displays. The shape can be changed at anytime.
|
Arc |
Chord |
Pie |
|
|
|
|
Configure the Shape
Open the Properties dialog box for the selected shape.
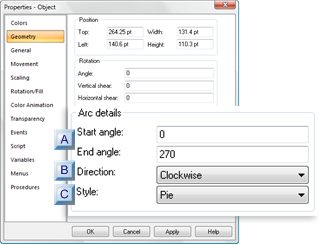
Select Geometry.

|
Start angle/End angle |
|
|
Direction |
|
|
Style |
|
A |
Start angle/End angle |
The start and end position combined with the direction determine the shape of the selected style.
Example
![]() A chord is draw on the screen
inside a rectangle.
A chord is draw on the screen
inside a rectangle.
![]() The Start and End angles only are
changed in its Properties dialog box.
The Start and End angles only are
changed in its Properties dialog box.
![]() The chord changes shape based on
the Start and End angle specifications.
The chord changes shape based on
the Start and End angle specifications.
|
Start 90/End 0 |
Start 180/End 0 |
Start 0/End 180 |
|
|
|
|
|
B |
The direction choices are:
![]() Clockwise
Clockwise
![]() Counter-clockwise
Counter-clockwise
The shape and size the of the selected style is affected by the start and end angles, combined with the selected direction.
|
C |
The style can be changed at any time. during or after the object is configured.
Options are:
|
Arc |
Chord |
Pie |
|
|
|
|
Object Angles/Direction and Style Example
An arc is placed on the screen within a rectangle.
Following is an example of the arc's first display and changes in its display when modifications are made.
|
Selections |
Example |
|
Start 90 End 0 Clockwise Arc |
|
|
Start 270 End 0 Clockwise Arc |
|
|
Start 0 End 180 Counterclockwise Pie |
|
|
Start 0 End 90 Counterclockwise Chord |
|
|
Start 0 End 0 Either Pie |
|
|
Basic graphic objects. |