|
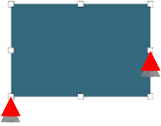
Rectangles |
|
|
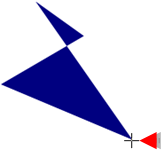
Polygons |
Click the
button ![]() in the Drawing tab>Shapes
group on the CimEdit Ribbon bar..
in the Drawing tab>Shapes
group on the CimEdit Ribbon bar..
The cursor changes to a crossbar.
Move the cursor to the starting position for the object.
Hold down the left mouse button; drag the crossbar cursor to the ending location for the rectangle.

Release the mouse button.
Result: A rectangle that represents the size you drew appears. Handles are available for moving and resizing the object.
![]() Tip: When you click the Rectangle button, then click the left
mouse button a duplicate of the last rectangle appears.
Tip: When you click the Rectangle button, then click the left
mouse button a duplicate of the last rectangle appears.
Click the
button ![]() in the Drawing tab>Shapes
group on the CimEdit Ribbon bar..
in the Drawing tab>Shapes
group on the CimEdit Ribbon bar..
The cursor changes to a crossbar.
Move the cursor to the starting position for the object.
Click the left mouse button to set the first point (or vertex) of the polygon.
Move the cursor to the second point you want to set.
As you move the cursor, a line will be drawn between the last point you set and the cursor.
Click the left mouse button to set the next point.
Move the cursor to the next point you want to set.
As you move the cursor, lines will be drawn between the last point you set and the cursor and between the cursor and the first point to create a closed polygon.
Click the left mouse button to set the next point.
Repeat 6 and 7 until you reach the last point in your polygon.
Double-click the left mouse button to finish drawing the polygon.
Result: A polygon that represents the shape you drew appears. Handles are available for moving and resizing the object.

![]() Tip: You can easily turn your polygon
into a single straight line. Double-click the left mouse button
after you create the first line of the polygon. You will create a
single straight line.
Tip: You can easily turn your polygon
into a single straight line. Double-click the left mouse button
after you create the first line of the polygon. You will create a
single straight line.
|
|
Basic graphic objects. |