|
Create a source for linked objects. |
|
|
Save the screen with the source in an easy to access location. |
|
|
Create links to the source object. |
|
|
|
|
|
Create an Object that can be the Source for a Linked Object |
Create the source for a linked object.
Open CimEdit.
Create all the objects you want to include in the linked object.
|
SCREEN 1 |
|
|
Note: The object can be a single object or group. Most often it will be a group. the remainder of this procedure assumes that a group will be linked.
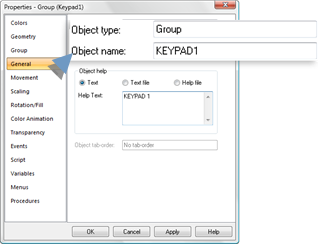
Open the Properties - Group dialog box.
Name the group.

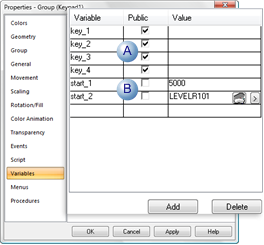
Create public or private variables needed in the group as follows.

|
A |
Checked |
Public |
Values can be entered for the variable ID in the link container. |
|
|
|
|
This makes some values unique to that container. |
|
B |
Clear |
Private |
A value cannot change for the variable ID in the link container. |
Implement events, procedures and scripts as needed.
Save the CimEdit screen that now contains the source object.
Result: Now screen designers can create links to the source object on other screens and change the public variables to those needed for each new link.
![]() Note: Screen designers
can also do a normal copy of the source object to create an
unlinked object on a new screen. However, when they do, any changes
you make to the source object will not automatically be made to the
copied object.
Note: Screen designers
can also do a normal copy of the source object to create an
unlinked object on a new screen. However, when they do, any changes
you make to the source object will not automatically be made to the
copied object.
Save the screen with the source in an easy to access location.
The screen with the source objects can be in any location that is available to the screens that will contain the links.
A convenient way to make the objects available is to add the screens to the Object Explorer.
Create links to the source object.
Create a link from either of the following.
![]() Source screen
Source screen
![]() Object Explorer
Object Explorer
Select a source object on the source screen, SCREEN1.
|
SCREEN 1 |
|
|
Hold down Ctrl+Shift keys and the left-mouse button.
Drag a link of the source object to another location button.
Note: Keep holding down the keys and button.
As you move the linked object to the destination screen, SCREEN2, the cursor looks like this.
![]()
Use the mouse or arrow keys to position the container where you want it on the destination screen, SCREEN2.
|
SCREEN 1 |
SCREEN 2 |
|
Source |
Links |
|
|
|
Result: The container is linked to the link source object.
Example. Create an Object that can be the Source for a Linked Object
This example creates a button with a script that increments a point and text that displays the current value of the point.
Open the CimEdit screen where you want to save your source objects.
Place a text button object on the CimEdit screen.
Place a text object underneath the button.

Change the text for the button object to ButtonName; name the object SetpointButton.
Change the text for the text object to Setpoint; name the object SetpointValue.
Group the two objects.

Open the group's Properties dialog box.
Name the group IncrementSetpoint.
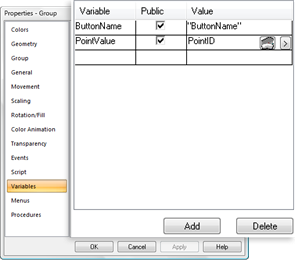
Create two public variables that look like this:

|
Variable |
Public |
Value |
|
ButtonName |
Checked |
"ButtonName" |
|
PointValue |
Checked |
PointID |
Select the SetpointButton object in the group.
Open the SetpointButton object's Properties dialog box.
Do the following configuration in the Properties dialog box.
Text Button.
In the Expression field, enter the variable {ButtonName}.
Event
Select a MouseUp event.
Create a new script in the Action field.
The script will increment the value of the Point ID assigned to the variable {PointValue}, as follows.:
Sub OnMouseUp(x As Long, y As Long, flags As Long)
Dim var As CimObjectVariable
Set var = CimGetScriptOwner().GetVariable("PointValue")
i = PointGet(var.Value)
PointSet var.Value, i+1
End Sub
Note: Even though the button owns the script, the variable will be resolved at the group level.
Select the Group tab.
Select the SetpointValue object in the group.
Open the SetpointValue object's Properties dialog box.
Do the following configuration in the Properties dialog box.
Text
In the Expression field, enter the variable {PointValue}.
Save the screen and close it.
|
Create linked objects. |