Resize an item using any of the following.
|
Resize tool. |
|
|
Properties dialog box (precisely). |
|
|
Grid units |
Resize Tool
The Resize tool can:
|
Expand/contract an object width or height. |
|
|
Expand/contract an object width and height. |
Click Resize in the Drawing>Edit group.
Select the object to resize.
The object is surrounded by resize handles.

Expand/Contract an Object (Width or Height)
|
Expand an object width or height. |
|
|
Reduce the object width or height. |
Expand an Object Width or Height
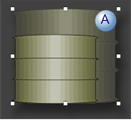
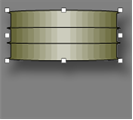
Select a handle on the side, top or bottom of the object.
Drag the selected handle to its new expanded location.
Release the mouse button when the new size is correct.
Result: The object size expands as follows.
|
|
|
|
|
Size Status |
Object Handles |
|
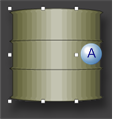
A |
Expanding |
The object handles remain in the original position. Note: Depending on the object selected, a expanded portion may be transparent. |
|
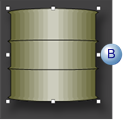
B |
Expanded |
The handles move to surround the expanded object. |
Reduce the Object Width or Height
Select a handle on the side, top or bottom of the object.
Drag the selected handle to its new contracted location.
Release the mouse button when the new size is correct.
Result: The object size contracts as follows.
|
|
|
|
|
Size Status |
Object Handles |
|
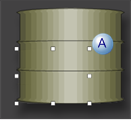
A |
Contracting |
|
|
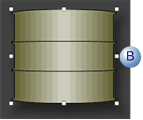
B |
Reduced |
|
Expand or Contract an Object (Width and Height)
|
Expand an object width and height. |
|
|
Reduce the object width and height. |
Expand an Object (Height and Width)
Select a handle on one of the object's corners.
Drag the selected handle to its new expanded location.
Release the mouse button when the new size is correct.
Result: The object size expands as follows.
|
|
|
|
|
Size Status |
Object Handles |
|
A |
Expanding |
The object handles remain in the original position. |
|
B |
Expanded |
The handles move to surround the expanded object. |
Reduce an Object Width and Height
Select a handle on one of the object's corners.
Drag the selected handle to its new contracted location.
Release the mouse button when the new size is correct.
Result: The object size contracts as follows.
|
|
|
|
|
Size Status |
Object Handles |
|
A |
Contracting |
|
|
B |
Reduced |
|
Properties dialog box (precisely)
The object can be precisely sized in its Properties dialog box.
Select an object.
Example
Note: The object width and height are measured from object handle to handle.
Open the Properties dialog box.
Select Geometry
The current dimensions display in the Width and Height fields.
Enter a new Width and/or Height of the object.

Click .
Result: The object is resized based on your entries.
Example
The re-sizing anchors are as follows.
|
Re-sizing |
Anchor |
The object |
|
|
Width |
Left |
Expands |
Left to right |
|
|
|
Contracts |
Right to left |
|
Height |
Top |
Expands |
Top Down |
|
|
|
Contracts |
Bottom Up |
![]() Note: If a shape has been rotated, changing its
size will change its rotation angle and shearing.
Note: If a shape has been rotated, changing its
size will change its rotation angle and shearing.
Grid Units
You can use the techniques to resize an object using the grid as follows.
Select an object.
Re-sizing options are as follows.
![]() Do either of the following.
Do either of the following.
![]() Press Shift+<arrow> on the keyboard. The
object expands or contracts in the specified direction by:
Press Shift+<arrow> on the keyboard. The
object expands or contracts in the specified direction by:
One grid unit when the grid is on
One pixel when the grid is off
![]() Press Ctrl+Shift+<arrow> on the keyboard. The
object expands or contracts in the specified direction by:
Press Ctrl+Shift+<arrow> on the keyboard. The
object expands or contracts in the specified direction by:
Two grid units when the grid is on
Five pixels when the grid is off
When you use either of the above methods, the upper left corner of the object remains fixed. Each arrow key does the following:
|
Up |
Decreases the height of the object. |
|
Down |
Increases the height of the object. |
|
Left |
Decreases the width of the object |
|
Right |
Increases the width of the object. |
For example, if snap to grid is off and you press Ctrl+Shift+<Down> the height of the object increases in size by five pixels, instead of grid units.
![]() Press the Ctrl key and hold down the right mouse
button; drag a side of the object to expand it or contract it.
Press the Ctrl key and hold down the right mouse
button; drag a side of the object to expand it or contract it.
The object expands or contracts in two directions, on the side you are dragging and on the opposite side.
![]() Tip: Click in the Nome>Grid group on the CimEdit
Ribbon bar to display the grid. Press the Alt key to toggle Snap to Grid on and off.
Tip: Click in the Nome>Grid group on the CimEdit
Ribbon bar to display the grid. Press the Alt key to toggle Snap to Grid on and off.
|
|
Change an object's size. |