|
Scaling overview |
|
|
Scaling configuration |
Scaling Overview
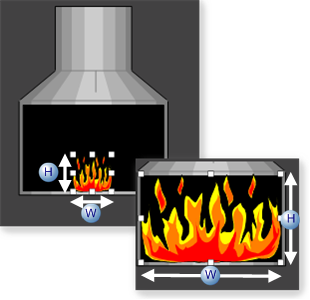
When you use CimEdit's scaling feature to configure an object, its horizontal and / or vertical dimensions will change during runtime based on the current value of one or two expressions. This is another way for a CimView user to be ably to glance quickly at a CimView screen and see when a change occurs.
If you define both horizontal and vertical scaling for an object, you may use different expressions, minimums, maximums, percent scales, and fixed locations for each scaling.
![]() Note: In order to make sure text is
legible:
Note: In order to make sure text is
legible:
![]() Text objects will only
change size when scaled vertically.
Text objects will only
change size when scaled vertically.
![]() Text Button objects with
Auto Size checked will not change size when scaled.
Text Button objects with
Auto Size checked will not change size when scaled.
Select the object you want to scale.
Open the object's Properties dialog box.
Configure either or both of the following.
|
W |
Width scale. |
|
H |
Height scale. |
Scaling Configuration
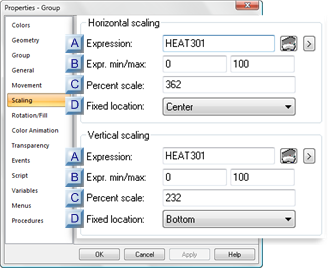
Select Scaling in the Properties dialog box.
Runtime horizontal and vertical scaling specifications are as follows.
|
Expression |
|
|
Expr min/max |
|
|
Percent scale |
|
|
Fixed location |
|
Expression |
A point ID or expression that will determine the object location between the START and END positions.
|
|
Opens the Expression Editor. |
|
|
Opens a Popup menu. |
|
Expr. min/max |
||
|
|
Min |
Minimum value of the point ID or expression. This value or lower will cause the object to be in the (minimum) START size |
|
|
Max |
Maximum value of the Point ID or expression. This value or higher will cause the object to expand to its (maximum) END size. |
|
Percent scale |
The percent scale is calculated by dividing the object's end size (largest width/height) by the object's start size (smallest width/height).
Status bar
Place the object's horizontal/vertical width in the START size.
Select the object.
Note the horizontal/vertical sizes in the CimEdit status bar.
Do the same for the object's END position.
Properties Dialog Box
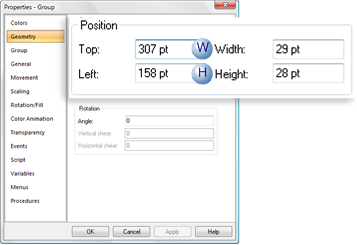
Place the object's horizontal/vertical width in the START size.
Open the Properties dialog box for the object.
Select Geometry.
Note the values in the Position Width and/or Height fields.
Example
|
|
Dimension |
Field |
|
W |
Width |
Width |
|
H |
Height |
Height |
Close the Properties dialog box.
Do the same for the object's END size.
Divide the END by START values.
The value is the size the object will expand to on the CimView screen.
Example: Horizontal
Maximum Width/Minimum Width = Percent
105/29 = 362(%)
Example: Vertical
Maximum Height/Minimum Height = Percent
65/28 = 232(%)
|
Fixed Location |
The starting point for scaling is as follows.
|
Option |
Side of object starts from: |
|
Left |
Left |
|
Center |
Center |
|
Right |
Right |
|
|
Runtime movement and animation |