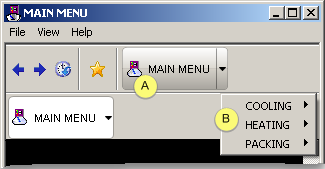
The root node starts the extended navigation menu.
|
A |
The root node is the first button in the CimView Navigation Extended menu. |
|
B |
The first children in the extended menu open from the root node. |
![]() Important: Once the root node is added to the
Navigation Configuration Editor's list, it cannot be deleted;
children can be deleted.
Important: Once the root node is added to the
Navigation Configuration Editor's list, it cannot be deleted;
children can be deleted.
Methods to add the root node are as follows.
|
Drag and drop a screen. |
|
|
Use the Navigation Configuration Editor's menu items. |
Drag and drop a screen
![]() Note: Dragging and dropping a screen speeds up
configuration when the node will use an Overlay action type, which
is one of three action types available for node configuration.
Note: Dragging and dropping a screen speeds up
configuration when the node will use an Overlay action type, which
is one of three action types available for node configuration.
Select a screen in the Navigation Configuration window lower right pane.
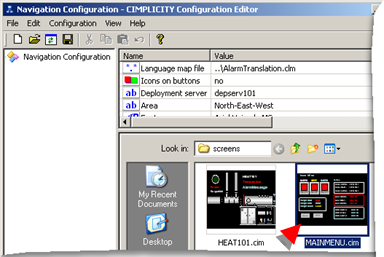
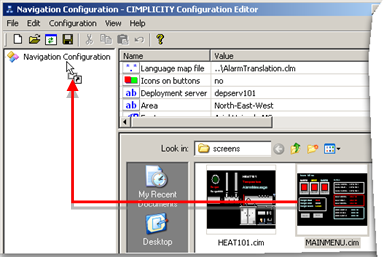
Drag the screen to Navigation Configuration in the left pane.
The screen file name displays as the node name.
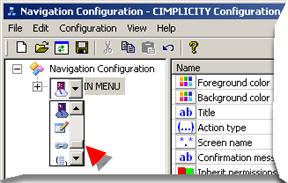
(Optional) Rename the node name.
Select the root node.
Do one of the following.
![]() Right-click the name; select
Rename on the Popup menu.
Right-click the name; select
Rename on the Popup menu.
![]() Select Edit>Rename on the
Configuration Editor menu bar.
Select Edit>Rename on the
Configuration Editor menu bar.
![]() Press F2
on the keyboard.
Press F2
on the keyboard.
The name can now be edited.
Type in the name that should display on the menu bar.
(Optional) Change the icon.
When the screen is dragged to create the node, the default icon will display in the tree. The icon can be changed.
Select the root node.
Do one of the following.
![]() Click Edit>Change Icon on the
Navigation Configuration Editor menu bar.
Click Edit>Change Icon on the
Navigation Configuration Editor menu bar.
![]() Right-click the root node; select
Change Icon on the Popup menu.
Right-click the root node; select
Change Icon on the Popup menu.
Select the icon you want to use for the node.
Result: The root node will now display on the menu bar; the screen that will display is automatically entered in the Overlay parameters Screen name field.
Use the Navigation Configuration Editor's Menu Items
Select the Navigation Configuration object in the Navigation Configuration editor left pane.
Do one of the following.
![]() Right-click Navigation Configuration; select Add Configuration
Object on the Popup menu.
Right-click Navigation Configuration; select Add Configuration
Object on the Popup menu.
![]() Click Edit>Add Configuration
object on the Navigation Configuration Editor menu bar.
Click Edit>Add Configuration
object on the Navigation Configuration Editor menu bar.
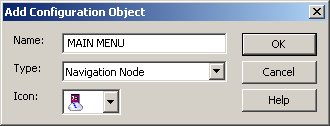
An Add Configuration Object dialog box opens.
Enter the following.
|
Field |
Description |
|
|
Name |
Name that will display on the Menu bar. |
|
|
Type |
The Navigation Node is the object that a user will click on to perform the selected root node action.
|
|
|
Icon |
An icon can be selected from the icon drop down list to represent the node. The icon selection will depend on your system's specifications and whether or not you use custom icons. |
|
|
|
Default |
Note: The default icon for a node may be different, based on your system's icon list. |
Click .
Result: The Add Configuration Object dialog box closes; The name that was entered displays as the root node name in the Navigation Configuration window left pane.
![]() Important: When the root is added using the Add
Configuration Object dialog box, an action type and specifications
required for that action type will have to be entered before the
navigation configuration can be saved with no errors.
Important: When the root is added using the Add
Configuration Object dialog box, an action type and specifications
required for that action type will have to be entered before the
navigation configuration can be saved with no errors.
|
|
Step 2.1. Add nodes for the extended menu. |