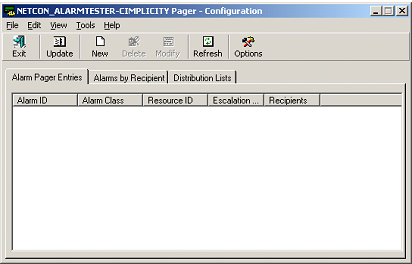
The CIMPager - Configuration window will display the following:
|
Alarm ID |
The Alarm ID of the alarm that has pager actions defined. |
|
Alarm Class |
The Alarm Class to be matched for that alarm. |
|
Resource ID |
The Resource ID to be matched for that Alarm ID and Alarm Class. |
|
Escalation Scheme |
The escalation scheme assigned to this pager action. |
|
Recipients |
A "+" separated list of recipients and their escalation levels in []. |
|
|
Alarm ID initially sorts the list of pager actions. Click on any of the other title buttons at the top of the list to sort by that attribute. |
To add an alarm pager entry:
Select the Alarm Pager Entries tab.
The following screen is displayed:
|
CIMPager Configuration |
|
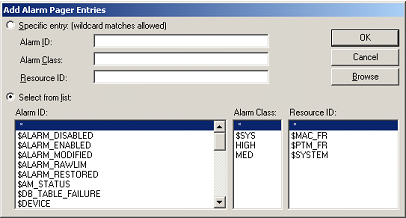
Click New button from the toolbar or select New Entry from the File menu.
The following screen is displayed:
|
Alarm Pager Entries |
|
Enter the name of the Alarm ID, Alarm Class, and Resource ID to create an alarm action for and click OK.
Click the button to populate the list boxes on the bottom of the form. Select the Alarm ID, Alarm Class and Resource ID to monitor.
The following wild cards can be used in any of the three fields:
|
* |
Search for any number of characters at this
point in the string. To create an entry for all alarm ID’s starting with "M" and ending with "X", enter M*X in the Alarm ID field. |
|
? |
Search for any character in this place in the
string. To create an entry for any resource ID’s that are three characters long, and whose first character is "M" and third character is "X", enter M?X in the Alarm ID field. |
|
|
There are no implied wild cards. If you do not include or terminate your search string with an asterisk, only those items that match your request exactly will be returned. |
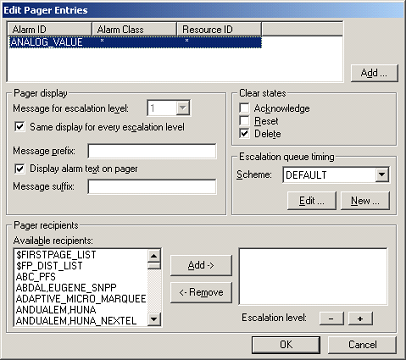
Once the correct alarm has been selected, click the OK button. The following screen is displayed:
|
Edit Pager Entries |
|
![]() Using CIMPager.
Using CIMPager.