An object designer configures an object based on the class you are creating in an Object dialog box. The specifications you make in the Object Builder Group of the class attribute's Attribute dialog box determine where and how the attribute appears in the Object dialog box.
Open the appropriate Attribute dialog box (if it is not open), in which you will fill in or modify the fields in the Object Builder box.
Fill in the fields as follows.
|
Prompt |
|
|
Help string |
|
|
Browser type |
|
|
Order |
|
|
Property page |
|
Prompt |
(Optional) A meaningful description that is up to 20 characters.
Your entry appears as the field name for the class attribute in the Object dialog box.
The class attribute ID appears as the field name if there is no entry.
|
Help string |
(Optional) A tip up to 80 characters.
Your entry appears as a tool tip in the Object dialog box when the user places the cursor over the field.
|
Browser type |
(Optional) A user has access to the selected browser in the Object dialog box.
The Browser's button will appear to the right of the field in the Object dialog box.
|
Browser Options |
Button that will display |
|
Alarm Class |
|
|
Resource |
|
|
Device |
|
|
Role |
|
|
Point |
|
|
User |
|
|
Port |
|
|
Order |
The order in which the field will appear on the Object dialog box tab in the field.
![]() Lower numbers appear before higher
numbers.
Lower numbers appear before higher
numbers.
![]() Class attributes with the same
order number (for the same tab) are sorted alphabetically by Prompt
(field name).
Class attributes with the same
order number (for the same tab) are sorted alphabetically by Prompt
(field name).
|
Property page |
Selects the tab on which the attribute will display in the Object dialog box as follows.
Do one of the following.
![]() Select the General which is the
default tab.
Select the General which is the
default tab.
Important: The General tab has a limit of 8 attributes (fields); CIMPLICITY attributes can be moved to another tab make room on the General tab for Custom attributes.
![]() Enter a new name. The name you
enter will appear as a tab in the Object dialog box.
Enter a new name. The name you
enter will appear as a tab in the Object dialog box.
Additional tabs have a limit of 9 attributes each.
Click or .
Result:
|
OK |
A new class attribute is added to the list of attributes and existing attributes are modified. In addition:
|
|
Cancel |
Cancels the procedure. |
![]() Note: CIMPLICITY attribute fields that
cannot be modified display as read-only. However, when you
duplicate a CIMPLICITY class attribute, all of the fields in the
Attribute dialog box for the new attribute can be modified.
Note: CIMPLICITY attribute fields that
cannot be modified display as read-only. However, when you
duplicate a CIMPLICITY class attribute, all of the fields in the
Attribute dialog box for the new attribute can be modified.
|
|
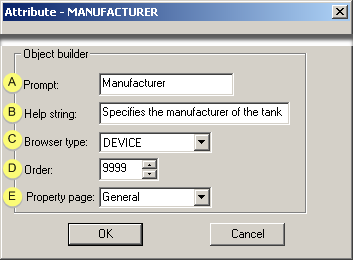
Example: Class attribute configured for an Object dialog box field. |
|
|
Step 3. Configure class attributes. |