Because you can change the fields to report data in both the CIMPLICITY table (Database Logger configuration) and the logging database, the Database Logger provides you with a tool to review the fields you have specified in each and reconcile the differences.
Open the CIMPLICITY table in the Database Logger that you want to reconcile.
Click Edit>Reconcile Table on the table's menu bar.
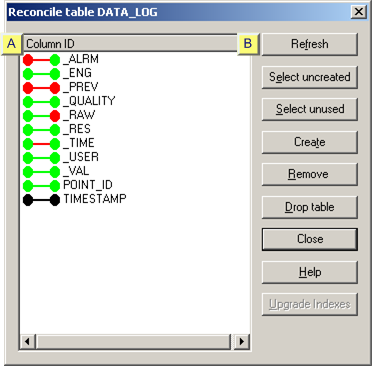
The Reconcile table dialog box opens.
|
Table reconcile status color code |
|
|
Reconcile buttons |
|
A |
Table Reconcile Status Color Code |
The icon colors display the differences between the CIMPLICITY table (Database Logger configuration) and the logging database as follows.
|
|
Field in the CIMPLICITY |
Field in the |
|
|
Icon |
Database Logger |
Logging Database |
Comment |
|
|
Yes |
Yes |
|
|
|
Yes |
Yes |
Types don't match. |
|
|
No |
Yes |
Unused |
|
|
Yes |
No |
Uncreated |
|
|
Removed |
Removed |
|
|
B |
Reconcile Buttons |
Reconcile buttons are available to perform the following actions.
![]() Refresh the view.
Refresh the view.
|
|
Refresh |
Click .
![]() Create uncreated fields
that are in the CIMPLICITY table but not in the logging
database.
Create uncreated fields
that are in the CIMPLICITY table but not in the logging
database.
|
|
Select uncreated |
|
|
Create |
Select the fields that display the ![]() icon.
icon.
Tip: Do one of the following.
![]() Press the Shift or Ctrl key to select multiple fields
Press the Shift or Ctrl key to select multiple fields
![]() Click Select Uncreated to select all the
uncreated fields in the table.
Click Select Uncreated to select all the
uncreated fields in the table.
Click Create.
The fields are created in the logging database.
The fields' icons change to:![]()
![]() Remove unused fields
that are in not in the Database Logger, but are in the logging
database.
Remove unused fields
that are in not in the Database Logger, but are in the logging
database.
|
|
Select unused |
|
|
Remove |
For Microsoft Access
Select the fields that display the ![]() icon.
icon.
Tip: Press the Shift or Ctrl key to select multiple fields, or click Select Unused to select all the unused fields in the table.
Click Remove.
SQL Server and Oracle
SQL Server and Oracle do not directly support dropping columns in a database table.
Copy the table to a temporary table.
Drop the table from the database.
Recreate the table with the fields you wish to use.
Copy the data from the temporary table to the new table.
Delete the temporary table.
Consult your SQL Server or Oracle documentation for details on how to do this.
Result: The unused fields are
removed from the database. The fields' icons change
to ![]() .
.
![]() Drop table
Drop table
|
|
Drop Table |
Click Drop Table to drop the table from the database.
A message displays asking you to confirm dropping the table.

Click to drop the table from the database.
Note: The table is not dropped from the CIMPLICITY Database Logger.
![]() Upgrade Indexes
Upgrade Indexes
|
|
Upgrade Indexes |
Note: Upgrade Indexes is enabled if you are looking at indexes that have not updated from a 5.0 or older log.
Important: Updating indexes to CIMPLICITY v5.5 may take a long time to complete. The amount of time required depends on the size of the table. This operation is very CPU intensive and will degrade the database server performance while it is executing.
Make sure your project is shut down.
Disconnect any other clients accessing the table whose indexes you will be upgrading.
Click Upgrade Indexes.
Result: A message appears warning you about making sure that no one is logging to the table.
CIMPLICITY:
Drops all old indexes that it had created,
Creates new Version 5.5 indexes and
Disables the Upgrade Indexes button.
|
|
Database Logger File Management functions. |