![]() Tip: Check Show Toolbar on the General tab so a runtime user can influence
the record selection by adding a filter and changing the record
sort order.
Tip: Check Show Toolbar on the General tab so a runtime user can influence
the record selection by adding a filter and changing the record
sort order.
Click on the SQL tab in the Historical Alarm Viewer Properties dialog box.
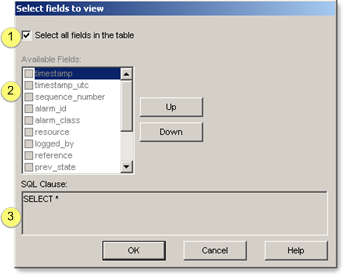
The Select Fields to view dialog box opens.
Do one of the following.
|
|
Select all fields in the table. |
|
|
Select some fields in the table. |
Select all Fields in the table
You can quickly select to display all of the columns in the Historical Alarm Viewer, as follows.
|
|
Feature |
Description |
|
1 |
Select all fields in the table. |
(Default) Check to select all of the fields at one time. |
|
2 |
Available Fields |
The list of available fields is disabled; their relative position in the Historical Alarm Viewer cannot be changed. |
|
3 |
SQL Clause |
The SELECT* clause includes all fields. |
Select some fields in the table
![]() Note: The fields that are
available are based on selections on the Connection tab's
CIMPLICITY Project to connect to field
and Table to View drop down list
Note: The fields that are
available are based on selections on the Connection tab's
CIMPLICITY Project to connect to field
and Table to View drop down list
You can select the columns that will display in the Historical Alarm Viewer, as follows.

|
|
Feature |
Description |
||
|---|---|---|---|---|
|
1 |
Select all fields in the table. |
Clear to select individual fields.
|
||
|
2 |
Available Fields |
Check the fields that should display in the Historical Alarm Viewer. |
||
|
3 |
Up/Down buttons |
To change the position of a field in the Historical alarm viewer.
|
||
|
|
|
|
Button |
Each click moves the field one column to the: |
|
|
|
|
Up |
Left |
|
|
|
|
Down |
Right |
|
4 |
SQL Clause |
(Read-only) The SELECT statement displays the selected fields in the order they will display in the Historical Alarm Viewer. |
||
|
|
Technical reference: Historical Alarm Viewer. |
|
|
Step 5. Configure the SQL display. |