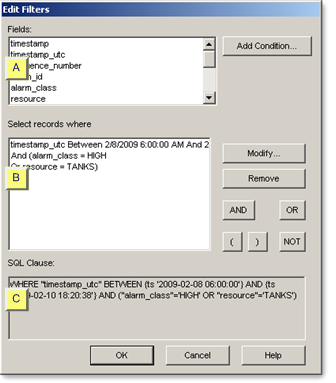
Click on the SQL tab in the Historical Alarm Viewer Properties dialog box.
The Edit Filters dialog box opens.
The fields that display in the Fields dialog box are based on your Connection tab CIMPLICITY Project to connect to and Table to View selections.
The Edit Filters dialog box provides the tools to define all filters, as follows.
|
Add conditions. |
|
|
Construct the SQL clause. |
|
|
Review the SQL clause. |
|
A |
Add conditions. |
Select a field in the Files box.
Note: If you are going to construct statements such as AND, OR, select the fields for those statements in the order they will be used.
Click .
A Select Values dialog box opens with fields that relate to your selection.
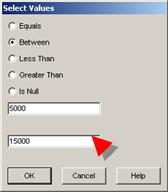
Enter the value(s) against which data will be evaluated and filtered.
Criteria types are as follows.
|
Time criteria |
|
|
Alarm state criteria |
|
|
Other alarm criteria |
Time Criteria
A Select Values dialog box provides the following options for fields that require date and time specifications.
Data that meets the date and time specifications passes the filter.
|
Check |
Displays |
|
One of the following:
|
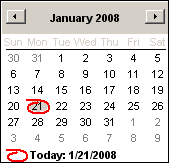
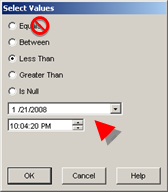
Displays a single date and time field for the date that will be referenced.
Important: Do not use Equals with a time stamp. |
|
|
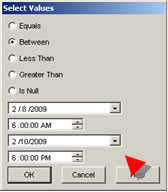
Two date and time fields for the date/time range that will be referenced.
|
|
|
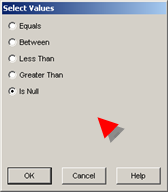
No time fields are required.
|
![]() Tip: Click the down arrow
to the right of a date field to display a calendar.
Tip: Click the down arrow
to the right of a date field to display a calendar.
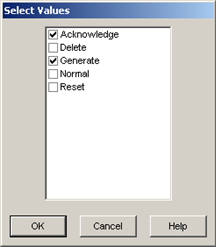
Alarm State Criteria
Alarm State criteria are available for the Database Logger ALARM_LOG table.
Checked values pass the filter.
Other alarm criteria
Other alarm criteria include:
Data is evaluated alphanumerically. Data that meet the specifications passes the filter.
|
Check |
Displays |
|
One of the following:
|
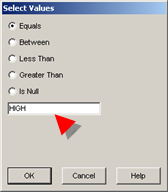
Displays a criterion field for the value that will be referenced.
|
|
|
Two criteria fields for the value range that will be referenced.
|
|
|
No criteria fields are required.
|
Result: The selected field is entered in the Select records where box.
|
B |
Construct the SQL clause. |
By default, each field is added to the Select records where box as an AND criteria. The alarm will have to fulfill that criteria and others on the list.
You can create statements to change how the list will be filtered.
Select a field in the Select records box.
Click any of the following to construct the SQL clause.
|
Button |
Description |
|
|
Modify |
|
Opens the field's Select Values dialog box The values can be modified. |
|
Remove |
|
Removes the field from the list (and clause). |
|
And |
|
Values that fill the criteria must or may have to fill the criteria, depending on where the AND is inserted in the statement, e.g. AND can be part of an OR clause inserted between parentheses. |
|
Or |
|
The values must fill the criteria or other criteria defined for other field entries to be displayed. |
|
NOT |
|
Values that fulfill the criteria will not be displayed. |
|
Parentheses |
|
Allow sub-clauses to be inserted in the clause. |
![]() Note: You can copy the data in the
Status box.
Note: You can copy the data in the
Status box.
|
C |
Review the SQL clause |
The SQL Clause that you create displays in the read-only SQL Clause box.
When you close the Edit Filters dialog box, the clause also displays in the read-only box on the SQL tab.
|
|
Technical reference: Historical Alarm Viewer. |
|
|
Step 5. Configure the SQL display. |
 .
.