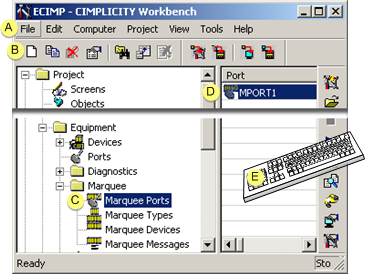
CIMPLICITY provides several methods to open a New Marquee Port dialog box.
Select Project>Equipment>Marquee>Marquee Ports in the Workbench left pane.
Do one of the following.
|
A |
Click File>New>Object on the Workbench menu bar. |
|
|
B |
Click the button on the Workbench toolbar. |
|
|
C |
In the Workbench left pane: |
|
|
|
Either |
Or |
|
|
Double click Marquee Ports. |
|
|
D |
|
|
|
E |
Press Ctrl+N on the keyboard. |
|
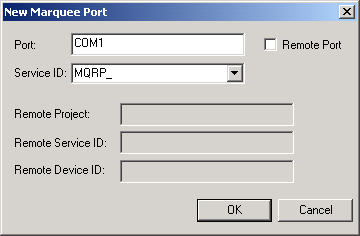
A New Marquee Port dialog box opens when you use any method.
Fill in the fields as follows.
|
Field |
Description |
|
Port |
Port to be used by the marquee driver. The port must be an existing communications port on your computer (for example, COM1 or COM2), or it can be a logical name to be associated with a terminal server port (for example, PORT1 or PORT2). Note: See Configuring Network Marquees for detailed information on how to do this. You cannot configure two marquee ports with the same port ID. If you attempt to do this, you will receive an error message in a popup window. |
|
Service ID |
Service ID for the marquee driver process. For physical ports on your computer, one process may control more than one port, but you should usually configure one process per port. For terminal server ports, one process may only control one port. It is suggested that you maintain the default prefix of MQRP_ for the service ID of all marquee driver ports. |
|
Remote Port |
Check if this port is to be associated with a marquee port in another CIMPLICITY project, Result: The Remote Project, Remote Service ID, and Remote Device ID fields become active. |
|
Remote Project |
Name of the CIMPLICITY project to which messages associated with this local port should be sent. |
|
Remote Service ID |
Name of the CIMPLICITY Marquee process to which messages associated with this local port should be sent. |
|
Remote Device ID |
Name of the marquee device to which messages associated with this local port should be sent. |
Click OK.
Result: The Marquee Port details dialog box opens.
|
|
1. Open a Marquee Port dialog box. |