The type of information available to you depends on the attribute properties created for the class.
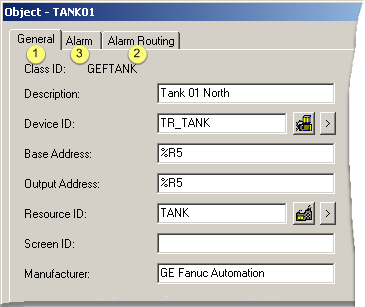
When you create a class object, an Object dialog box that reflects the class configuration opens. (The object ID displays in the dialog box's title bar.)
The class object adheres to specified requirements based on the class definitions. You assign the values of these requirements in the Object dialog box.
Customized class features that display in the dialog box can include:
|
Customized Feature |
Description |
||
|
Fields |
The fields that display and whether or not they are write-able come from the class configuration. |
||
|
Default Entries |
Any default entries in fields come from the class configuration. |
||
|
Tabs |
The Object dialog box displays. |
||
|
|
|
||
|
|
1 |
General |
Default tab |
|
|
2 |
Alarm Routing |
Displays if any class data item (object point) has alarms |
|
|
|
|
Note: You can also configure alarm routing in the Point Properties dialog box for any of the object's points. |
|
|
3 |
Other tabs |
e.g. Alarm, Any tab that a Class developer has specified when creating the layout to the class' Object dialog box. |
Enter values in the Object dialog box fields that define the specific criteria for the class object that is being configured.
When appropriate, the Browse buttons that appear throughout CIMPLICITY, display to aid you search for the correct entries.
|
Option |
Browse Button that will display |
|
Alarm Class |
|
|
Resource |
|
|
Device |
|
|
Role |
|
|
Point |
|
|
User |
|
|
Port |
|
|
|
Class object configuration. |