Open a CimEdit screen.
The CimEdit screen can either be a new or existing screen.
Select the class object in the Workbench right pane.
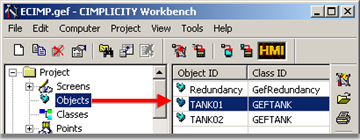
Drag the object onto the CimEdit screen.
The default graphic for the class displays.

Right-click the class object graphic.
Select Properties from the Popup menu.
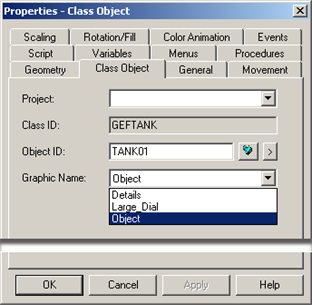
The Properties - Class Object dialog box opens.
Select the Class Object tab.
Configure the Class Object tab as follows.
|
Option |
Description |
|
Project |
Project with which the class object is associated. |
|
Class ID |
Class that contains the CimEdit graphic (read-only). |
|
Object ID |
Selected class object (read/write). The ID for any object in the class can be selected if you want to associate the graphic with a different object from the one dragged onto the CimEdit screen. Tip: Click the
button |
|
Graphic Name |
Selected class object graphic (read/write). Any graphic from the source CimEdit screen can be selected if you want to use a class graphic that is different from the default. |
|
Apply |
Important: Clicking Apply updates the $OBJECT variable to the new value. The $OBJECT variable, which was created during class object configuration, is read-only on the Variables tab in the Class Object dialog box. |
Click .
Result: The graphic will adhere to your specifications as follows:
During runtime the graphic will represent the values of the selected class object.
The graphic wills change to the graphic you selected, if it is different from the default, as soon as you close the Properties - Class Object dialog box.
|
|
Graphic example: Result of class object configuration. |
|
|
Class object configuration. |