![]() Note: You can only insert a control within the
borders of the dialog box you are creating. You cannot insert a
control on the dialog box's title bar or outside its borders.
Note: You can only insert a control within the
borders of the dialog box you are creating. You cannot insert a
control on the dialog box's title bar or outside its borders.
Do one of the following.
|
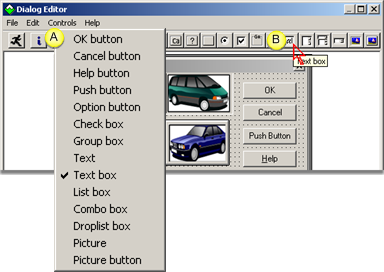
A |
Click Controls><control object> on the Dialog Editor menu bar. |
|
B |
Click the button on the Dialog Editor toolbar that corresponds to the type of control you want to add. |
Place the cursor in the dialog box where you want the upper left corner of the control to be positioned.
![]() As soon as you place the cursor in
the dialog box it changes to a crossbar accompanied by a small
image of the selected object.
As soon as you place the cursor in
the dialog box it changes to a crossbar accompanied by a small
image of the selected object.
![]() The Dialog Editor status bar
displays the crossbar's coordinates.
The Dialog Editor status bar
displays the crossbar's coordinates.
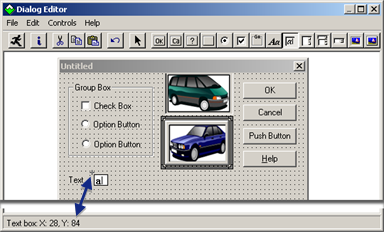
Click the mouse button.
Results
![]() The selected control is placed in
the dialog box. The upper left corner of the control corresponds to
the position of the pointer's crossbar at the moment you clicked
the mouse button.
The selected control is placed in
the dialog box. The upper left corner of the control corresponds to
the position of the pointer's crossbar at the moment you clicked
the mouse button.
![]() The object's upper left corner
coordinates, width and height display on the Dialog Editor status
bar.
The object's upper left corner
coordinates, width and height display on the Dialog Editor status
bar.
Note: The status bar displays this information anytime the mouse passes over a control or the control is selected.
![]() A frame that surrounds the object
identifies it as selected.
A frame that surrounds the object
identifies it as selected.

![]() Tip: Press Ctrl+D on
the keyboard to add another control that is the same type as the
control that was just added.
Tip: Press Ctrl+D on
the keyboard to add another control that is the same type as the
control that was just added.
|
|
2. Create a custom dialog box. |