Each Map has an associated Map Data dialog box in which recipe map properties can be viewed and recorded.
Select a recipe map using either of the following methods.
![]() Click a map in the RecipeConfig window left pane.
Click a map in the RecipeConfig window left pane.
![]() Click the map's name that identifies its column in the
RecipeConfig window right pane.
Click the map's name that identifies its column in the
RecipeConfig window right pane.
Do one of the following:
![]() Click Edit>Properties on the RecipeConfig window menu
bar.
Click Edit>Properties on the RecipeConfig window menu
bar.
![]() Click the right-mouse button;
select Properties on the Popup menu.
Click the right-mouse button;
select Properties on the Popup menu.
![]() Press Alt+Enter.
Press Alt+Enter.
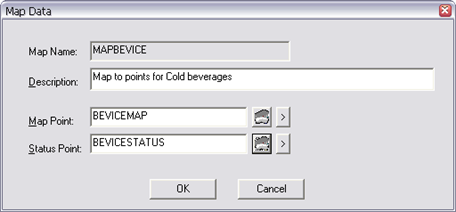
The Map Data dialog box opens.
Enter and review the following.
|
Map Name |
(Read-only) Name of the selected map. |
|
Description |
Descriptive phrase to help identify the map. |
|
Map Point |
CIMPLICITY point ID that the map name will be written to when a Recipe is downloaded or uploaded. Note: The point ID may be:
|
|
Status Point |
CIMPLICITY Point ID that the status will be written to while a Recipe is downloaded or uploaded. Notes
This point can then be used to animate an object on a CimView screen.
Be sure to use a TEXT_80 type point so that the status message can be displayed in full. |
|
|
Step 4. configure recipe maps. |