![]() Note: This step is required the first time you
use the Broadcast Queue Manager. After that, you will only need to
open it to modify the list of job fields.
Note: This step is required the first time you
use the Broadcast Queue Manager. After that, you will only need to
open it to modify the list of job fields.
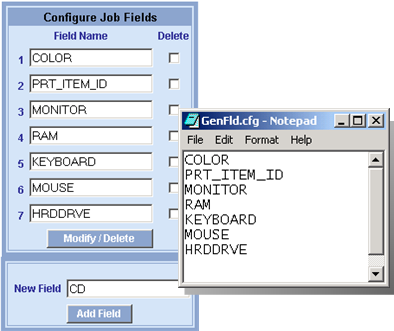
You can categorize jobs to help users identify groups of jobs that are printed by the Broadcast Queue Manager. You enter names based on your project's Tracker attributes and extended attribute names.
Click Home Page on the Broadcast Queue Manager menu bar.
Select Configure Fields.
A Configure Job Fields page displays.
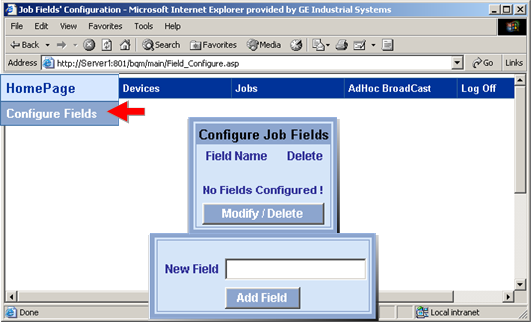
Enter a name in the New Field field.
Click .
A message asks you if you are sure you want to configure.
Click .
The field name is added to the genFld.cfg file that is in the Program Files\GE Fanuc\Proficy CIMPLICITY directory.
Configure Job Fields features are as follows.
|
Option |
Description |
|
Field name (1, 2, 3...) |
Names for the job categories. Names can be Tracker attributes or extended attributes. When you do a search to find specific forms, you can enter criteria for one of these fields.
Example A Tracker attribute is COLOR You enter COLOR as a field in the Configure Job Fields box. You can then search for printed, historic and/or archived forms that contain selected colors, e.g. all forms in which COLOR = BLUE. |
|
Check to delete the corresponding field when you click . |
|
|
Modify/Delete |
Click to do the following.
|
|
New Field |
Enter a Tracker attribute or extended attribute in the field that is not already on the list.
|
|
Add Field |
Click to add the entered name to the:
|
|
|
Broadcast Queue Manager User Interface. |