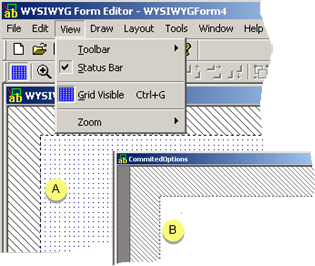
You can use a configurable grid to help place and align objects on your WYSIWYG form.
|
Display or clear the grid. |
|
|
Configure the grid. |
Display or clear the grid
Click View on the WYSIWYG Form Editor menu bar.
Check Grid Visible to display the grid.
Note: Press Ctrl+G to toggle the grid on and off.

|
A |
Grid Visible checked |
|
B |
Grid Visible cleared |
Configure the grid
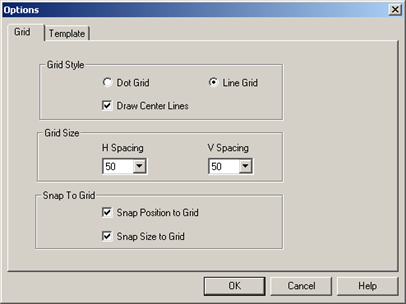
Click Tools>Options on the WYSIWYG Form Editor toolbar.
The Options dialog box opens.
Select the Grid tab.
Configuration options are as follows.

|
|
Field |
Description |
|||
|
|
Dot Grid |
Displays the grid as dots. |
|
||
|
|
|
Line Grid |
Displays the grid as lines. |
|
|
|
|
|
Draw Center Line |
Displays horizontal and vertical lines in the center of the form. |
|
|
|
H Spacing |
Spacing between horizontal dots or lines. |
||||
|
|
|
|
Range |
10-400 |
|
|
|
|
V Spacing |
Spacing between vertical dots or lines. |
||
|
|
|
|
Range |
10-400 |
|
|
|
|
|
Examples |
||
|
|
|
|
Dots 10 X 10 |
||
|
|
|
|
|
||
|
|
|
|
Lines 50 X 50 |
||
|
|
|
|
|
||
|
|
|
|
Lines 250 X 10 |
||
|
|
|
|
|
||
|
Snap to Grid |
Snap Position to Grid |
When you release the left mouse button or use the arrow keys to move an object, the object snaps to the nearest horizontal/vertical grid lines/dots. |
|||
|
|
|
Snap Size to Grid |
When you release the left mouse button after increasing or decreasing the object size, the object edges snap to the nearest horizontal/vertical grid lines/dots. |
||
|
|
|
|
Example |
||
|
|
|
|
Item before snapped. |
||
|
|
|
|
|
||
|
|
|
|
Item after snapped (position and size). |
||
|
|
|
|
|
||
|
|
|
|
|||
|
|
|
Press Alt when: |
Result |
||
|
|
|
Snap to Grid is checked |
Disables the functionality. Objects do not snap to the grid. |
||
|
|
|
Snap to Grid is clear |
Enables the functionality. Objects do snap to the grid. |
||
|
Step 4. Work with the WYSIWYG Form Editor tools. |