![]() Note: Make sure the site is locked.
Note: Make sure the site is locked.
Right-click the RCO Triggers folder in the TrackerCfb_UI left pane.
Do one of the following.
Method 1
Select File>Routing Control Objects on the Tracker menu bar.
Method 2
Right-click the Triggers icon.
Select New Trigger Sequence from the Popup menu.
![]()
A new Trigger item displays in the left pane; the right pane displays the dialog for configuring a trigger.
Enter the following:
![]()
|
|
Field |
Description |
|
A |
Name |
A unique name for the new trigger. |
|
B |
Description |
(Optional) A brief description describing the purpose of the trigger. |
Click ![]() to display the
Trigger Details dialog box.
to display the
Trigger Details dialog box.
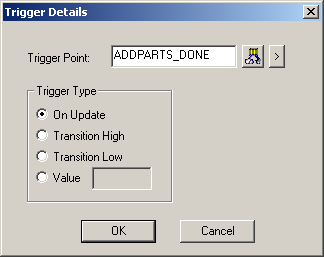
Configure the trigger details as follows.
|
Field |
Description |
|
|
Point value is used to determine the trigger sequence of events. The point type depends on what value is being compared. |
||
|
The checked radio button specifies when the trigger will be activated, as follows. |
||
|
|
On Update |
Value of the Point must change to activate the trigger. |
|
|
Transition High |
Value of the Point must start high to activate the trigger. The initial state of this trigger upon CIMPLICITY startup is high. |
|
|
Transition Low |
Value of the Point must change from a non-zero value to 0 to activate the trigger. The initial state of this trigger upon CIMPLICITY start is low, so the point must change to a non-zero value, and then to a 0 value. |
|
|
Value |
Point changes to the value you specify to activate the trigger. When radio button is clicked, the Value field will activate. Type the value in the field. |
Click OK.
Result: The new trigger is listed in the TrackerCfg_UI left pane; when selected, its details display in the right pane of the window.
![]() Note: More than one trigger can be
added to the Routing Control Object. Repeat procedure to add more
triggers.
Note: More than one trigger can be
added to the Routing Control Object. Repeat procedure to add more
triggers.
|
|
Routing Control Object configuration. |