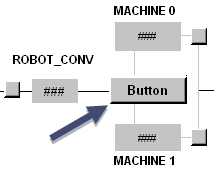
Create a single button and place it after the ROBOT_CONV region between the two MACHINE regions.
Select a Mouse Up event on the Events tab.
Create a new script.
First create a new object that represents your region.
Dim region As New prtregion
Assign this region's id property to the ROBOT_CONV region.
Region.Id="ROBOT_CONV"
Get the item list for this region.
Region.GetItemList
Now you want to examine the COLOR attribute for the block item.
Because two items can exist in each location. you have to make sure that you are looking at the correct item within the first location. Your item count is going to be twice as big as the number of locations that are currently filled.
In other words, if there are 5 locations, there are going to be 10 items. Items 0 and 1 are going to be in location 1; items 2 and 3 are going to be in location 2 and so on.
As the block and carrier can exist in one location and the order in which they exist is dependant on which item entered that location first, it is up to you to determine where you block item exists within a particular location.
Use the structure below to determine if you are looking at the correct item.
If 'the first item's item type id is 00' then
'set the index to the second item in location 1
Else
'set the index to the first item in location 1
Endif
If the color attribute(index) is red or green, update the X_MACHINE0 transition point
If the color attribute(index) is blue, update the X_MACHINE1 transition point
Close the Properties - Object dialog box when you have completed the script.
Note: Go to the next page if you have questions about the script.
|
|