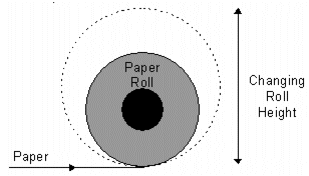
You can change the height of an object during runtime. As the value of the expression increases or decreases, the height of the object increases or decreases accordingly as a percentage of the original height; that is, when the object was added to the graphics page.
For example, an elevation of a paper roll (in a paper mill), could display changing roll height (and width):
Objects have the following vertical scaling properties:
Scaling expression
The value of the expression entered in this field (253 characters maximum) will determine the vertical scaling (height) of the object. By default, when the expression returns its minimum value, the object will display at its minimum height (as defined in the Scaling fields below). When the expression returns its maximum value, the object will display at its maximum height (as defined in the Scaling fields below).
To insert a tag or a function, click the Wizard button to the right of this field. This button displays two options: Insert Tag and Insert Function.
[Scaling expression] Specify range
Select this box to manually specify Minimum and Maximum values for the scaling expression, rather than using the default values. For an expression containing an analog variable tag, the defaults are the Engineering Zero and Full Scale values from the last variable tag in the expression. If the analog variable tag does not have Engineering Zero and Full Scale values, the defaults are 0 (zero) and 32000. For expressions without tags, the defaults are 0 (zero) and 100.
[Scaling expression] Minimum
Enter the minimum value for the expression. When this value is returned by the expression, the height of the object will be reduced to its minimum. You can only enter a value here if you have selected the Specify range box.
[Scaling expression] Maximum
Enter the maximum value for the expression. When this value is returned by the expression, the height of the object will be increased to its maximum. You can only enter a value here if you have selected the Specify range box.
[Scaling] At minimum
The minimum height of the object (as a percentage of its original height). The object will be reduced to this height when the Scaling expression returns its minimum value. You can change the percentage by pressing the up and down arrows to the right of the field, or by entering another value in this field. Percentages of greater than 100% can be entered.
[Scaling] At maximum
The maximum height of the object (as a percentage of its original height). The object will grow to this height when the Scaling expression returns its maximum value.
You can change the percentage by pressing the up and down arrows to the right of the field, or by entering another value in this field. Percentages of greater than 100% can be entered.
Note: You can increase the height at minimum, and decrease it at maximum, by swapping the percentages in the Scaling fields (i.e. put the high percentage in the At minimum field, and the low in the At maximum), or by swapping the expression limits (in the Minimum and Maximum fields).
[Center axis offset] Express
Click this radio button to select one of three of the object's horizontal axes (top, middle, and bottom). These axes appear in the picture field to the right of the dialog. Click an axis to select it.
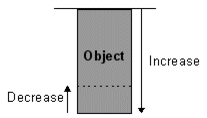
If you choose the top, height changes will occur from the top of the object down. (i.e. the top edge will remain anchored):
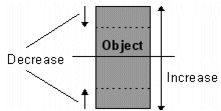
If you choose the middle, height changes will occur equally above and below the axis. (i.e. the horizontal center axis will remain anchored):
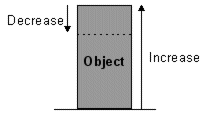
If you choose the bottom, width changes will occur to the top edge of the object. (i.e. the bottom edge will remain anchored):
[Center axis offset] Custom
Click this radio button to define your own center axis. A field will display to the right of the dialog, allowing you to specify how far from the object center (in pixels) you would like to place the axis. Although this option gives you the freedom to place the center axis anywhere on the object, once placed, the scaling process works in exactly the same manner as for the Express option (illustrated above).
For example, if you enter 20, the Center axis will be 20 pixels below the object center.
Enter a negative value to move the Center axis up instead of down.
Notes:
See Also