The T5 runtime version 2.10 or later provides an event driven protocol on TCP-IP for exchanging real time data among runtime systems. As the protocol is purely event-based, it ensures high performances and very low network trafic at runtime. This section explains how to use the T5 event-based protocol for binding variables of runtime systems in order to build a distributed application. Please refer to the following topics:
- Exchange mechanism
- Exchanges
- Limitations
- Using the global binding editor
- Defining the network
nodes
- The editor
workspace
- The editing grid
- Produced variables
- Consumed variables
- Declaring new
variables
- Link identifiers
- Using the local editor within the
Workbench
- Dual binding on redundant
ETHERNET
New! The EnableEvents function can be used to enable or disable the production of events for binding.
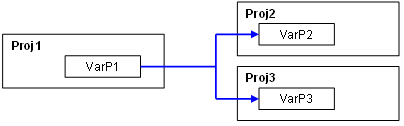
The T5 protocol is based on a "publish-subscribe" model. Each runtime system may publish some variables on the network and consume variables from other runtime systems. Each produced variable is identified by a number. This identifier is used for linking the source and destination variables in the projects. The same published variable can be consumed in several destination projects. Below is an example:
In this example, the variable VarP1 of project Proj1 will be bound (copied) at runtime to the variable VarP2 of project Proj2 and to the variable VarP3 or project Proj3.
The value variable is sent on the network only when it changes. For each produced variable, you can define a positive and negative hysteresis in order to adjust the network traffic according to the needs of your application. Each new value sent on the network is qualified with a date and time stamp. For each consumed variable in destination projects, you can have access to its date/time stamping and to its quality flag. You can also have a global information about the status of the connection with each producer.
The maximum number of produced variable is limited. Refer to your OEM instructions for more information about the binding limitations imposed by the T5 runtime implementation.
Only boolean, numerical and TIME variables can be exchanged. STRING variables, function block instances cannot be exchanged on the network.
Using the global binding editor
The system offers a global tool for defining the data exchange among several projects. To build a distributed application, you need to:
- create all source and destination projects,
- from the main window, run the "Tools / Global Binding Editor"
menu command.
The Global Binding Editor can also be launched directly from the Workbench group in the Windows "Start" menu, without opening the Workbench.
Run the "File / New" menu command of the Global Binding Editor to initiate a new distributed configuration and define the nodes linked in the configuration. Then at any time you can run the "File / Projects" menu command to change the list of nodes defined. A dialog box shows all the projects (nodes) included in the configuration.
Each node is referred to as a "project" in the global binding editor, and is identified by a name, an IP address and an ETHERNET port number. Refer to your OEM instructions for knowing the port number used for publishing variables.
Press the "Browse" button for adding in the configuration a project. You simply need to select the folder where the project is stored.
Press the "Import" button for adding in the configuration the published variable of a project. In that case, you just have to select the "APPLI.EVT" file located in the project, that contains all binding information. Other files of the project are not needed in that case. The "APPLI.EVT" file can also be exchanged alone among users without need of exchanging the whole project. You will not be allowed to change the published and consumed variables of such a project in the binding editor.
Press the "Declare" button for declaring in the configuration a node with no project associated with. In that case, you will have to manually declare in the binding editor the variables published by the node and specify the link identifier for each variable produced.
Below is the general form of the global binding editor:
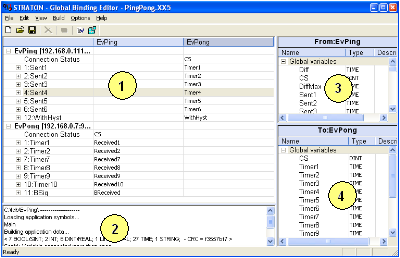
1: editing grid
2: output window for reports
3: list of variables in the source project for the selected
cell
4: list of variables in the destination project for the
selected cell
The first column of the editing grid list all the variables produced in the source projects. Other columns show variables consumed in the destination projects. Let us consider the following example:
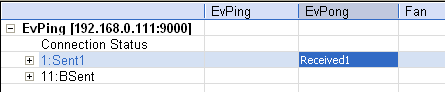
This example shows that the project "EvPing" produces its variables "Sent1" and "BSent1". The selected cell shows that the variable "Sent1" of source project "EvPing" is bound to the variable "Received1" of destination project "EvPong". The link identifier of the source variable is "1".
You can at any time double click on the name of a source project in the first column for setting its IP address and ETHERNET port number.
To add a published variable in a project, select the project name in the first column, and double click on the wished variable in the list of source project variables (in the top/right window).
When a source variable is selected in the first column, run the "Edit / Properties" menu command to define an hysteresis for its change detection.
To add a consumed variable, select the cell with we wished source variable and destination project, and then double click on a variable of the destination project in the bottom/right window.
If you put a variable in a destination project in front of the "Connection Status" line of a source project, this variable will contain the possible error status of this connection. Value 0 (or FALSE for a boolean) indicates that the connection is OK.
The line with the source variable name indicates an exchange of its value. If you expand the variable in the first column, then extra information about this variable is shown and can be linked to destination variables. For example:
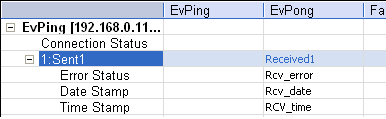
This example shows that the "Sent1" variable of source project
"EvPing" is bound to the following variables in the destination
project "EvPong":
- Variable "Receive1" will contain the last value
- Variable "Rcv_error" will contain possible error status (0 or
FALSE means OK)
- Variable "Rcv_date" will contain the date stamp of the last
change
- Variable "Rcv_time" will contain the time stamp of the last
change
The global binding editor enables you to declare new variables in source and destination projects without need of opening the Workbench. For that, when a source or destination cell is selected, run the "Edit / Insert variable" menu command and enter the name of a new variable.
If the Workbench is opened when you declare a variable in the binding editor, it is automatically updated with the new created variable.
If you create, change or remove variables from the workbench when the global binding editor is opened, a "!" sign appears in the corresponding variable list. Click on the "!" sign to actuate the list:

The global binding editor automatically allocate identifiers for each produced variables. However you can use the "Edit / Property" menu command when a published variable is selected for changing its identifier.
Using the local editor within the Workbench
If you do not use the global binding editor, you can enter the network configuration locally in each project. For that, run the "File / Open / Binding configuration" menu command form the main window.
Produced and consumed variables of the project are entered in a tree.
The first main node of the tree is called "PUBLIC" and groups all produced variables. Use the "Insert Variable" toolbar command or drag a variable on the PUBLIC node to define a new produced variable. For each variable you must specify its name, its link identifier, and possibly positive and negative hysteresis.
The "Insert Master - Port" toolbar command enables you to define external nodes (other runtime systems). Each node is identified by a name, an IP address and a ETHERNET port number. Then you can define within external nodes consumed variables.
A consumed variale refers to a link identifier, and represents the kind of network operation performed on the variable of the project:
- get external variable value
- get error status
- get date of time stamp