Hilscher CIF Profibus DP configuration
The workbench includes a fully integrated configurator for Hilscher CIF boards. Please refer to the following topics in that page for detailed information on how to use and configure Hilscher CIF boards:
Data exchange - configuration
Data exchange -
configuration:
The runtime
manages an intermediate variable map representing Profibus inputs
and outputs. A dedicated configuration tool is integrated in the
Workbench. Run it using the
File > Open > Fieldbus Configurationmenu command from
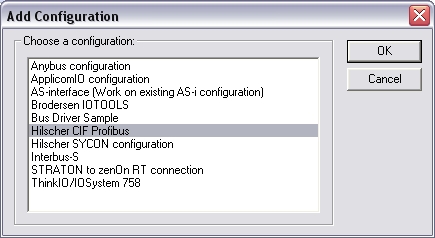
the Workbench. Then select
Insert > Insert configuration…
Select Hilscher
CIF Profibus and click OK.
The
configuration is represented as a tree:
-
Hilscher
Profibus configuration
(*) This item
can appear up to four times (four boards allowed).
You need to
configure the network in order to map I/Os from Hilscher CIF to
variables. Run the
Insert > Insert
Master/Port…menu to declare a new CIF board.
Each board is
identified by a number (0…3), and a free description text.
The following
Parameter can be changed:
If available a GSD file can be loaded by clicking on "Load GSD
file". When loading a GSD file it is possible to overwrite
parameters already changed.
When a board is
selected, you can insert Profibus Slaves by running the
Insert > Insert
Slave/Data Block…menu command.
For each Slave
you need to enter an address and slave data according to Profibus
conventions and a free description text.
If available you can load a GSD file for the Profibus slave
(click "Load GSD file").
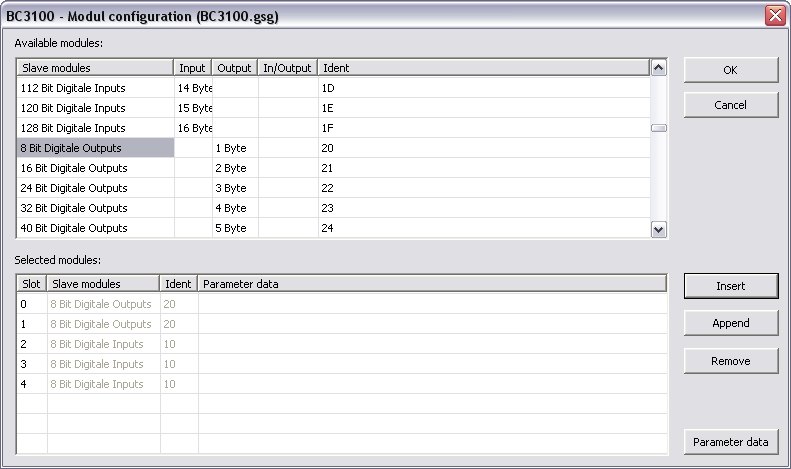
After loading the GSD file you can append Slave modules resp.
change Parameter data.
Now you have to
map variables to the remote I/Os. Use the
Insert > Insert
Variable…menu command to insert a variable to the selected
slave or diagnostic block.
When you insert
a variable to a slave, the following items must be entered:
Note: The offset
of a variable is relatively to the slave. So the offset of the
first variable is always 0.
Note: Take care
to the number of I/Os for a slave! Do not overlap the next slave
with the I/Os of the slave above.
All Settings can
also be changed in the Grid. Click
View > Gridto show/hide the Grid area. The
listed information is always concerning the items below the
selected item (e.g. a master is selected the grid shows the
information of all connected slaves).
The Grid shows
the values of the variables when connected to the runtime.
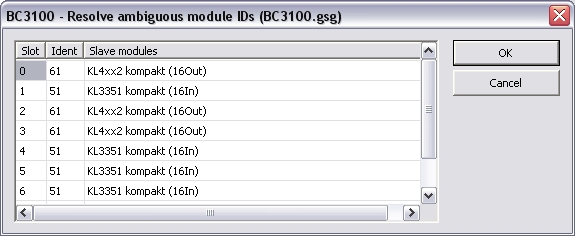
"Resolve ambiguous module IDs"
With this dialog you can define the really used module (double
click on the referring entry in the "Salve modules" column).
You can freely
map a variable of any data type to an I/O. The runtime
automatically converts the value to the type of the variable.
STRING variables are not supported.
“
Browse boards”:
Select the
necessary boards and click “OK”.
Use the
Edit > Properties…menu command for the selected
Hilscher CIF board in the configuration to set all available
Profibus DP properties and logging information.
The log file
will be written into the folder which hosts the Runtime program
code.
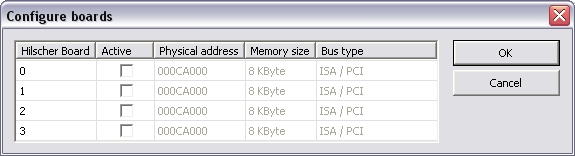
Configure boards
Note: The Physical address of the Profibus master and the
Memory size of the dualport memory must be inserted
manually!
“
Create master
diagnostics”:
Additionally set
the flag “Create variable” if variables for the master diagnostics
variables shall be declared in the variable list.
The following
variables will be created:
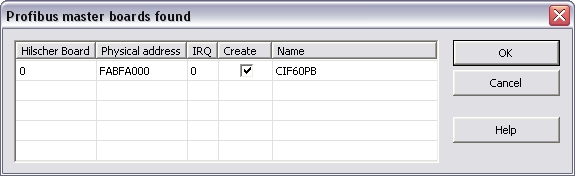
“
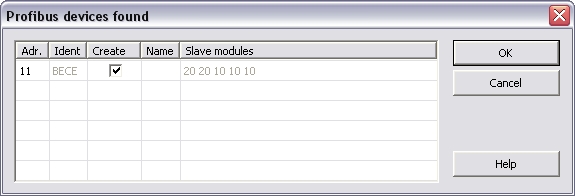
Browse bus”:
Choose the boards using the Create-column by check/uncheck the
box. Via double click on the slave or
Edit > Propertiesthe mask for the configuration
of the slaves opens. Here you can load the GSD file, define the
Slave modules and change the Parameter data.
"Create variables for slave modules"
“
Create slave
diagnostics”:
Additionally set
the flag “Create variable” if variables for the slave diagnostics
variables shall be created.
The following
variables will be created:
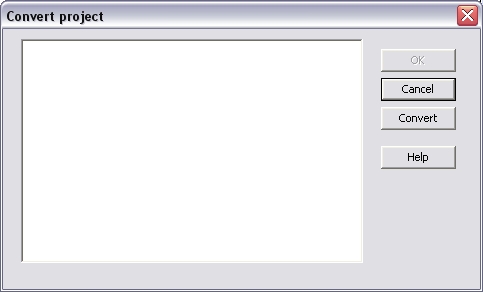
“
Convert project” (for
zenOn integrated Workbench only!):
Please follow
the following steps to convert a project:
1.
Open an existing
project that has a Profibus configuration
2.
Insert a
configuration: Via “
Edit / Insert
configuration…” or context menu in the Fieldbus
Configuration
3.
Select Hilscher
CIF Profibus
4.
Select “Convert
project” in the context menu of the configuration
5.
Click “Convert”
in the “Convert project”-window
6.
The “Convert
project”-window lists up all found masters, slaves and
variables
7.
Click OK in the
“Convert project”-window
8.
You can either
leave the profile of the variable if you still need it in zenOn or
delete it if you do not need this variable in zenOn any more
Configuration
Data types
Additional features
-
CIF Board (*)
-
Profibus Slave
(**)
-
Exchanged
variable (**)
(**)The items with this mark can appear several times in the
configuration.
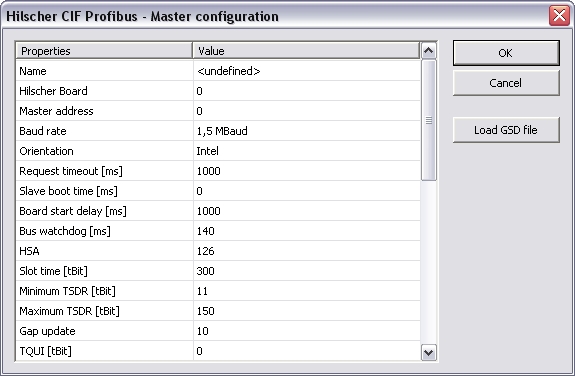
Name
Free description text
Hilscher Board
0…3
Master address
Baud rate
9,6kBaud…12MBaud
Orientation
Intel/Motorola;
Orientation of
word data
Request timeout [ms]
Within this
time the Hilscher board has to answer to requests
Slave boot time [ms]
Within this time the slaves must be
ready for communication; this value should not be 0 because so the
bus communication could not be re-established after
interruption
Board start delay [ms]
Within this time the Hilscher board has
to be ready for communication after restart
Bus watchdog [ms]
Time for watchdog cycle; If set to 0
watchdog is inactive
HSA
Highest station address; HSA defines
the highest active address for GAP refresh (if active)
Slot time [tBit]
The slot time defines the time to wait
by the master for an answer of the DP slaves before retry or send
the next telegram.
Minimum TSDR [tBit]
Minimum station delay responder; The
min. TSDR defines the time a DP slave waits at least with its
answer. This time is set at all slaves at DP-start-up (11-255
tBit). Min. TSDR has to be smaller than max. TSDR.
Maximum TSDR [tBit]
Maximum station delay responder; The
max. TSDR defines the time a DP slave may wait at most with its
answer. This time is set by the GSD file parameters. Max. TSDR must
be smaller than the Slot-time.
Gap update
The GAP update can be switched on or
off. It requests all stations up to HSA from time to time. It is
actually only used for multi master mode. In single master mode it
creates a higher jitter, thus it is switched off per
default.
TQUI [tBit]
Quiet time; Defines the time for
translation from NRZ signals to other codes. (Switch time for
repeater) TRDY > TQUI < min TSDR
TSET [tBit]
Setup-time
TTR [tBit]
Target Token Rotation Time
Transfer attempts
Number of transfer retries
Request delay [100µs]
Delay between requests for a
slave
Timeout 2nd master [ms]
Time for searching for a second
master
Data control time [10ms]
Minimum time to refresh the global
states in the master
Wait data control time
On/Off;
If activated
time "Data control time" will be waited after initialization until
I/O exchange starts
Start despite disconnected slaves
On/Off; It is possible to start with an uncompleted
Bus-Network
Do not reset on stop (keep outputs)
On/Off; Keep the Outputs after stop; could be
necessary after a shutdown-routine
Log errors
On/Off
Log warnings
On/Off
Log available boards
On/Off
Log slaves on bus
On/Off
Log slave topology
On/Off
Log initialize retries
On/Off
Log slave I/O
On/Off
Log data exchange
On/Off
Log manual I/O
On/Off
Log protocol states
On/Off
Log slave diagnostics
On/Off
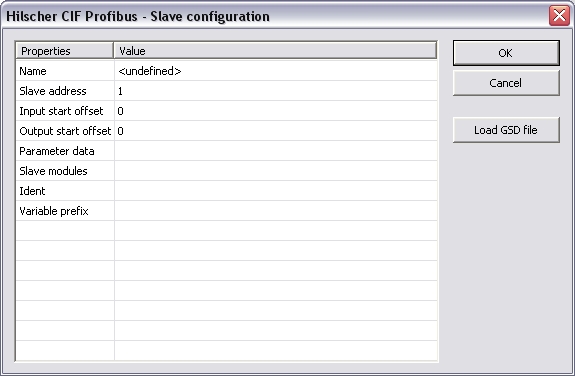
The following items are available:
Name
symbol name / variable name
Slave
address
I
nput
start
offset
Output
start offset
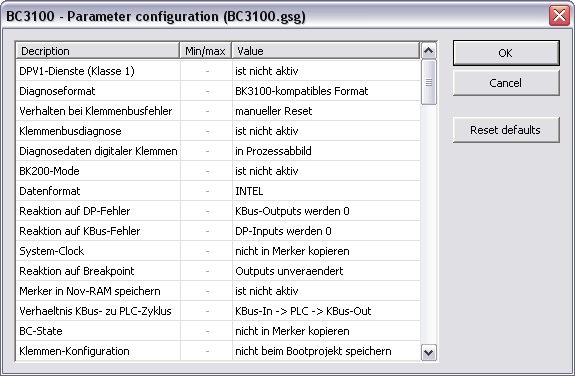
Parameter data
This data is
available in the *.GSD file of your Profibus slave (
User_Prm_Data
). Please look
up the data and enter it in HEX with a blank in between (e.g.: C0
80 08 0A 11)
Slave
modules
Identifying
information of I/O modules of the slave; the identifying
information hast to accord to the Profibus standard.
Enter data in
HEX with a blank in between (e.g.: 10 08 70 1A FF)
Variable prefix

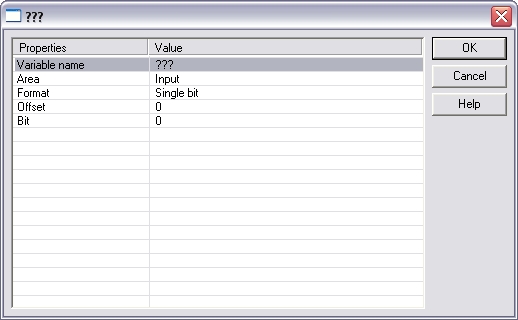
Variablename
Area
Bus state,
Diagnostic, Input or Output
Format
32 bit float, Boolean Byte, Signed 16
bit integer, Signed 32 bit integer, Signed 8 bit integer, Single
bit, Unsigned 16 bit integer, Unsigned 32 bit integer, Unsigned 8
bit integer
Offset
Bit

This dialog opens either you use "Browse bus" (see below) or
you enter slave modules in the slave configuration and read the GSD
file afterwards and the GSD file interpreter finds more than one
modules per module ID.
This menu command is available in the context menu of the
configuration (Hilscher CIF Profibus). With this command all
available boards are listed up.
This command is available in the context menu of the Hilscher
CIF Profibus configuration. You can define CIF boards offline. This
can be necessary e.g. to configure a Profibus network for a Windows
CE device with CE runtime.
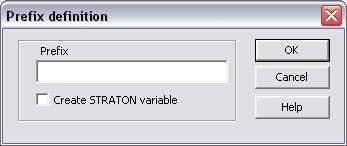
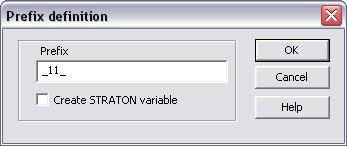
This menu command is available in the context menu of the
Hilscher board. To create all master diagnostics variables of the
Profibus master set a prefix referring to the IEC 61131-3
identifier conventions in the opened dialog.
WrongParameterization [BOOL]
AutoClearActivated [BOOL]
NoDataExchange [BOOL]
FatalError [BOOL]
BusErrorEvents [BOOL]
HostNotReady [BOOL]
PROFIBUS_timeout [BOOL]
GlobalState [USINT]
LocationOf Error [USINT]
ErrorEvent [USINT]
BusErrorCount [UINT]
BusTimeoutCount [UINT]
This menu command is available in the context menu of the
Hilscher board. All available Profibus slaves are listed up in a
dialog.
In the context menu of the slaves you find the "Create
variables for slave modules" command. This commands creates I/O
Variables based on the existing Slave modules configuration. The
I/O Variables can be declared in the variable list by checking the
"Create variables" in the prefix-mask.
This menu command is available in the context menu of the
referring slave/device. To create all slave diagnostics variables
of the Profibus slave set a prefix referring to the IEC 61131-3
identifier conventions in the opened dialog.
ConfigurationReady [BOOL]
SlaveState [BOOL]
SlaveDiag [BOOL]
StationNonExistent [BOOL]
StationNotReady [BOOL]
SlaveCfgFault [BOOL]
ExtendedDiag [BOOL]
SyncFreezeNot Supported [BOOL]
InvalidResponse [BOOL]
ParamFaulty [BOOL]
MasterLook [BOOL]
ParamRequest [BOOL]
StaticDiagnostic [BOOL]
SlaveTrue [BOOL] … This bit can be used for detecting the
initialized Profibus. If this bit is TRUE all diagnosis data are
read by the master and the bus is initialized.
WatchdogOn [BOOL]
FreezeOn [BOOL]
SyncOn [BOOL]
SlaveDeActive [BOOL]
ExtDiagOverflow [BOOL]
SlaveMasterAdr [USINT]
SlaveIdent [UINT]
This menu command is available in the context menu of the
configuration (Hilscher Profibus) if an old Profibus configuration
of zenOn 6.01 is available.