| Applies To: |
|
1 Introduction
This document describes Windows XP Service Pack 2 and its implications for Citect and OPC products, and offers recommendations on configuration settings to allow CitectHMI/SCADA, Plant2Business and OPC servers and clients to operate normally when running under Windows XP Service Pack 2.
2 Windows XP Service Pack 2
The major goal of Windows XP Service Pack 2 is to reduce common openings for attack of the Windows operating system. Windows XP Service Pack 2 reduces the most common attack vectors in four ways:
- better shields the network
- enhances protection of memory
- handles e-mail more safely
- browses the Internet more securely
2.1 Network Protection
Network protection is the largest area of improvement in Windows XP Service Pack 2, and the one with the most implications for existing software. Windows Firewall is now enabled for all network interfaces by default, the Remote Procedure Call (RPC) service has been made less vulnerable to outside attack and the Distributed Component Object Model (DCOM) infrastructure has additional access control restrictions to reduce the risk of a successful network attack.
2.2 Memory Protection
On CPUs that support execution protection (NX) technology, Windows XP Service Pack 2 marks data pages non-executable. This feature of the underlying hardware prevents execution of code from pages marked in this way. In addition to supporting NX, Service Pack 2 implements sandboxing. All binaries in the system have been recompiled with buffer security checks enabled to allow the runtime libraries to catch most stack buffer overruns, and "cookies" have been added to the heap to allow the runtime libraries to catch most heap buffer overruns.
2.3 E-mail Protection
In SP2, a new version of Outlook Express can block images and other external content in HTML email, warn about other applications trying to send mail, and control the saving and opening of attachments that could potentially be a virus. Outlook Express also coordinates with the new application execution service, to better protect the system from the execution of harmful attachments. Users also have the option to read or preview all messages in plain text mode, which can avoid potentially unsafe HTML. Windows Messenger and MSN Messenger share the improvements to attachment control made for Outlook Express.
2.4 Safer Browsing
Internet Explorer (IE) has been made much more secure in Service Pack 2. It now manages add-ons and detects crashes due to add-ons, controls whether or not binary behaviors are allowed to run, and applies the same safety restrictions to all URL objects that previously applied only to ActiveX controls. It has more control over the execution of all content. IE now disallows access to cached scriptable objects: HTML pages can only script their own objects. IE now has a built-in facility to block unwanted pop-up windows, and manage the viewing of desired pop-up windows.
3 The Windows Firewall
It may be appropriate to permanently turn off the Windows Firewall if the machines running Citect or OPC products are sufficiently protected behind a corporate firewall. When turned off, the individual firewall settings outlined in the following sections need not be performed to allow Citect products to operate normally when running under Windows XP Service Pack 2.
3.1 Disabling the Windows Firewall
The Windows Firewall is on by default. If it is considered appropriate to permanently disable the firewall use the following procedure:
- Launch the Firewall Manager from the Windows Control Panel.
- Select the OFF radio button.
- Click OK.
3.2 Modifying the Firewall Settings
If you choose to use the Windows Firewall then you will need to modify the settings before using network resources. If you do use network resources before doing so you may be presented with a dialog requesting you to make a decision. It will ask you if you want to K eep Blocking , U nblock or A sk Me Later . Selecting U nblock or K eep Blocking will create a rule in the firewall settings. You can always delete or modify this at any time through the firewall manager in the Windows Control Panel.
The Windows Firewall Configuration Manager can be found in the Windows Control Panel . Locating it depends on how you have your system configured.
If your Windows Control Panel is in Category View you will see the option Security Center and you can double click to open.
Locate the option for Windows Firewall and double click to open.
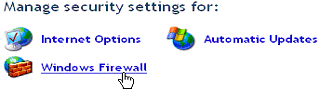
If your Windows Control Panel is in Classic View you can open Firewall direct by double clicking the icon.
At this stage the firewall should be enabled – O n (recommended) selected with D on’t allow exceptions unchecked.
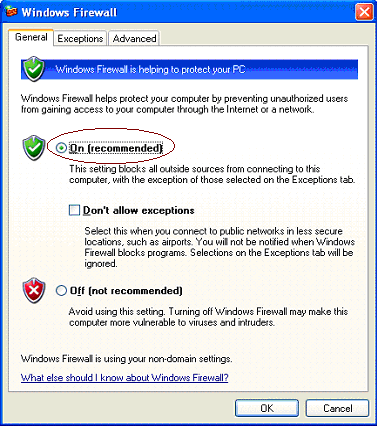
To make changes to what is allowed to traffic your network you should select the Exceptions tab.

3.3 Methods of Allowing Access
There are two basic methods of allowing access to your machine through Windows Firewall. They are the Program method and the Port method. The program method is the safest option but some administrators will require the port method to be used. In some cases it is only possible to use the port method.
3.3.1 The Program Method
The advantage of using the application name is that it limits the scope on that PC to that application only. If another application tries to make a connection on the same ports the user will be notified as if no rule exists and be requested to take action on that application. It does not, however, stop another application being renamed to Citect32.exe (the Citect Runtime) in the same location from maliciously opening ports. In fact this could open any port, not just the ports actually used by Citect products, as adding a program allows that program to open any port. If this is a concern then it may be necessary to secure the executable to prevent it being changed or overwritten. To add an application use the following procedure:
- Launch the Firewall Manager from the Windows Control Panel.
- Click on the Exceptions tab.
- Select Add Program from the button selection.

- Add the required program from the list. If the program does not exist in the list then you will have to navigate to it from the B rowse… button.

If you have installed IDC as well as the standard full display CitectHMI/SCADA then you will see two Citect Runtimes in the list on the firewall manager main dialog. Note the capitalisation in the name along with the install path so that you are aware of the one you need to select. This will be the same when adding or editing a program.
3.3.2 The Port Method
Some administrators prefer to open specific ports for that PC rather than whole programs. The difference is that any application on that PC will be able to listen on that particular port. To add a port use the following procedure:
- Launch the Firewall manager from the Windows Control Panel.

- Click on the Exceptions tab.
- Select Add Port from the button selection.
- Enter a name (e.g. Citect Trend Server) and port number.
- Select the type of traffic you will allow on this port - TCP for connection based applications like CitectHMI/SCADA, or UDP for datagram based communications.

3.3.3 Scope
When adding programs, opening ports or editing a rule in the Windows Firewall you will notice that there is a scope button called C hange Scope… .

The scope allows you to further lock down the system by only permitting certain machines or ranges of machines to use the added program or opened port. For more information on scope see the Microsoft XP Service Pack 2 documentation.
The network protection enhancements in Windows XP Service Pack 2 have implications for the following Citect and third party products:
- CitectHMI/SCADA
- Plant2Business
- OPC Servers and Clients (including CitectHMI/SCADA as an OPC server or client)
The specific enhancements which affect these products are the new default settings for the Windows Firewall (all products) and DCOM enhancements (Plant2Business and OPC Servers and Clients).
5.1 Windows Firewall Settings
|
Role |
Program |
Checked |
Port(s) |
|
NetBIOS Server |
N/A |
N/A |
UDP 137,138 TCP 139 |
|
NetBIOS Client |
Citect32.exe |
No |
TCP 2073, 2074 |
|
TCP/IP Report Server |
Citect32.exe |
Yes |
TCP 2075 |
|
TCP/IP Alarm Server |
Citect32.exe |
Yes |
TCP 2076 |
|
TCP/IP Trend Server |
Citect32.exe |
Yes |
TCP 2077 |
|
TCP/IP I/O Server |
Citect32.exe |
Yes |
TCP 2078 |
|
TCP/IP Time Server |
Citect32.exe |
Yes |
TCP 2081 (v6.0 or later) |
|
TCP/IP Client |
Citect32.exe |
No |
TCP 2073, 2074 |
|
IDC Server |
Citect32.exe |
Yes |
TCP 2079 |
|
FTP Server |
Ftpsvr.exe |
Yes |
TCP 21 |
|
Internet Display Client |
Citect32.exe |
No |
TCP 2073, 2074 |
|
CTAPI Server |
Citect32.exe |
Yes |
TCP 2073 |
|
Web Server (v6.0 or later) |
N/A |
N/A |
TCP 80 |
|
Web Client (v6.0 or later) |
Internet Explorer |
No |
TCP 2073, 2074 |
|
Cicode Remote Debugging |
Citect32.exe |
Yes |
TCP 2074 |
|
Server Heartbeat 1 |
Citect32.exe |
Yes |
TCP 2080 |
| CitectHMI/SCADA ODBC server | Citect32.exe | Yes | TCP 20222 |
1. This change is only required on a machine acting as a
CitectHMI/SCADA Trend, Alarm, Report, IO or Time Server where
customers are using the TCP/IP server status heartbeat. This
heartbeat is a not a default operation in CitectHMI/SCADA and is
used by few customers. To check if you are using it, refer to your
Citect.ini parameter [LAN]ServerHeartbeat=1. If this parameter does
not exist then you are not using this functionality.
6.1 Windows Firewall Settings
|
Role |
Program |
Checked |
Port(s) |
|
Plant2Business |
N/A |
N/A |
TCP 135 |
|
Plant2Net |
N/A |
N/A |
TCP 80 |
6.2 Plant2Business Security Settings
Citect Plant2Business may also require these security modifications:
Open Component Services . Expand to Computers | My Computer | Com+ Applications | Plant2Business Portal . Open the Properties of the Plant2Business Portal and select the Security tab.
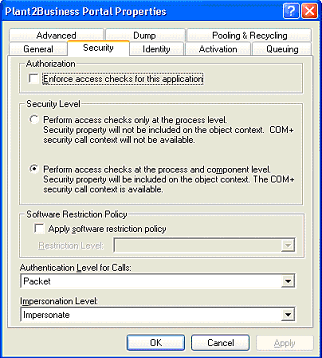
Check that the E nforce access checks for this application check box is unchecked.
Repeat these steps for Plant2Business Server Data Access .
7.1 Windows Firewall Settings
|
Role |
Program |
Checked |
Port(s) |
|
OPC Server |
Your OPC Server Name |
Yes |
TCP 135 |
|
Citect as an OPC Client |
Citect32.exe |
Yes |
TCP 135 |
7.2 DCOM Settings
DCOM has been enhanced and may need modifications to its security settings. You must modify DCOM Launch and Access permissions. For each user you add in these permissions, it is now possible to further limit them to local and remote access. Launch Permission is for the users who are able to start an OPC Server. Access Permission is for those users who may use the server once it is running. To configure DCOM use the following procedure:
- Launch Administrative Tools from the Windows Control Panel.
- Double click on the Component Services icon (alternatively you can open the Windows Run dialog by going to the Start button and selecting Run and typing dcomcnfg) .
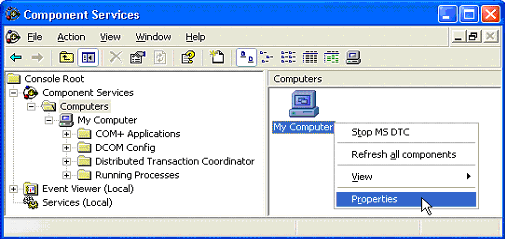
- Expand Component Services.
- Click on the + under Computers .
- Right click My Computer and select Properties .
- Select the COM Security tab.
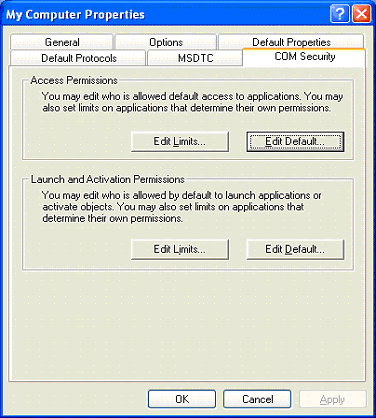
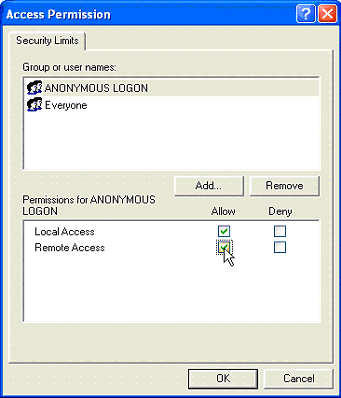
- In the Access Permissions section choose Edit Limits… .
- Check the Remote Access box for ANONYMOUS LOGON .
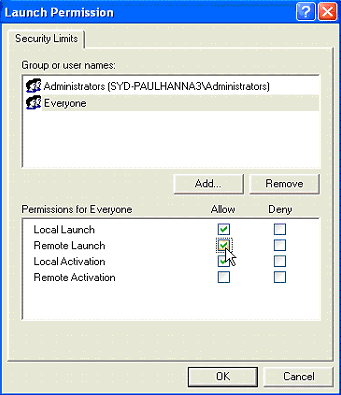
- In the Launch and Activation Permissions choose Edit Limits… .
- Check the Remote Launch box for the user labelled Everyone (or another user group of your choice if you wish to more strictly limit the users who can remote launch an application).
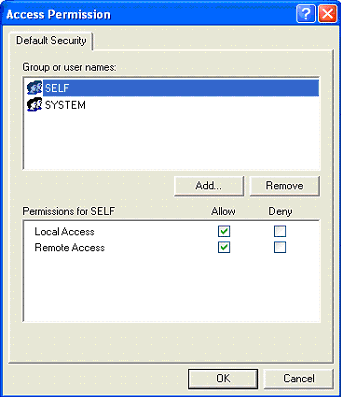
- Edit the default for both Access Permissions and Launch and Activation Permissions .
- Ensure that both Local Access and Remote Access have had the Allow box checked for the groups you wish to give access.
| Keywords: |
Related Links
Attachments
