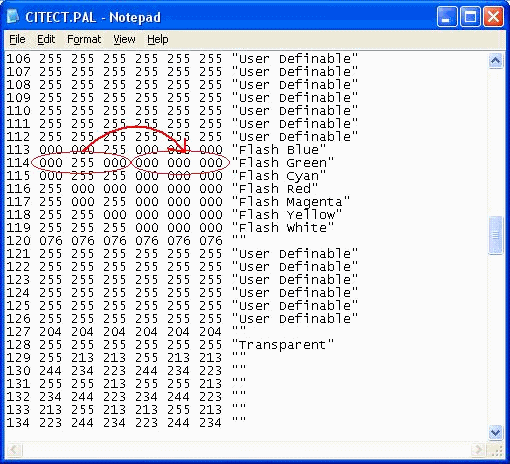
The project has been created, probably
unintentionally, with several objects having had a flashing
instead of a full (non-flashing) colour selected. For example,
the flashing green is selected (as below, in the user definable
list) instead of normal green.

In resolving this, there are three options:
1. Set Windows back to 16bit or higher colour mode - this is just
masking the problem.
2. Open the Properties of every affected item and select the full
colour instead of the flashing ("user defined") colour - most
thorough option but very tedious/time-consuming.
3. Open project's citect.pal file in Notepad and change the colour
codes to make flashing colour into a full colour.
Changing the Colour Codes in the Citect.pal File
If you open the colour palette file for the project
(...\User\<projectname>\citect.pal) in Notepad you will
notice that in the left-most column is the colour index
number for each colour. The second, third and
fourth numbers represent the ratios of red, green and blue for
the 'flash on' colour. The fifth, sixth and
seventh numbers represent the ratios of red, green and blue
for the 'flash off' colour. Obviously, if the colour is
non-flashing then the second, third and fourth numbers will be
the same as the fifth, sixth and seventh numbers respectively, such
that there will be no change to the colour of the object between
'flash on' state to 'flash off' state.
Taking 'Flash Green' as an example again, you can see that
the second, third and fourth numbers are 000 255
000, which actually corresponds to 'Lt Green' (index 010).
The fifth, sixth and seventh numbers are 000 000 000,
which corresponds to 'Opaque Black' (index 016), which means the
object will not be visible against the black background of the
page when Windows is running in 256 (or lower) colour mode.
To turn the flashing colour into a full colour you can just
copy the second, third and fourth numbers across so they
occupy the fifth, sixth and seventh positions also.

The flash green line would then be
114 000 255 000 000 255 000 "Flash Green"
The effect of this would be that any object in the
project with flash green selected (as per the first picture)
would then appear light green and not flash, regardless of Windows
colour mode setting. The seven flashing colours in the palette
file are set as follows by default:
113 000 000 255 000 000 000 "Flash Blue"
114 000 255 000 000 000 000 "Flash Green"
115 000 255 255 000 000 000 "Flash Cyan"
116 255 000 000 000 000 000 "Flash Red"
117 255 000 255 000 000 000 "Flash Magenta"
118 255 255 000 000 000 000 "Flash Yellow"
119 255 255 255 000 000 000 "Flash White"
If these are changed as per flash green in the above example you
should find the objects no longer flash.
To undo this and restore the original palette, just copy the
citect.pal file from the Bin directory into your project
directory and overwrite the edited file.
There is more information about this topic in article
Q1282. The article dates back to early
versions, however the information is still relevant for
CitectSCADA versions up to and including version 5.50, after
which True Colour was introduced and the format of the file
was changed.
|


