
Citect on iPaq
Technical
Paper
December 2002
Presented by:
Mark Hoogeveen

Abstract
This paper describes how to set up a demo where you can show a Citect Display Client on an iPaq via a wireless connection to a Citect Server. This is done via Windows 2000 Terminal Server technology.
Contacts
support@citect.com
Contents
2.3 Terminal Service Client for Pocket PC
2.4 Hints & Tips for using the iPac
3) Setting up the Access Point
3.1 Access Point configuration
3.2 Hints & Tips for using the Access Point
4) Setting up PC with Terminal Server
4.1 Terminal Services Client installation disks
4.2 User properties for a terminal server user
4.3 Properties for a Terminal Services RDP connection
4.4 Citect.ini file for Terminal Server connections
4.5 Connecting via IIS to a Terminal Server
4.5 Hints & Tips when using Terminal Server
1) Hardware setup of my demo
- Compaq iPaq
In my demo I used a HP3600 Compaq iPaq (240 x 320 pixels) with a wireless network card (Compaq WL100)
- Access Point
In my demo I used a Sitecom Wireless LAN Access point WL-006
- PC with Windows 2000 Server
On this PC Windows 2000 Terminal Server was installed. In my demo I connected the Access Point directly to the PC, via a cross cable. If you use a hub or a switch, then you can connect the Access point and the PC via a normal (straight) network cable to the hub/switch
2) Setting up Compaq iPaq
To load programs on an iPaq handheld PC you need a connection to your PC, via a USB connection, and on the PC you need the Microsoft ActiveSync program to install programs on the iPaq. See below a screenshot of MS ActiveSync.

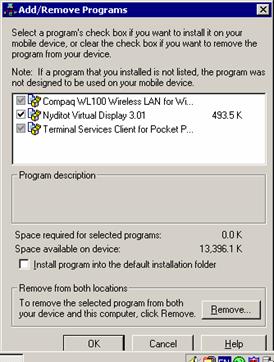
The following programs need to be present on the iPaq. You can view this via Tools | Add/Remove programs in ActiveSync.
2.1 Compaq WL100 Wireless LAN
On the iPaq the drivers for PCMCIA Wireless LAN card need to be installed. You can find this driver either on the install CD (for the Wireless LAN card) or they can be downloaded from the manufacturers website
To configure the WL100 card, go to Start | Settings on the iPaq. Then click the system tab (on bottom), and go to the icon 'WL100 settings'
The configuration settings that I used were:
Mode: Infrastructure. (This is needed when using an Access Point. If
you are establishing a pure wireless connec-tion to for example a laptop with a wireless card as well, then you need to choose '802.11 AdHoc')
SSID: leiden (This is sort of comparable to Windows work-
group name, and needs to be the same for all
the participants of the wireless network).
TransmitRate: Fully Automatic
PS Mode Enabled: Not enabled
I did not use any 'Encryption' settings (se tab 'Encryption'). Please be aware that without any encryption in place it is very easy for an intruder to log in to your wireless network, and access your network.
In the tab 'Link' you can view the quality of the wireless connection. For example when there is no connection due to obstacles or a frequency mismatch you can use this tab for diagnosis. You can also check the LED of the wireless card; if it is flashing then you know there is a problem.
To configure the desired TCPIP settings for the iPaq, go to Start | Setting on the iPaq. Then click the connection tab (on bottom), and go to icon 'Network Adapters'. Select the Compaq WL100 11Mbps Wireless Lan card and go to the 'Properties'.
There are two tabs, one to fill in IP address and one to fill in the available name (DNS) servers.
In my demo the settings for the iPaq were:
IP address: 192.168.21.52
Subnet Mask: 255.255.255.0
Default Gateway: 192.168.21.1
DNS: 192.168.21.3
Alt DNS: 192.168.21.1
2.2 Nyditot Virtual Display
This program can be obtained from www.nyditot.com, and enables you to view a full PC screen on an iPaq (in any direction). This is quite handy because otherwise you are always searching were you are on a Citect graphics page.
On the iPaq you can start Nyditot Virtual Display via Start | Programs | Virtual Display, and then go to 'VD Settings'
2.3 Terminal Service Client for Pocket PC
This enables a terminal client connection to a terminal server machine. The client is on install CD (for iPaq) but can also be obtained via Compaq/HP ( www.compaq.com/ipaq ) or Microsoft website. ( www.microsoft.com/mobile )
This needed to connect the iPaq to a terminal server machine, as a terminal client. Then the actual program (Citect) is running on the server machine, but the output (graphics pages) can be seen on the iPaq screen.
On the iPaq you can start Terminal Service Client via Start | Programs | Terminal Services Client. Then you only need to specify the IP address of the Terminal Server that you are connecting to.
2.4 Hints & Tips for using the iPaq
On the iPaq you can start Internet Explorer via Start | Internet Explorer. However I could not get a tsweb connection to work, this is the web component for Terminal Services that should allow you to connect to a terminal server via a webpage and an embedded ActiveX control.
On the iPaq you can see which programs are running via Start | Settings, then in the System tab you will find the Memory applet. There you can also close running programs, via the tab ‘running programs’.
If the green led on the Wireless card is blinking, then the communication between iPaq and the Access Point is not working. Please double-check your settings for the Wireless LAN card and the Access Point.
3) Setting up the Access Point
Before you can use the Access Point you need to configure the Access point with the right network settings. So you will first have to install the configuration software for the Access Point on your PC.
Then go to Programs | Wireless_LAN_Utility | Access Point Utility. The following screen will then appear. Of course the Access Point needs to be connected correctly to your PC. It should then find your access point automatically.
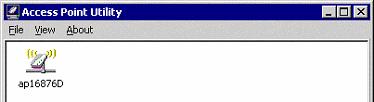
Double click on the icon and then enter the password to be able to access the configu-ration data. The password is 'default' by default.
3.1 Access Point configuration
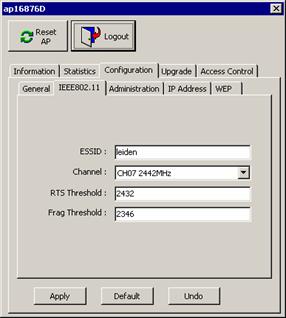
In the configuration environment you will find several tabs with settings for the Access Point. The main tab is the ‘configuration’ tab. See below a screen shot.
|
|
ESSID:
This needs to match the SSID setting for the iPaq. In my demo I used 'leiden' as ESSID name.
Channel:
If you use an 'infrastructure' environment with not only wireless participants, then this setting does not matter.
If you use only wireless participants then it needs to match the channel frequency that is defined for the ‘AdHoc’ connection in the iPaq.
|
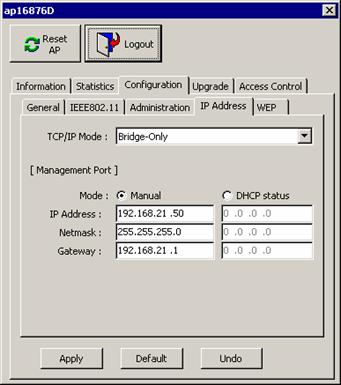
TCP/IP Mode
This needs to be set to 'Bridge-Only'
IP Address:
This needs to be set to a value that fits in your network range. In my demo I used 192.168.21.50 as IP address for the Access Point.
3.2 Hints & Tips for using the Access Point
Our Access Point sometimes behaved strangely. This meant that all of a sudden (after transporting it for demo reasons) it did not work anymore. To resolve it I used the following remedy:
- Change a setting (f.e. the IP address), then download these setting to the Access Point.
- Do a hardware reset of the access point. Simply power off the Access Point and then switch it on again.
4) Setting up PC with Terminal Server
Windows 2000 Server needs to be installed on the PC, plus also Terminal Server, IIS (Internet Information Server) and of course CitectSCADA.
Please make sure to install Terminal Server before installing Citect. To install Citect you need to use the Add/Remove Programs applet in Control Panel.
4.1 Terminal Services Client installation disks
To install a Terminal Services Client on another Windows machine you can use the following tool from Terminal Server; go to Start | Programs | Administrative Tools | Terminal Services Client creator.

4.2 User properties for a terminal server user
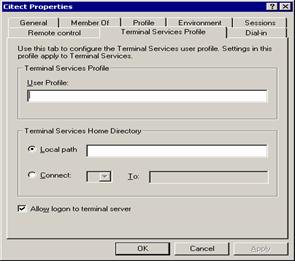
When a client (for example the Terminal Services Client iPaq) connects to terminal server it needs to supply login credentials. You should define the Terminal Service user rights for each user that can login via a terminal services session.
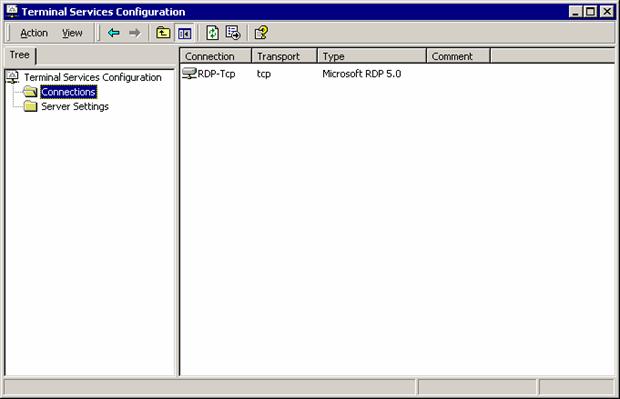
4.3 Properties for a Terminal Services RDP connection
In the Terminal Services Configuration program you set the properties of the RDP-Tcp connection. Just double click on the RDP-Tcp entry.
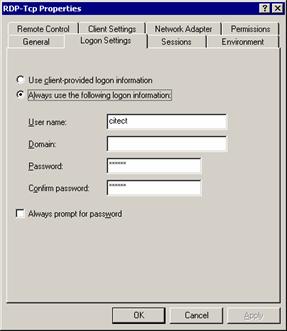
You can specify that a user is automatically logged in when a Terminal Services client connects.
To startup an application automatically for that user session you have tow possibilities, you can use the RDP-Tcp settings (Client Settings tab) to configure an application that needs to run when a session is created, or alternatively you configure this in the Startup group for that user (in C:\Documents and Settings\<user name>\Start Menu\Programs\Startup)
Another important setting is timeout and reconnection settings for a Session. You can either define this per user or you can override user settings in the Session tab of the RDP-Tcp settings.
There you set what should happened when a connection is broken, in some cases you may want to continue the session (and keep that instance of Citect32.exe running), in other cases you may want to end a session (and free up a Citect display license).
|
|

4.4 Citect.ini file for Terminal Server connections
Normally a Citect.ini file is located in the \winnt folder. However the citect.ini file that the terminal client uses is located in: C:\Documents and Settings\<user name>\WINDOWS.
If both client and server instances of Citect32.exe will be running on one PC, then you need to use pure TCPIP sockets for the network architecture. (If you only use Terminal Server to run Citect Display Clients then you can choose either NetBT or TCP/IP Sockets for Citect networking).
For example for a Citect display client you fill in:
>>>
[lan]
node=cttest
disable=0
LanA=-1
TCPIP=1
[CLIENT]
Primary=Fac
Standby=
Display=1
[DNS]
IOServer=192.168.21.10
FacAlarm=192.168.21.10
FacTrend=192.168.21.10
FacReport=192.168.21.10
>>>
Please be aware that the Citect server needs to be setup as a networked server (so not standalone), and that you need a Citect key with sufficient licenses on the Terminal Server PC.
Each session/instance of Citect32.exe will require a Citect license.
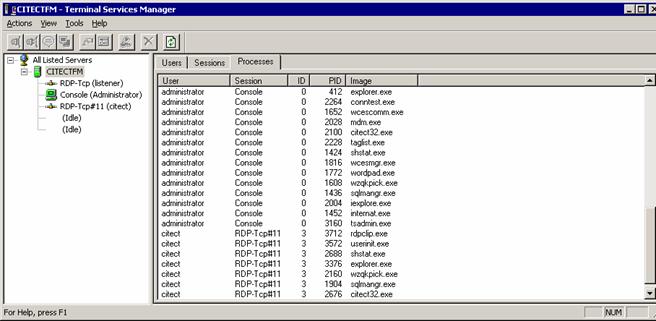
You can see in the Windows Task Manager how many instances of citect32.exe are running in parallel on the Terminal Server PC; you can also see this in the Terminal Services Manager, in the Processes tab
4.5 Connecting via IIS to a Terminal Server
Other then connecting via a terminal services client, you can also connect via an ActiveX control, and a web connection. Then you also need to have IIS (Internet Information Server) running on your Terminal Server PC.
To install the ActiveX Client Control and sample Web pages, you can install the following component from a Windows 2000 server CD:
< cdroot >\ValueAdd\TSAC\Tswebsetup.exe
The ActiveX Client Control Setup program installs the files in the directory you specify on the target computer (Default = C:\Inetpub\Wwwroot\Tsweb).
To connect to the terminal server via a (tsweb) link, you can use Internet Explorer, and the following URL (for my demo)
http://192.168.21.10/tsweb/connect.asp?Server=192.168.21.10&rW=1024&rH=768
Connect.asp is the page that contains the actual ActiveX client control, which hosts the Terminal server session. By design, Connect.asp does not run alone but must be called with parameters.
You need to specify the webserver where IIS (and the tsweb components) are running; the IP address of the Terminal Server PC and the width and height of the terminal client window. Microsoft documents it as follows:
http://MyWebServer/tsweb/connect.asp?Server=MyTSServer&rW=800&rH=600
4.5 Hints & Tips when using Terminal Server
I found one issue with the tsweb connection. I could not get it
to work on an iPaq but only on a normal Windows PC. This is
probably related to installing the ActiveX components for TSWEB on
the iPaq.
To be able to use Terminal Server with a lot of clients, you need
to have a machine with a lot of RAM. For Windows 2000 server you
need at least 256 MB, and then per session you need 15 – 21 MB RAM
for the session itself, plus also the amount of RAM that a Citect32
instance requires.
Since Citect32.exe loads everything into memory except for the
graphics pages (they are loaded and unloaded on demand), the RAM
size that is needed for Citect32.exe will increase when the size of
your project increases. You can check this for your project in the
Windows Task manager
For example if you have 4 clients connected to a Windows 2000
Terminal Server you need:
- 256 MB RAM for W2000 Server
- per session 21 MB RAM + 20 MB RAM for
Citect32.exe (project dependent)
This is a total of 256 + 4 x 41 = 420 MB
Disclaimer
Disclaimer of All
Warranties
SCHNEIDER ELECTRIC (AUSTRALIA) PTY LTD DISCLAIMS ANY AND ALL
WARRANTIES WITH RESPECT TO SCHNEIDER ELECTRIC (AUSTRALIA) PTY LTD
PRODUCTS AND THE RELATED DOCUMENTATION, WHETHER EXPRESS OR IMPLIED,
INCLUDING SPECIFICALLY THE IMPLIED WARRANTIES OF MERCHANTABILITY
AND FITNESS FOR A GENERAL OR PARTICULAR PURPOSE. CITECTSCADA AND
THE RELATED DOCUMENTATION ARE PROVIDED "AS IS," AND YOUR COMPANY
UNDERSTANDS THAT IT ASSUMES ALL RISKS OF THEIR USE, QUALITY, AND
PERFORMANCE.
Disclaimer of
Liability
YOUR COMPANY AGREES AND ACKNOWLEDGES THAT SCHNEIDER ELECTRIC
(AUSTRALIA) PTY LTD SHALL HAVE NO LIABILITY WHATSOEVER TO YOUR
COMPANY FOR ANY PROBLEMS IN OR CAUSED BY SCHNEIDER ELECTRIC
(AUSTRALIA) PTY LTD PRODUCTS OR THE RELATED DOCUMENTATION, WHETHER
DIRECT, INDIRECT, INCIDENTAL, SPECIAL, OR CONSEQUENTIAL (INCLUDING
LOSS OF PROFITS).
Related Links
Attachments