
How to install and configure the
Citect WebService with
CitectSCADA V5.42
Technical
Paper

Abstract
This paper details how to install and configure the Citect WebService for CitectSCADA V5.42.
Contacts
support@citect.com
Contents
How to install and configure the Citect WebService with CitectSCADA V5.42
Citect WebService Requirements
How to install and configure the Citect
WebService with CitectSCADA V5.42
With CitectSCADA v5.5 the WebService is automatically installed and none of the following steps should be required for full functionality. However, if you want to run CitectSCADA Pocket and connect it with CitectSCADA v5.42 please follow the instructions in this document.
CitectSCADA Pocket connects to CitectSCADA, via the CTAPI, through a web service component provided by Citect.
Citect WebService Requirements
Windows 2000 or XP
Internet Information Service (IIS)
CitectSCADA 5.42 with hot fix HF542R020681 (Available from website)
.Net Framework (Available from Microsoft website)
1. Verify that IIS and .Net Framework is installed and running properly. This can be done by looking in the TaskManager. You should see inetinfo.exe and aspnet_wt.exe running.
2. Start the IIS configuration applet from the Control Panel
3. Right click on the “Default Web Site” and click “New / Virtual Directory”
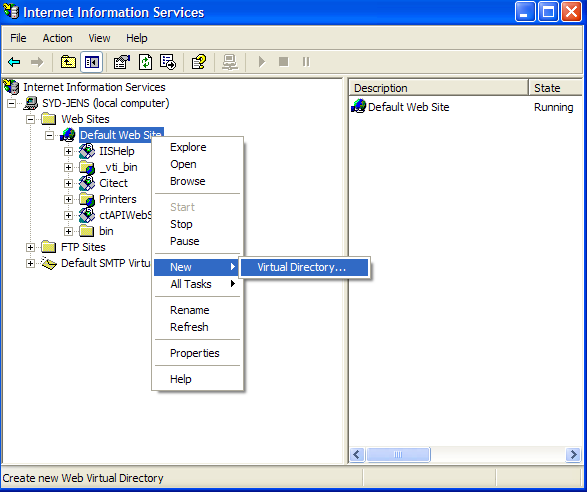
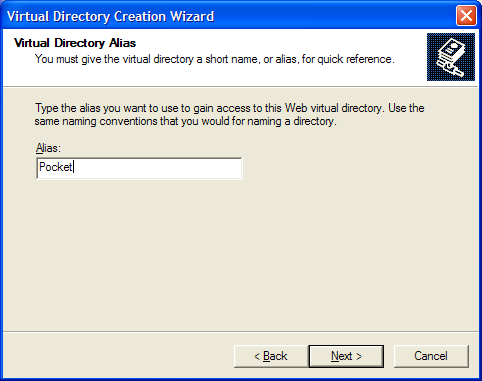
4. Give it a simple Alias name such as “Pocket”
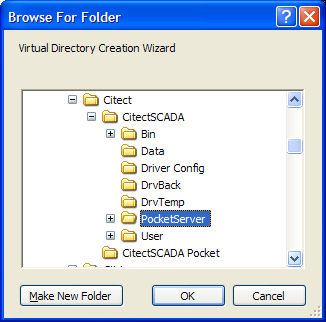
5. Next task is to select/create a directory where the WebService files should reside. NOTE! Do not use the InetPub/www default directory created by IIS as this has security limitations that will cause the WebService not to work properly.
6. For example create a directory in your CitectSCADA directory and give it a simple name such as “PocketServer”.
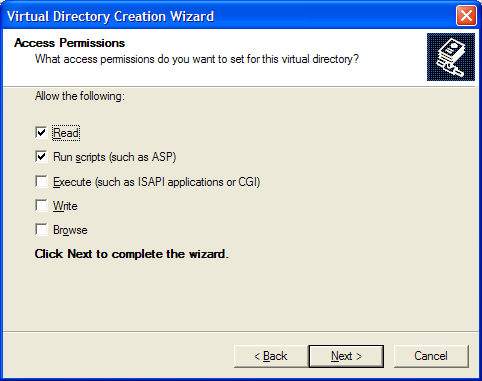
7. In regards to Access permissions please leave the default settings as they are.
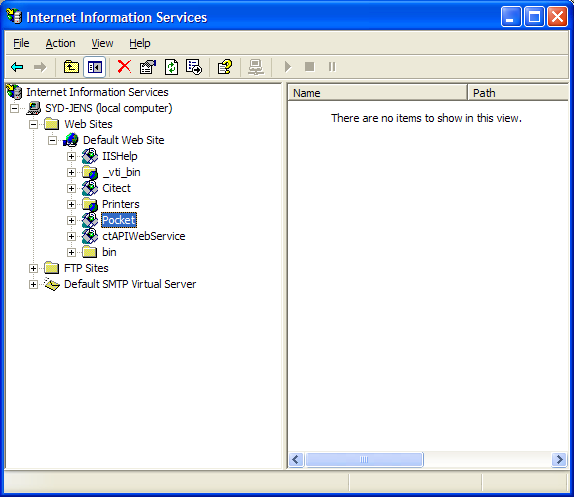
8. Then finalise creating your Virtual directory and IIS should look something like this with your Pocket virtual directory.
9. In your PocketServer directory you just created please create a subdirectory called Bin. This directory will hold the CTAPI files required for the connection with CitectSCADA.
10. Make sure you have installed Hotfix (HF542R020681) described in the top of this document before proceeding with this step! From the CitectSCADA/BIN directory please copy the following files to your new PocketServer/Bin directory, these files must be from the version of CitectSCADA that you are running.
a. CiDebugHelp.dll
b. CTAPI.DLL
c. CTENG32.DLL
d. CTRES32.DLL
e. CTUTIL32.DLL
f. CT_IPC.DLL
11. Also copy the following file from the WebService.ZIP to your new PocketServer/Bin directory
a. CtApiWebService.dll
12. The following files from the WebService.ZIP should be copied to your PocketServer directory
a. CtApiService.asmx
b. Global.asax
c. Web.config
13. Now you should have an IIS looking like this

14. Right click the ctAPIService.asmx and click browse, your default web browser will now display the default page of the Citect WebService.
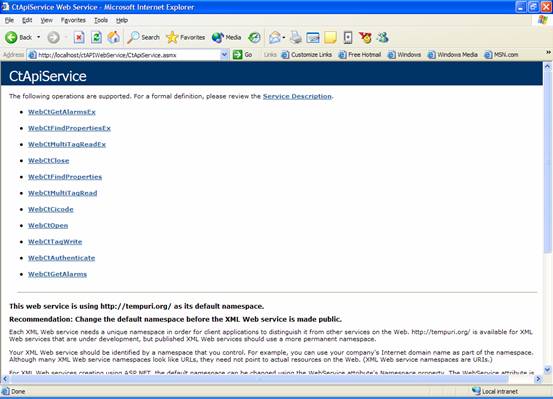
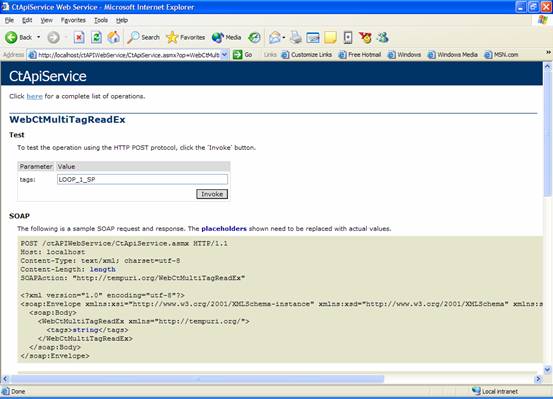
15. Make sure your CitectSCADA is running and for example clicking WebCtMultiTagReadEx and then entering a tag from your CitectSCADA project and pressing the Invoke button you should get the value of this tag.
16. The steps until now have showed how to configure and test the Citect WebService and that it connects properly to CitectSCADA.
17. The following steps will show how to configure CitectSCADA Pocket running on your PDA. This assumes that you have CitectSCADA Pocket already installed and running properly in Demo mode.
18. Instead of having the Demo tick box ticked we now need to provide a URL address in the top edit field under the CitectSCADA Pocket settings tab.
19. The easiest way to get the correct URL is by clicking the “Service Description” link seen on the WebService web page in step 14. When scrolling down to the bottom in the right pane you should see a web page looking like this.
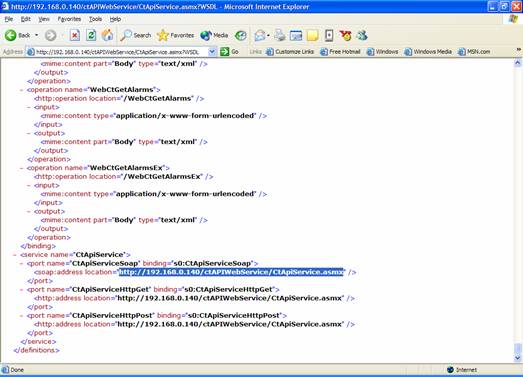
20. Start the Internet Explorer (IE) you have in your PDA and type exactly the same URL into the address field, you should now get the same result as in step 14. Repeat step 15 and you should see the value of your tag.
21. This has proved that the communication between your PDA and CitectSCADA is working properly.
22. Now we should configure CitectSCADA Pocket and connect to CitectSCADA.
23. Log in to CitectSCADA Pocket as Administrator and use the password you entered the first time you ran CitectSCADA Pocket. If this is the first time you will be asked to provide a password for the Administrator account.
24. Take the same URL and type this into the top edit field under the settings tab in CitectSCADA Pocket.
25. Untick the Demo Mode tick box and set the other settings as you prefer
a. Sample Frrequence: The time between each sample is taken from CitectSCADA
b. Web Method Timeout:
c. Server Down Timeout:
26. Go to the Server menu and click download tags…you should now have got a message saying Downloaded XX tags in YY seconds
27. Go to the File menu and save your configuration as config.xml.
28. Go to the File menu and login with the same login details as one of your CitectSCADA users. In the Example project “engineer / citect” would be a valid user.
29. Now you should have access to all tags, trends and alarms from CitectSCADA.
DisclaimerDisclaimer of All
Warranties
SCHNEIDER ELECTRIC (AUSTRALIA) PTY LTD DISCLAIMS ANY AND ALL WARRANTIES WITH RESPECT TO SCHNEIDER ELECTRIC (AUSTRALIA) PTY LTD PRODUCTS AND THE RELATED DOCUMENTATION, WHETHER EXPRESS OR IMPLIED, INCLUDING SPECIFICALLY THE IMPLIED WARRANTIES OF MERCHANTABILITY AND FITNESS FOR A GENERAL OR PARTICULAR PURPOSE. CITECTSCADA AND THE RELATED DOCUMENTATION ARE PROVIDED "AS IS," AND YOUR COMPANY UNDERSTANDS THAT IT ASSUMES ALL RISKS OF THEIR USE, QUALITY, AND PERFORMANCE.
Disclaimer of
Liability
YOUR COMPANY AGREES AND ACKNOWLEDGES THAT SCHNEIDER ELECTRIC
(AUSTRALIA) PTY LTD SHALL HAVE NO LIABILITY WHATSOEVER TO YOUR
COMPANY FOR ANY PROBLEMS IN OR CAUSED BY SCHNEIDER ELECTRIC
(AUSTRALIA) PTY LTD PRODUCTS OR THE RELATED DOCUMENTATION, WHETHER
DIRECT, INDIRECT, INCIDENTAL, SPECIAL, OR CONSEQUENTIAL (INCLUDING
LOSS OF PROFITS).
Related Links
Attachments
