|
Presented by: Eric Black
This guide is written for those who wish to install or configure CitectSCADA Pocket. This is intended to supplement, not replace, the documentation that comes with CitectSCADA Pocket version 2.0, including the following files:
Contacts support@citect.com Contents
Quick Start CitectSCADA and Pocket Server PC Setup Pocket PC Setup
Technical notes Configuration Configuration Security Configuring Communications Testing Communications Configuring Tags Configuring Trends Configuring Alarms Runtime Licensing Security Trends Tags Communications Demonstrating SCADA Pocket Pocket Client Simulation Demo Mode Pocket Server Demo Mode Remote Display Errors
Quick StartThe following steps will take you through installing and configuring the Pocket server and the Pocket client. For more details about these steps, see the documents mentioned above and the Technical Notes section below. CitectSCADA and Pocket Server PC SetupThe PC must have Windows 2000 or XP installed. If the Pocket PC will only be used in demo mode, no server is needed and you can skip to the Pocket PC Setup section. 1. Uninstall Microsoft .NET Framework if it is already installed Go to the Start menu | Settings | Control Panel | Add/Remove Programs and remove Microsoft .NET Framework. 2. Install Windows 2000 Service Pack 3 or higher, or Windows XP Service Pack 1 or higher, available from http://www.microsoft.com/download 3. Install IIS Go to the Start menu | Settings | Control Panel | Add/Remove Programs. Select Add/Remove Windows Components, then select Internet Information Services (IIS). 4. Install Pocket Server Insert the Citect SCADA Options CD and select to install CitectSCADA Pocket Server. Microsoft .NET Framework version 1.1 will be installed automatically. After .NET installs you will need to re-select the Pocket Server to install it. 5. Update Citect (skip this step if you have Citect 5.50 or later installed) If you have Citect version 5.42 with no service pack, you need to install hotfix HF542R019341_19758_20681_20019 (also known as P2B v3.02 SP A), available from Citect Support. After copying the hotfix files to the Citect\Bin folder (or installing a Citect 5.42 service pack), copy the following files from Citect\Bin to the Pocket Bin folder (By default this is C:\Program Files\Citect\CitectSCADA Pocket\Bin). ct_ipc.dll, ctapi.dll, ctutil32.dll, cidebughelp.dll, cteng32.dll, ctres32.dll 6. Run the Example project Open the Citect Explorer and select the Example project. Go to the Tools menu | Computer Setup. Select Express Setup, then Stand-Alone Server and Display Client, and click Next until finished. Go to the File menu and select Run. Server setup is now complete! Pocket PC Setup
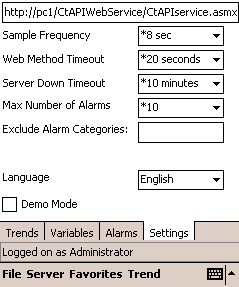
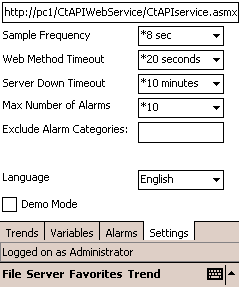
Note: The Pocket PC must be running Microsoft Pocket PC 2002 or 2003. 1. Install Microsoft ActiveSync version 3.7 on a desktop PC 2. Connect the Pocket PC to the desktop PC 3. Install the Pocket Client Insert the Citect SCADA Options CD and select to install CitectSCADA Pocket Client. Microsoft .NET Compact Framework version 1.0 will be installed on the Pocket PC automatically. If a dialog box appears on the Pocket PC asking to replace system files, choose ‘Yes to All’. 4. Set up networking (unless only demo mode is needed) Configure your Pocket PC’s network adaptor (such as WLAN, Bluetooth, GPRS, or 3G) so it can connect to the Citect server. The docking station / transfer cable can also be used as a network connection. Go to Internet Explorer on the Pocket PC and enter the address: http://<your server PC> (e.g. http://cha-ericblack/ or http://192.168.11.130/) to test the networking. To find your desktop PC’s IP address, go to the Start Menu | Programs | Accessories | Command Prompt, then type: IPCONFIG <Enter>. 5. Run the SCADA Pocket Client Go to the Start menu | Programs | PocketSCADA. When prompted, choose a password for the administrator login. Re-enter it on the 2nd line to confirm it. You will need to use this whenever you want to change the configuration. Click the Settings tab and enter the server URL at the top of the page as shown here (http://pc1/CtApiWebService/CtApiService.asmx), but replace “pc1” with the name or IP address of your PC:
In the Server menu, choose Download tags to read the tag list from Citect. It may time out on the first try—If it says ‘Cannot Find Resource Assembly’, try downloading tags again. To save the settings and log in as a user, go to the File menu and choose Login. When prompted to save the configuration, choose Yes and save over the existing configuration file. Next, enter a username and password that are defined in your Citect project. For the Example project, use: User: engineer Click the Alarms tab to view or acknowledge Citect alarms. Click the Trends tab to view real-time trends. You may select up to 4 variable tags from the dropdown list boxes on the left of the screen. Click the Variables tab to display tag values. 1. Tap and hold the stylus in the top pane of the screen and choose New from the popup menu 2. Select a variable tag from the dropdown list. Click on the name field and tag name will be automatically filled in as the variable’s descriptive name (though you may change it) 3. Select whether the tag is digital or analog 4. If you configure the variable while logged in as the administrator you will also have the option to make the tag writeable 5. Click OK to accept it 6. The variable name will be displayed in the top pane and when you click on it and the value will display in the bottom pane Congratulations! You have now set up CitectSCADA Pocket. Technical notesThe following notes give more detail about how SCADA Pocket works and how to troubleshoot problems. ConfigurationOnce the Pocket client is installed, it must be configured to connect to the correct server and it may be configured with predefined tags and trends. Configuration SecurityTo enter configuration mode, you need to log in as administrator using the password you chose the first time you ran the Pocket client. You can view or change the Administrator password by editing \Program Files\PocketSCADA\PocketSCADA.exe.config on the Pocket PC. Open the file in Notepad and change the highlighted value listed on this line: <add key="AdminPassword" value="citect" /> Configuring Communications
The Pocket client needs the URL of the server. To set this, log in to the Pocket client as the administrator. Then, go to the Setup tab and enter the server’s URL at the top of the page. The server URL will be:
http://<computer_name>/CtApiWebService/CtApiService.asmx.
You can verify the server’s URL using the IIS Administrator. Go to
the Windows Control Panel | Administrative Tools | Computer
Management. Open Services and Applications | Internet Information
Services | Default Web Site | ctAPIWebService. Right-click on
CtApiService.asmx and choose Browse. The CtApiService web page will
open in Internet Explorer. This also confirms that the SCADA Pocket
web service is working. The address shown should look like: Testing CommunicationsThe Pocket client should be able to communicate using any TCP/IP network that the Pocket PC supports. This includes connecting through a USB synchronization cable. If the Pocket client is having trouble connecting to Citect or logging in, you can test communications in Pocket Internet Explorer. Open Internet Explorer and enter the server’s name or IP address. This will open a web page saying that the site is under construction. This confirms that the network connection between the Pocket PC and the server is OK, and the IIS web service is installed and running. Next, in Pocket Internet
Explorer go to the address: This lists the available functions for the CTAPIService. If this page doesn’t display, you may need to re-install SCADA Pocket server. To read a tag, select WebCtFindProperties. Set both the table name and the property name to TAG and click Invoke. It will return a page listing all the tags in the currently running Citect project. Next, click WebCtMultiTagReadEx, enter a tag name, and select Invoke. The value will display in black print in an XML string like this: <?xml version="1.0" encoding="utf-8" ?> <string xmlns="http://tempuri.org/">26</string> Configuring Tags
Before you can configure tags or trends or view data, you need to download the list of tags from the server or manually create the tag list. When you download tags from the Citect server, they will be listed in the same order as they are in Citect. You may wish to use Notepad to edit the config.xml file on the Pocket PC to customize the order. Or, sort the variable.dbf file using a database editor like MS Excel before downloading the tags. If you manually edit the tag list in config.xml, you may need to delete your previous favorites (which are defined in config.xml also). Internally, tags are numbered sequentially and these tag numbers are used to define the favorites lists instead of using tag names. If you insert or delete tags, it will change the numbering and may change the tags displayed by old favorites. Configuring TrendsAfter configuring a set of trend pens, you can save them as a named favorite. Go to the Favorites menu and choose Add. Now, you can select the favorite name from the dropdown list on the trend page.
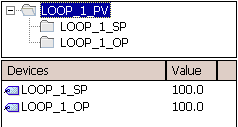
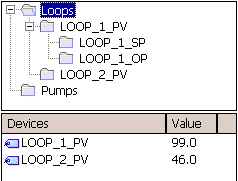
To delete the currently selected favorite, go to the Favorites menu and choose Delete. Trend favorites are deleted automatically when you download tags. Favorites save trend pen names only. The range (time span) is not saved. Drag the stylus across the trend graph to create a trend cursor line. Labels will appear next to each pen to show the value at the cursor position. You can display the tag name, value, and/or time in the label. Go to the Trend menu and choose Label to enable or disable each of these items. If you disable all three, the labels will no longer appear. Configuring AlarmsAlarms must be configured in Citect, but you can select the alarm categories to filter out and how many alarms to display from the Settings page. It is possible to change the alarm sound by replacing My Pocket PC\Program Files\PocketSCADA\Alarm.wav with another wav file with the same name. RuntimeLicensingEach Pocket PC that will be connected to the server requires one Pocket license, regardless of whether they are connected simultaneously. Run the Citect Key Update utility (Citect Explorer | Help menu | Citect Key Update) to check the number of licenses that are on your key. You need the Key Update utility that comes with Citect 5.50 or later to recognize Pocket licenses. SecurityUsers must log in with a username and password that are defined in the running Citect project. Users are defined in the Citect Project Editor | System menu | Users. It is only necessary to set the User Name and password—the privilege settings do not apply. Citect 5.41 and higher only show asterisks instead of the password. If login fails on the Pocket client, try logging in to the Citect runtime with the same user name and password. TrendsTrends are realtime only. The graph starts when you log in and continues recording as long as SCADAPocket is running. No historical data is loaded from the Citect trend server. Since trends are realtime only, any variable tag may be trended. Because of this, trend tags defined in Citect are not listed in the Pocket client—only variable tags. TagsWhen you select a group in the top pane of the screen, the bottom pane will display the variables in that group and their values.
If a variable tag has other tags grouped inside it like LOOP_1_PV shown above, the only way to see the its value is to have created a parent group and to select it (like Loops shown below).
String variable tags can be displayed but they will be read-only. Memory tags from Citect can be read/written but they will only be seen by the Citect I/O server PC that is connected to the Pocket server, since memory tags are not shared with other Citect nodes. CommunicationsYou can view, but not change the communication settings on the Settings page and from the Server menu. Clicking the close button doesn’t shut the Pocket client down. It will still be monitoring trends and alarms. Go to the File menu and choose Exit to shut down. Demonstrating SCADA PocketThe Pocket server will run for 30 minutes without a license key, Citect will run for 15 minutes or more in demo mode, and the Pocket client can even generate its own simulated data if no server is available. Pocket Client Simulation Demo Mode1. Log in with the administrator username and password 2. Go to the Settings page and select the Demo checkbox 3. Go to the Server menu and select Download Tags. This will create a list of 9 tags that display memory counters from the Pocket PC, as well as a random bit 4. You may now configure trend and variable displays, but there are no demo alarms 5. Go to the Server menu and choose Start. Values should start displaying on the trend and variable page Pocket Server Demo ModeIf no Pocket license is found, the web service will run for 30 minutes. During this time it will allow clients to connect and view/edit data from Citect. After demo mode expires, the server returns “No hardware lock present” errors. When demo mode has ended it may be restarted. Go to the Windows Control Panel | Administrative Tools | Services. Right-click on World Wide Web Publishing Service and choose Restart. Remote DisplayMicrosoft has a Remote Display
Control PowerToy for the Pocket PC that allows you to view and
control a Pocket PC from your desktop. This may be more convenient
for configuration or testing. It also would allow a group to see
the Pocket PC’s screen more easily. The Remote Display Control can
be downloaded from: After installing it, run the Remote Display Control Host on your desktop PC. On the Pocket PC run CerDisp and select Connect. Enter the desktop PC’s name when prompted.
Errors
See the Citect Knowledge Base for more information about these and other error messages.
Disclaimer of All
Warranties Disclaimer of
Liability
|
|||||||||||||||||||||||||
|
|||||||||||||||||||||||||
Related Links
Attachments


