|
The benefits of Terminal Services with CitectSCADA and how to configure.
About the Authors Daniel Strand, former Business Development Manager at Citect Pty Ltd, and Paul Burns, Director for Automation Control Products, wrote this document.
Daniel Strand has 8+ years experience from the automation industry and started off in software development. At Citect, he was the product manager for their vertical initiatives.
Paul Burns is the Director of Education for ACP. A former college instructor and system integrator, Paul is responsible for technical training and product support for ACP.
This document was updated in October 2004 by Tony Podsiadly, Senior Global Support Engineer.
Contacts support@citect.com Contents TERMINAL SERVICES
WHITEPAPER
Terminal Services (TS) are popular in office applications as it lowers IT administration costs for software applications that are accessed by a large number of users. Even though Terminal Services has been available since before 1997, this architecture has not been adopted as rapidly in the industrial automation environment because the savings don’t exceed extra set up cost until at least 4 clients are deployed. With traditional automation architecture the clients have been “islands of automation”, all running their independent databases and applications, and not easily adaptable to a centralized architecture. However, once TS is adopted, it can provide great savings in a plant. CitectSCADA supports Terminal Services and has been used in a number of large applications around the world since 1999. We recommend considering Terminal Services for applications larger than six clients. This will not only save cost, but also save resources and lost time.
The use of thin clients lowers the Total Cost of Ownership (purchase plus maintenance) and provides alternative system architecture for suitable types of applications. Below is a table comparing the resources spent on a Terminal Services setup as compared to a traditional client/server configuration.
We can see that breakeven occurs at 4 clients on a capital basis and our recommendation is to consider the Terminal Services architecture on all applications larger than 6 clients. At a hardware level, thin clients are devices that rely on a server for applications and data, and perform little application processing. The clients used are low cost and get a long life span due to Terminal Services. This cost saving is partly offset by larger server requirements. Other benefits in addition to lower Total Cost of Ownership are: § Centralized deployment and management of programs Increased Security: The Terminal Server Client will retrieve all its information and applications from the centralized server. This provides more control of security. § Use existing hardware: Due to low system requirements, old hardware can be used as Terminal Server Clients. New machines can perform their own processing, but at the same time be setup to run Terminal Server Client sessions. § Scalability: Terminal Services provides the means to easily install additional clients as well as maintaining them. This gives a scaleable solution that can easily grow. § Data Access for the Casual User: Ability to support the casual user who needs temporary access to critical information.
Terminal Services is Microsoft's solution for server-based computing because the server performs most of the processing remotely and very few client resources are necessary. The server performs all the application processing and only the information from the display monitor, keyboard and mouse are transmitted between the server and the client. It uses far less bandwidth than downloading and running the application locally on a client computer. Microsoft included Terminal Services in Windows 2000 Server, Windows 2000 Advanced Server, and Windows 2000 Datacenter Server. Because it's intended for server-based computing, Terminal Services isn't available in Windows 2000 Professional. You can use Terminal Services on any TCP/IP connection over a LAN, WAN or the Internet, even at dial-up modem speeds. For example, many implementations use a VPN to connect remotely to the server. A Terminal Server client can be run on many different platforms. By default, Terminal Server clients can run on all Windows platforms including Pocket PC 2002. Other platforms that can be used with Citrix Metaframe are Linux, Unix and Macintosh.
Server Terminal Services should be installed on a new Windows 2000 Server or Advanced Server. Do not upgrade from a Windows NT system. ?? Multi-processors can improve performance. ?? Add 128 MB RAM for Windows 2000 Advanced Server. ?? Memory requirements depend on application load and the number of users connected. The Terminal Server will need approx 20 MB per session running CitectSCADA. A good way to estimate how many users a server can support is to measure system performance (memory and CPU usage) with a handful of Terminal Server Clients on the system, and then extrapolate the result. ?? Virtual memory (page file size) should be 250% of the physical memory.
Clients Clients that run Terminal Services are not required to have much processing power. For example, a Pentium with 32 MB of RAM and a VGA video card is sufficient. Therefore, it is very easy to integrate Terminal Services into a network that has older computers and equipment. Supported client operating systems are Windows, Linux, Unix and Macintosh as well as ACP’s Thin Clients (more details in ACP Thin Client chapter in this whitepaper).
1 Click “Start” on the Windows Taskbar, point to “Settings”, and then click “Control Panel”. Double-click the “Add/Remove Programs” icon. The “Add/Remove Programs” dialog box appears. 2 Click “Add/Remove Windows Components”. The “Windows Components Wizard” appears. 3 Select the “Terminal Services” and “Terminal Services Licensing” options, and then click “Next”. (Terminal Services licensing may be installed on a separate machine.) 4 Select the “Application server mode” option, and then click “Next”. 5 Select the “Permissions compatible with Windows 2000 Users” option, and then click “Next”. 6 When prompted locate file TSC.00_ on Windows 2000 Server CD. 7 When prompted please reboot as requested. 8 Select the “Your domain or workgroup” option and provide the directory location for the licensing server database Note: This option only appears if you selected the “Terminal Services” Licensing option. 9 Click “Next” to begin the installation.
6.1. Terminal Server Client Environment By default, the TS Client will be presented with a normal Windows environment when logging into a Terminal Server - task bar at the bottom of the screen with a START button and applications on the desktop. This is useful if the client needs to access other software in addition to Citect. However, if a client should only have access to Citect, we can configure the system to start Citect as the shell for the client. This can be configured for ALL TS Clients by selecting “Terminal Services Configuration”, then “Connections” and then the properties of the connection you wish to edit. If this should be configured on a user by user basis select “Computer Management” in the Control Panel, expand the node “System Tools”, then “Local Users and Groups” and open the properties of the user you wish to configure. See the below picture for an example on how to configure Citect to automatically start for the Terminal Server User named: Client.
In addition to this, note that each user will have its own instance of CITECT.INI. Its location will be “c:\Documents and Settings\<user_name>\Windows”, it will NOT use the normal C:\WINDOWS folder. If preferred, it is possible to force all users to look at one version of the Citect.INI file. Typically, this is placed in one of three places, the "Windows" directory (or WinNT directory), the "\Bin" directory or in the main project directory (your preference may vary dpending on how many different projects and versions of CitectSCADA you have installed on your PC). CitectSCADA will initially look for an INI file in the "CitectSCADA\Bin\" directory, and if it doesn't find one there, it will then look in the Windows/WinNT directory (i.e. the path specified by the %WinDir% environment variable. If it does not find an INI filein the default %WinDir% directory, it gets re-directed to the User profile directory. Placing the INI file in the
"\Bin" directory should stop this from happening, or alternatively
you can force the path that Citect uses to look for an INI file to
by using the "-i" switch
Notes: 1. - You will need to use quotation marks around paths that contain spaces as shown above 2. - You can always force Citect Explorer to use a specific INI file, using the same method, but you need to substitute CTEXPLORER.EXE for Citect32.EXE. It is recommended you force them both to the same location.
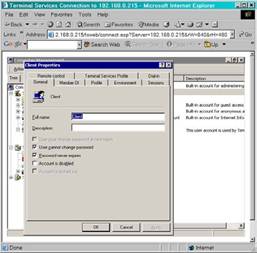
- This procedure was written based on Windows XP; however the process is extremely similar for Windows NT4/2000/2003. Notice the second example points explicitly to the %WinDir% directory. If you want your INI file to be placed in the Windows/WinNT directory, you need to explicitly state the full path as shown (and not use the %WinDir% environment variable), or else the Citect.INI file will be created and maintained in the User's profile directory. 6.2. Password Management If multiple users will use the same user login on the Terminal Server, it is a good idea to make sure that the password is fixed. Otherwise, if a user changes the password, everybody else will be locked out until they were told the new password. Examples of such clients would be full featured operator stations that connect from the outside or reside on the LAN. Setup the appropriate users as below:
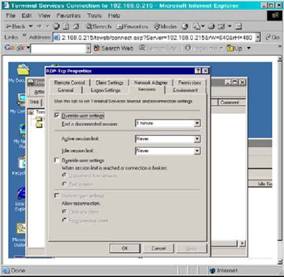
6.3. Citect License Management Each Terminal Server Client that uses Citect will require an appropriate Citect license from the Citect server. Once the Citect session starts, the license is used from the server and it will not be released until the Citect session is closed. By default, the terminal server session will not terminate just because the TS Client closes its Terminal Server window to the server. The server will continue to process this session indefinitely. When a user logs in again and there is an active session from a previous session, the client will be prompted if they want to use the existing session or create a new one. The correct answer should be to connect to the existing one. To keep operators from creating unused sessions, the Terminal Server can be setup to automatically end sessions that have been disconnected. In this way the Citect licenses will release properly back to the Citect server where they will be available for future sessions. Below is an example of ending any disconnected session that has been disconnected for 1 minute. This means that any Citect license will not be tied up in a disconnected session for more than 1 minute.
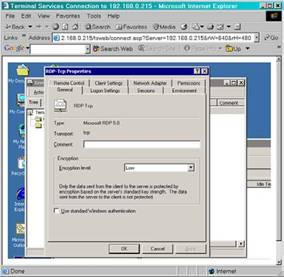
6.4. Terminal Server Encryption Terminal Server has inbuilt encryption and it can be set to LOW-MED-HIGH. In a secure environment, such as an Intranet, this parameter can be set to LOW to increase performance and LOW or MED if going through a VPN. If Terminal Server is used on the Internet we recommend that the encryption level is set to HIGH to provide the most secure link. Naturally, for each situation you have to take your circumstances under consideration to make sure that appropriate security and encryption are used. This can be configured for all TS Clients by selecting “Terminal Services Configuration”, then “Connections” and then the properties of the connection you wish to edit. See the picture below. This encryption setting can also be set on a per user basis if required.
ACP has enhanced the standard Thin Client technology as it comes from Microsoft by providing support for features required by the industrial market. These enhancements are coupled with ACP's award winning Thin Client management software, ThinManager. ACP technology is now used by 9 different manufacturers who bring to market combined almost 40 different models of ACP Enabled Thin Clients, all of which are completely interchangeable. Some of the most important benefits that the user will see when coupling Citect software with ACP Thin Client technology: § Automatic server Failover and redundancy, controlled by the clients. If any ACP Enabled Thin Client detects a problem with the server, it can be configured to automatically switch to a backup server without operator intervention. Once the primary server has become operational again, the client can be configured to switch back. Useful not only to eliminate a single point of failure, but also for application and operating system updates.
§ Industry Specific I/O directly from the clients. Standard Thin Clients are not able to handle high-speed serial communication needed to rapidly poll industrial equipment. Any ACP Enabled Thin Client can send/receive serial data at up to 115KB, and can also accept Profibus and Devicenet communication cards.
§ Auto login, auto configuration of new clients, and auto replacement. Because they are designed for the industrial market, any ACP Enabled Thin Client can be replaced by an operator without any intervention from IT personnel. The client's configuration is kept and generated at the server so operators do not have to keep up with complicated settings.
§ ThinManager management software. All ACP Enabled Thin Clients are configured and monitored from a simple Windows interface.
§ Centralized support for any combination of ACP Enabled client hardware. ACP Thin Clients are interchangeable - if a unit from Advantech is destroyed by a forklift, for instance, the damaged unit can be replaced with a Thin Client from Ann Arbor.
§ No software resident on the clients. This means that ACP Enabled Thin Client hardware will not become obsolete, and always has the latest version of the operating software. For more information on the advantages of ACP Thin Client technology, please visit their website at http://www.acpthinclient.com/
8.1. Citect Licensing Each Terminal Server Client that will use Citect requires an appropriate Citect license in the same way as you would license floating Citect licenses, i.e. the licenses have to reside on an IOServer in the network and these floating licenses should be the number of concurrent Citect client sessions required. You should only run a CitectSCADA client under the Terminal Server. You should never run a CitectSCADA Server under Terminal Server as you would get a clash with PLC hardware or network server connections. The CitectSCADA client is compatible with Microsoft Terminal Server. The recommended architecture is to run all your Citect Servers on non Terminal Server computers, and then setup a CitectSCADA client to run on the Terminal Server. Only the first client running on the Terminal Server will get access to the local hardware key. If you only want to run one client at a time, and have a single user key you could install that key on the Terminal Server computer, however if you want to run more than one CitectSCADA client on the Terminal Server, then you must install your multi-user CitectSCADA key on one of your CitectSCADA Servers. This will allow many instances of the CitectSCADA clients to get licences from the remote Servers. 8.2. Microsoft Licensing 8.2.1. Microsoft CALs and TS CALs Thin clients using Microsoft Terminal Server require a terminal server running Microsoft’s Windows NT 4.0 Terminal Server Edition or Windows 2000 Server with Terminal Services enabled as an operating system. Each of these operating systems requires a standard Microsoft Client Access License (CAL) for each connection to the server. These are based on concurrent use; a 5-pack would allow more than five users to access server resources, but only five users at a time. Terminals require an additional Microsoft Terminal Server Client Access License (TS CAL) to connect to the server using either RDP or ICA. This licensing is per seat; ten terminals would require ten TS CALs, even if only two were connected at a time. Windows NT 4.0 Terminal Server Edition is sold with TS CALs. These are installed on the terminal server. Additional TS CALs are available from Microsoft. Windows 2000 Server is not normally sold with TS CALs. These need to be purchased separately and installed on the Terminal Services License server. 8.2.2. Microsoft Terminal Server Licensing Server Windows 2000 has a new method of license management. All TS CALs are installed on a single Terminal Services Licensing Server, which acts as a repository for all TS CALs. The terminal servers request TS CAL authentication from the Terminal Services Licensing Server as terminals (thin clients) attach to terminal servers. This allows a single site for management and authentication of terminal server connections.
A server becomes a Terminal Server Licensing Server by selection of the option during the installation phase or by selecting Add/Remove Programs… Add/Remove Windows Components from the Control Panel and selecting the Terminal Services Licensing option. See Microsoft Terminal Server Installation for details. The Terminal Services Licensing server is activated through the Internet by connecting to the Microsoft Certificate Authority and License Clearinghouse. Windows 2000 Server with Terminal Services enabled will issue 90-day temporary licenses while the Terminal Services Licensing server is being setup and activated. If this period has elapsed, the terminal will not connect to the terminal server and will display an “Error Number 50” message box.
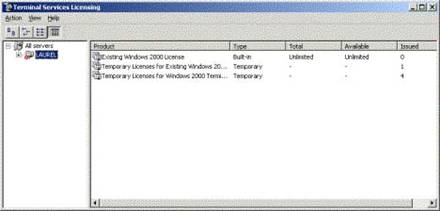
Microsoft Terminal Server Licensing Server Hotfix Microsoft released a hotfix for its licensing server in June, 2001. It allows the licensing server to release licenses that are no longer used, which makes replacements easier. This hotfix needs to be added before you add the licenses. Further information can be obtained from Microsoft. Try Terminal Services Licensing Enhancements and Windows 2000 Terminal Services Licensing Hotfix Now Available for Download The licensing of the Microsoft components of a Windows 2000 terminal server is a two-step process; one must first authorize the Terminal Server Licensing Server, then one must activate the licenses. The license activation will be repeated for each license pack. To begin the process select “Start” + “Programs” + ”Administrative Tools” + ”Terminal Server Licensing” on the Terminal Server Licensing Server.
Figure 1 Terminal Services Licensing
Highlight desired server
Figure 2 Selected Terminal Server
Select “Action” + ”Activate Server” from the menu bar.
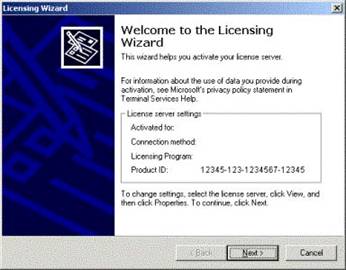
Figure 3 Licensing Wizard
The Licensing Wizard will launch. Follow the steps of the wizard. Note: The ID numbers shown on screens have been changed to “1234”. Please use the appropriate numbers that apply to your server and licenses.
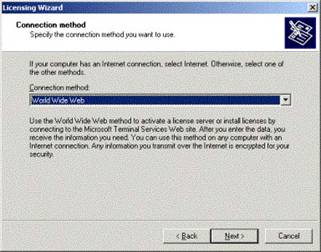
Figure 4 Connection Method There are several methods for connecting to the Microsoft License Clearinghouse. Internet Allows activation through a direct connection to Microsoft. The Licensing Server must have Internet access. World Wide Web Allows activation at Microsoft’s web site through a web browser. Fax Allows activation through faxes to Microsoft. Telephone Allows activation through the telephone.
Select the desired method from the drop-down box and select Next. Note: This article will detail the World Wide Web method.
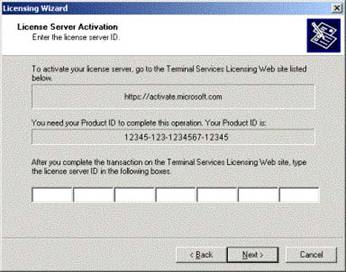
Figure 5 License Server Activation The server needs a License Server ID for authorization. This is done on the Microsoft web site.
Go to the https://activate.microsoft.com site mentioned in the dialog box.
Figure 6 Microsoft Terminal Services Licensing Web Site
Select Activate a license server and select “Next”.
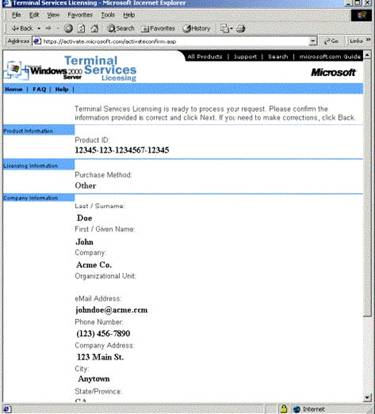
Figure 8 Customer Information Continue with web-based wizard. Verify the data and select “Next”.
8.2.3 Microsoft TS CAL License Authorization To continue adding license packs, return to the https://activate.microsoft.com web site.
Select the “Install client license key packs” and select “Next”.
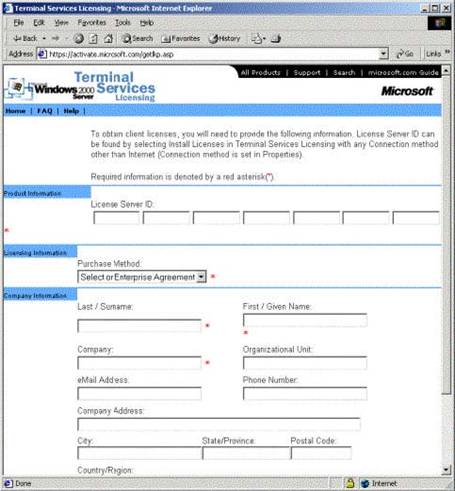
Fill out the form and select “Next”.
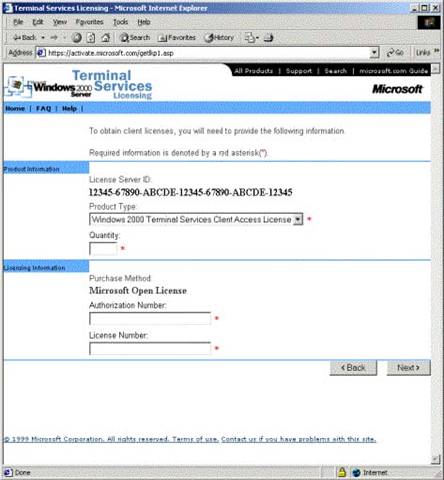
Select the Product Type and fill in the fields with the Quantity, Authorization Number, and License Number from the Licensing Certificate that was included with the purchase of the licenses. Select “Next” to continue.
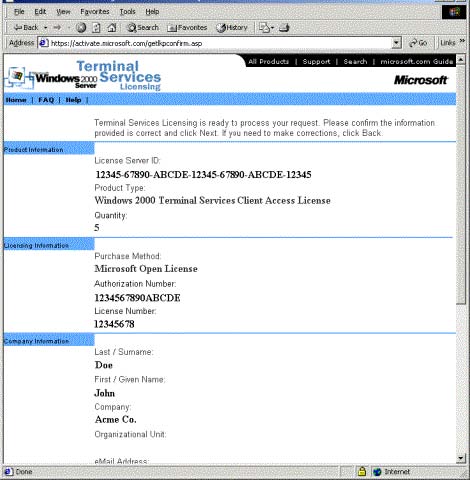
Verify that the information is correct and select “Next” to continue.
The Microsoft site will provide the License Key Pack ID. This needs to be installed in the Licensing Wizard.
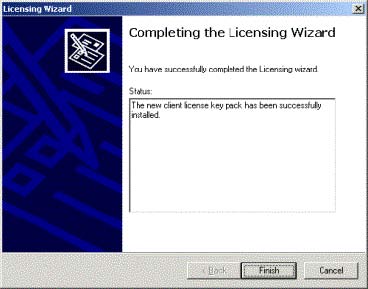
Fill in the fields of the Licensing Wizard with the License Key Pack ID from the Microsoft site and select “Next”.
The licenses will be added and will be displayed in the Terminal Services Licensing window.
For further information on Citect products and services, visit http://www.citect.com/
Disclaimer of All
Warranties Disclaimer of
Liability
|
|||||||||||||||
|
|
|||||||||||||||


 ACP
is a partner of Citect and CitectSCADA works well with ACP thin
clients without modification.
ACP
is a partner of Citect and CitectSCADA works well with ACP thin
clients without modification.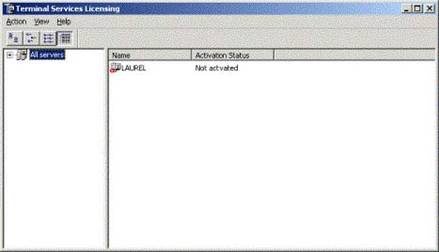


Related Links
Attachments