CitectSCADA WebClient
QuickStart Guide
V7.0
Table of Contents:
2.1 Internet Information Services (IIS) - 3 -
2.2 CitectSCADA Web Server - 4 -
3. User Account Setup. - 5 -
3.1 Create User Groups. - 5 -
3.2 Create users. - 6 -
3.3 Set up security of the web server - 8 -
3.4 Set up security for web deployment - 11 -
4. Prepare Scada Project for Deployment - 12 -
Client Side Configuration. - 14 -
5. Create Scada Project Deployment - 14 -
6. Connecting. - 16 -
7. Licensing. - 17 -
8. Checklist - 18 -
9. FAQ.. - 19 -
Troubleshooting. - 21 -
10. Internet Explorer and WinXP Security. - 21 -
11. IIS. - 22 -
11.1 IIS v6.0 issues. - 22 -
11.2 Security. - 24 -
11.3 ASP.NET. - 25 -
11.4 CAB File Download and Installation. - 26 -
Knowledge base articles: - 27 -
User manuals: - 27 -
Introduction
1. Architecture
The CitectSCADA Web Client allows the remote viewing and control of a live running CitectSCADA project through internet explorer. The three components required are:
· Web server (CitectSCADA web server + Microsoft IIS)
· Run time servers (IO and RAT servers)
· Web client (Internet Explorer)
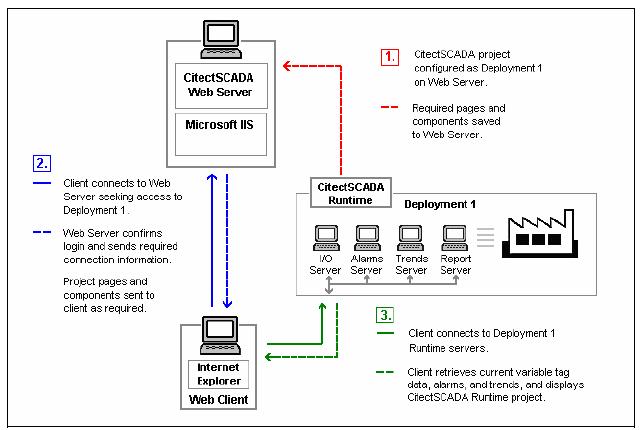
Figure 1: CitectSCADA Communication Architecture
As we can see from the diagram, the WebServer acts as a Fileserver for project files, however the actual data is still received directly from the SCADA Servers, as per a normal Display Client.
In the following example, the WebServer and SCADA Servers are on the same PC, but this does not always have to be the case.
Hence, in this example only two PCs will be required:
· Server
o Hosts the WebServer
o Hosts SCADA Runtime Servers
· Client
o A ‘Display Client’ viewed via Internet Explorer
§ Retrieves Project files from WebServer
§ Receives Comms from SCADA Runtime Servers
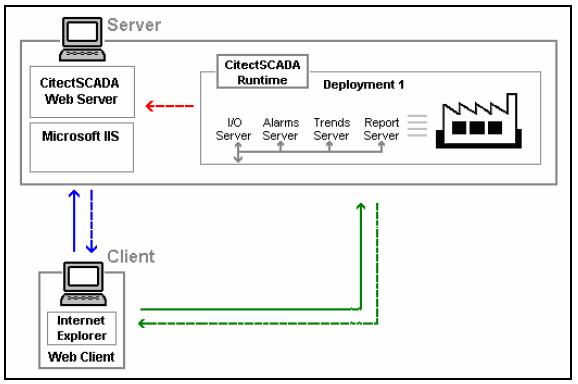
Figure 2: Communication structure of example web client project
Server Side Configuration
The main benefit of Citect SCADA WebClient is that the majority of the configuration is ‘Server-Side’.
In most cases the Client PC does not require any configuration, as Internet Explorer will download the required program files when the WebClient is first run.
However, in some corporate environments, some security settings are required to be modified on the client. All ‘Client-Side’ settings are covered in a later section.
This section deals with the ‘Server-Side’ configuration.
2. Software Requirements
2.1 Internet Information Services (IIS)
The Windows IIS World Wide Web service needs to be installed. Select:
· Control Panel >> Add Remove Programs
· Add/Remove Windows Components button on the left of the window.
· Select the “Internet Information Services (IIS)” item and then select the Details button.
· Select the “World Wide Service” checkbox if not already.
o Doing so will automatically activate the “Common Files” and “Internet Information Services Snap-in” checkboxes.
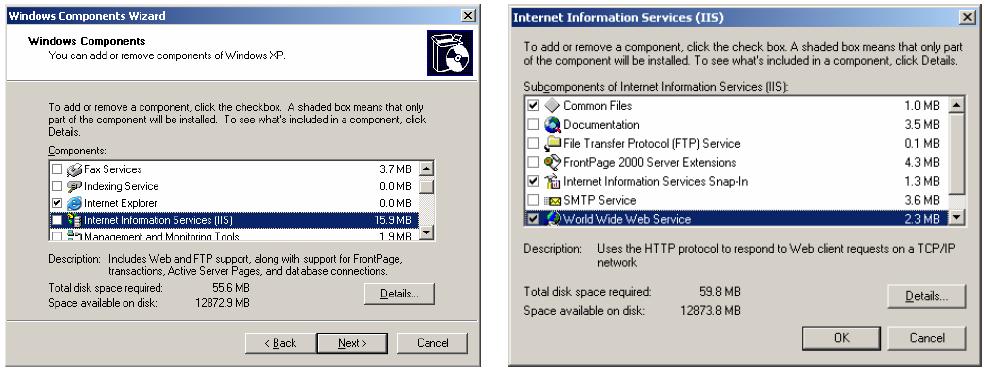
· Select the Ok button
· Follow the prompts to install IIS, if not installed already.
· After installation is complete, open the following newly created shortcut:
Control Panel >> Administrative Tools >> Internet Information Services
2.2 CitectSCADA Web Server
During the CitectSCADA Web Server installation, the default destination folder is:
C:\Program Files\Citect\CitectSCADA\WebServer
This is the main folder used in the subsequent configuration steps.
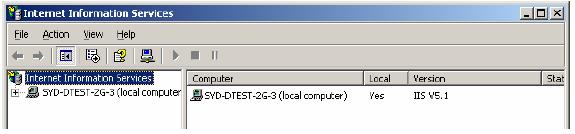
After installing the Web Server a virtual directory called Citect is added to the default web sites of IIS. Open up the IIS Management Console, as detailed in the previous section, to confirm the Citect item under the list of default web sites.
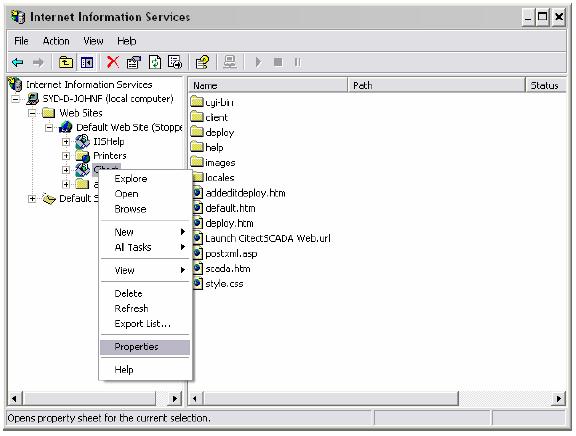
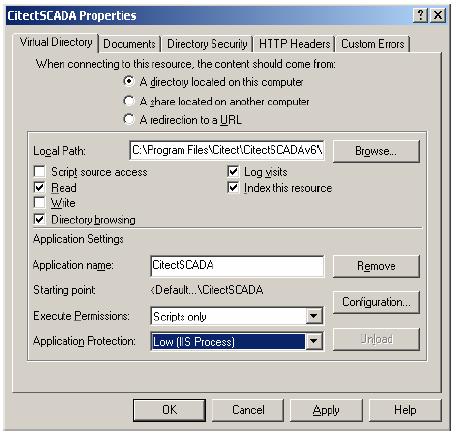
Right select the Citect virtual directory and select Properties. The settings as shown below should be set. The settings circled below are particularly important.

3. User Account Setup
3.1 Create User Groups
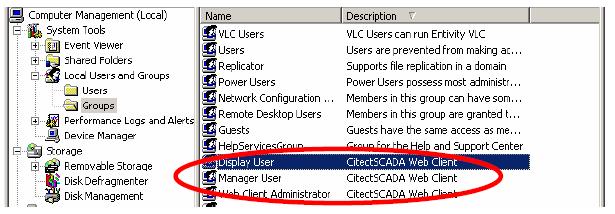
Security on the CitectSCADA web server is handled by Windows. Three Windows User Groups must be created on the Server PC:
1. Web Client Administrator – user is permitted to remotely view, add, update and delete deployments
2. Display User – user can view project pages and make adjustments to writable values
3. Manager User – user can only view the project pages
To define access privileges on the Server PC:
· Log in to Windows with Local Administrator privileges.
· Go to Control Panel >> Administrative Tools >> Computer Management Tool
· Find “Local Users and Groups” in the directory tree.
· Right select the “Groups” folder and select New Group.
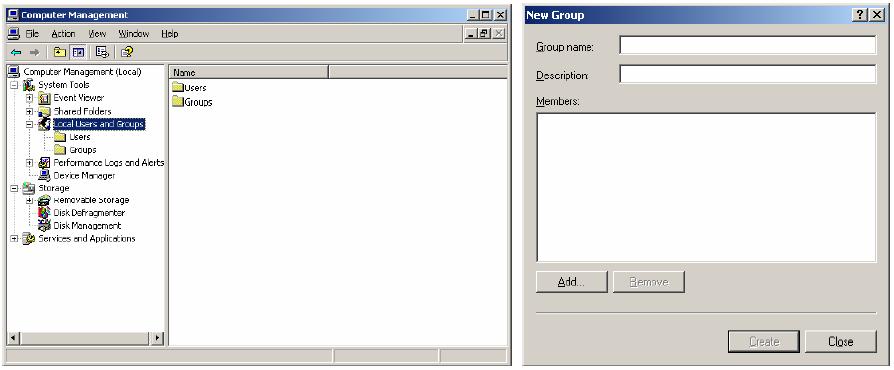
· Right select the “Groups” folder and select New Group.
· To create the ‘Administrator’ Group:
o In the Group Name type “Web Client Administrator” and in the
o Description type “CitectSCADA Web Client”.
o Select the Create button.
· To create the ‘Display User’ Group:
o In the Group Name type “Display User” and in the
o Description type CitectSCADA Web Client”.
o Select the Create button.
· To create the ‘Manager User’ Group:
o In the Group Name type “Manager User” and in the
o Description type “CitectSCADA Web Client”.
o Select the Create button.
· Select the Close button.
You will now see these three groups in the list of groups presented in the Computer Management console.
3.2 Create users
- Create example user of each category in the Computer Management console
Control Panel >> Administrative Tools >> Computer Management
-
Find the Local Users and Groups tree sub-item.
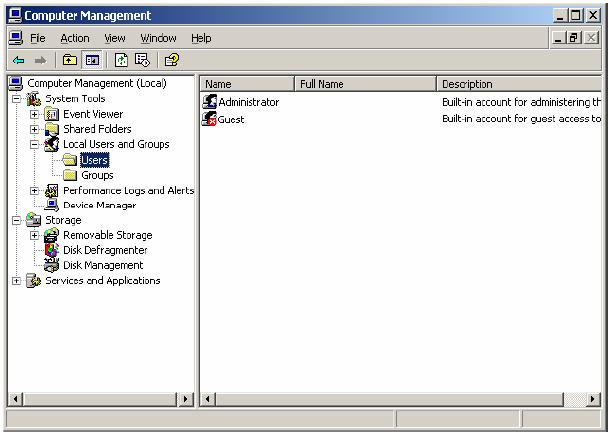
· Right-select the Users folder and select New User.
· Enter each of the following three accounts and press Create for each:
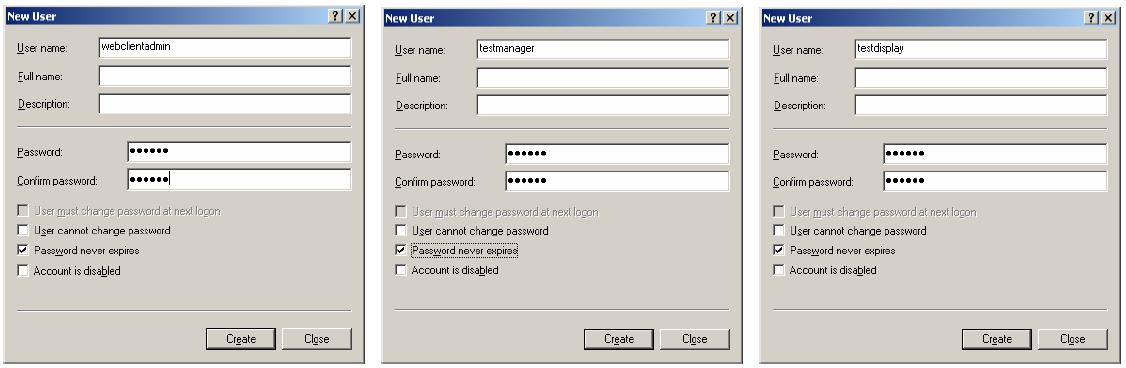
· Set the password for all three accounts to be something easy to remember, for e.g. Citect.
· When done press Close.
· For each user right select and select Properties.
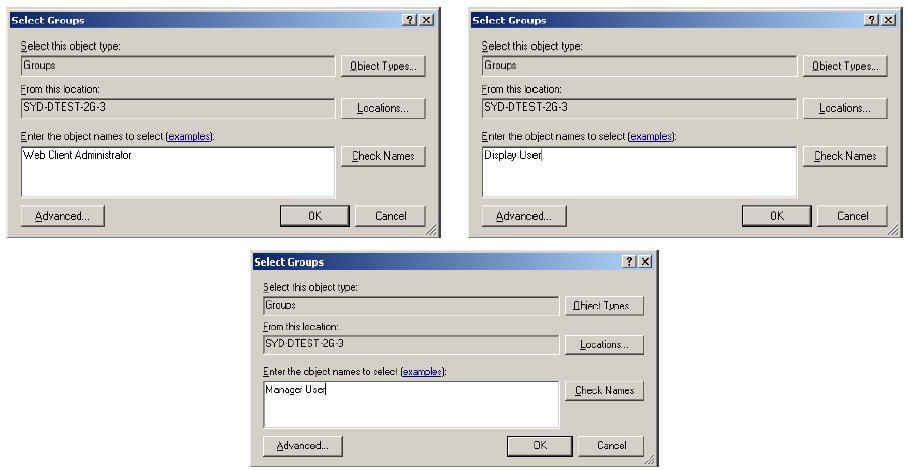
· Select the Member Of tab and press Add.
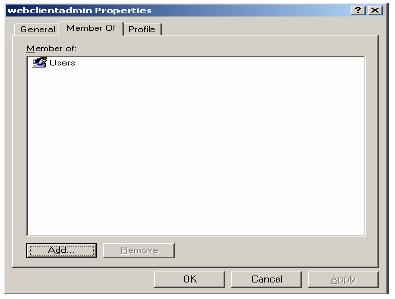
· Make sure the From this location field displays the workstation name.
· Enter the group for each user in the bottom field and press Ok.
- Once done for each, the group will be in the Member of list for the specific use.
3.3 Set up security of the web server
· You need to adjust the security settings for the Web Server folder defined in Section 2.2.
· Locate and right-select the Web Server folder, located in the installation directory.
- By default this will be C:\Program Files\Citect\CitectSCADA\WebServer.
· Select Properties.
· From the Properties dialog select the Security tab.

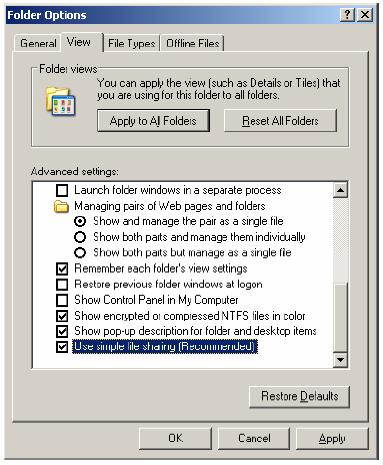
- If you do not see the Security tab, make sure you are logged into Windows with a user that has Administrator privileges. If you are and still cannot see the Security tab, you will need to turn off Simple File Sharing. This option is only available in Windows XP. In Windows Explorer select the Tools >> Folder Options… menu item, then on the View Tab there is a checkbox within the Advanced Settings. The following screenshot shows this.
- Go back to the Security tab in the Webserver folder properties window. Select the Add button and the following dialog appears:
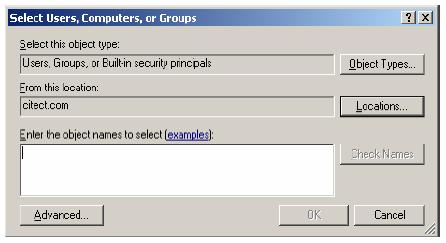
- Note: The Select Users or Groups dialog appears differently in Windows 2000 to the Windows XP version pictured above. In Windows 2000, you can simply select a user or group from the list of those available and select Add.
- Locate the user groups you created on the local machine. If your computer is on a network domain the “From this location” field will contain this. You need to change the location to be the local machine. Select the Locations button.
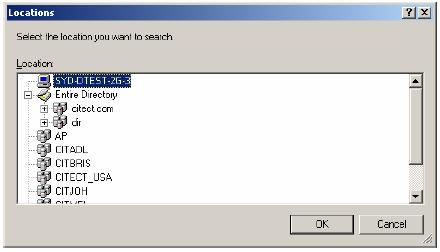
- Select the item containing your workstation name (it will have a PC icon next to it) and press Ok.
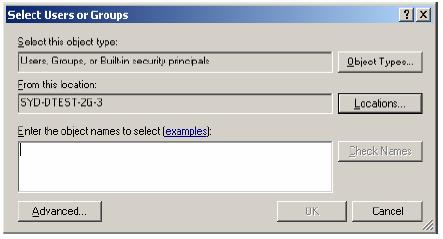
- In the “Enter the object names to select” field enter Web Client Administrator and press Ok. The Web Client Administrator group will be added to the group list in the Web Server >> Security properties window.
- Repeat this for both Display User and Manager User.
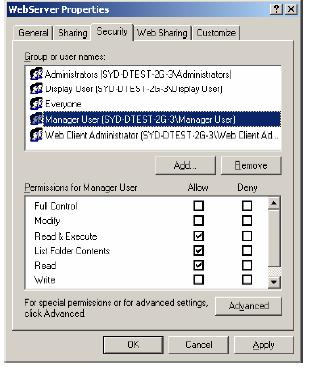
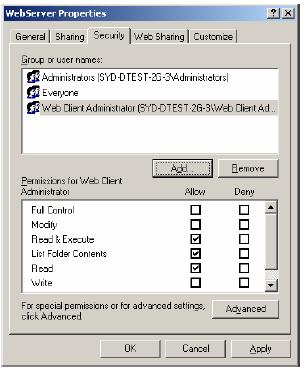
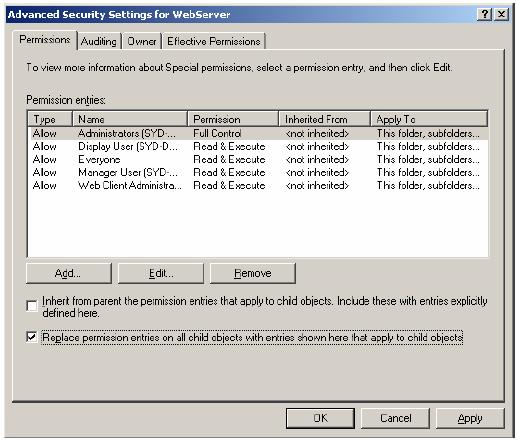
- Confirm the security settings for the three newly created groups. Each should have the same read access as the Everyone group, which is allow Read & Execute, List Folder Contents, and Read permissions. Press the Advanced button and select Replace permission entries on all child objects…, [Note: Windows 2000 will have the option Reset permissions on all child objects and enable propagation…].
- Once selected, press Ok. A security dialog will appear, press Yes.

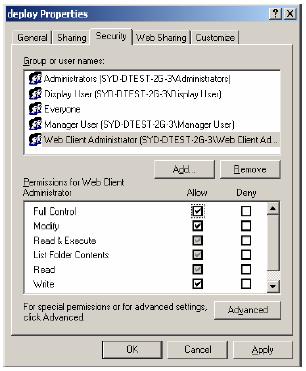
3.4 Set up security for web deployment
- We need to set up user group specific access rights. Locate the Deploy subdirectory in the Web Server folder and set Allow Full Control for the Web Client Administrator.
- Locate the deploy\#displayClient subdirectory and set Deny Full Control for the Manager User
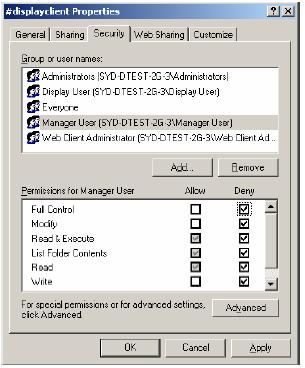
- A security prompt will appear, press Yes.

4. Prepare Scada Project for Deployment
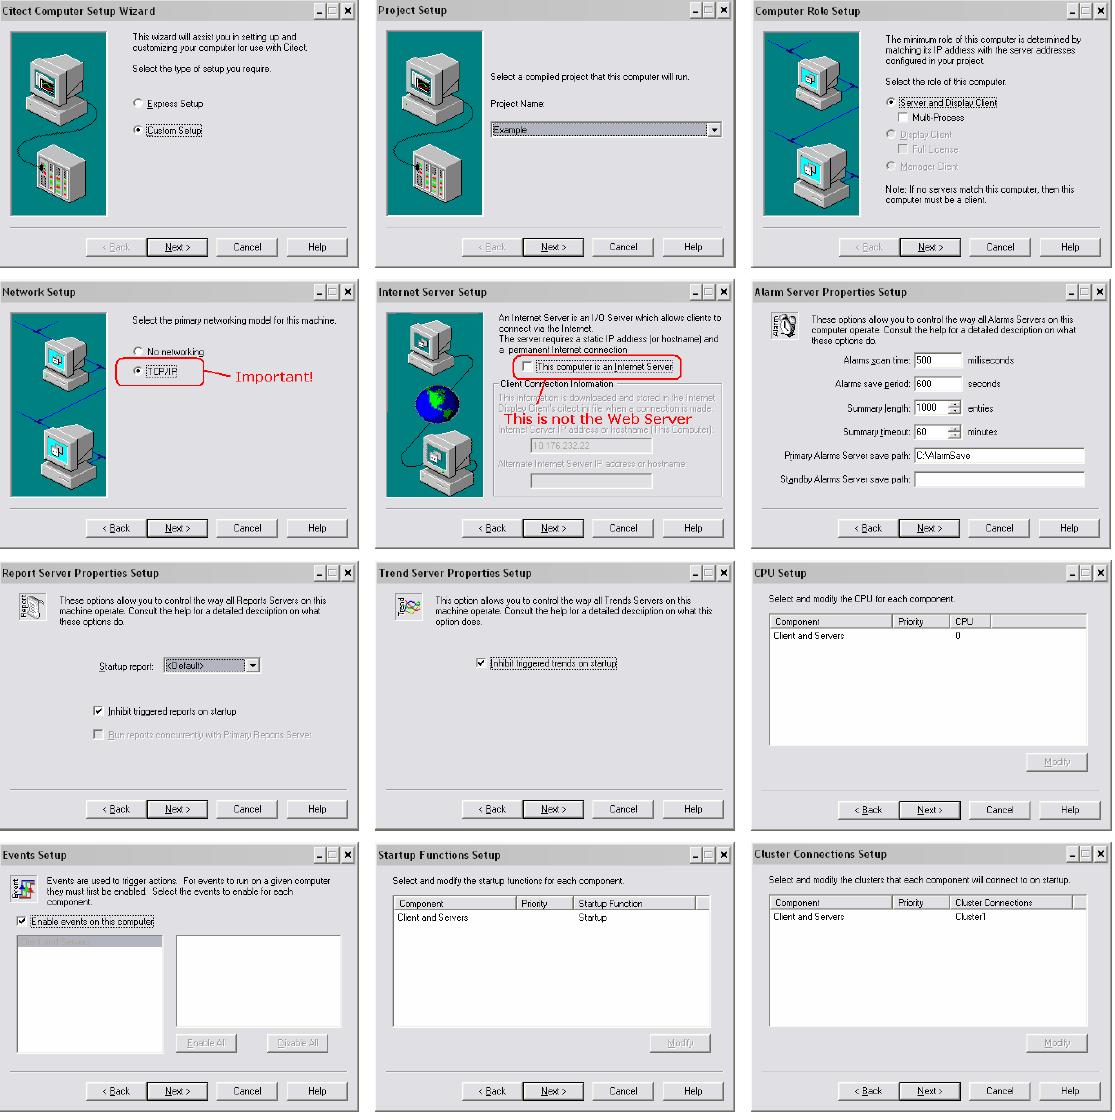
We will be using the Example project in CitectSCADA 7.0 for demonstration of the web client. Make it the active project in Citect Explorer and then Compile the project (File >> Compile in the Project Editor). Then, from either the Project Editor or Citect Explorer, run Tools >> Computer Setup Wizard.
- Use the following settings:

- If the content of the project incorporates any user created files, such as DBF, HTML or CSV files, you will need to manually place these into a special zip file called Misc.zip and store inside the Citect\User\<Project Name> directory.
- Similarly, if a project contains any ActiveX objects, these will also need to be included in a zip file called ActiveX.zip. The example project comes with this already done.
- The example project already comes compiled with CitectSCADA v6, so there is no need to compile the project unless you have made changes to it. Otherwise, if you are using a different project a fresh compile is required before the next step.
Next run Tools >> Web Deployment Preparation [or the button] in Citect Explorer.
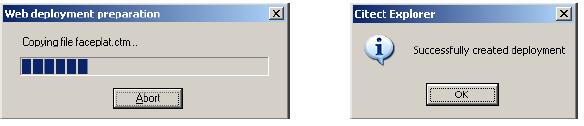
- A progress bar and completion message will appear, as shown above.
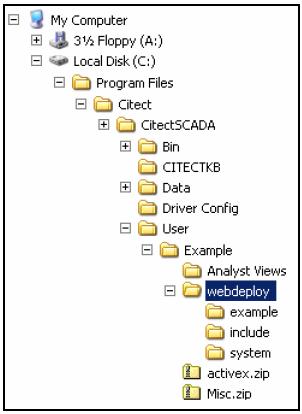
- Confirm that a webdeploy folder exists in the Example project folder of CitectSCADA\User.
- Once this is complete, run
the example project in Citect.
Internet Explorer 6.0 or later is required to use the Web Client.
5. Create Scada Project Deployment
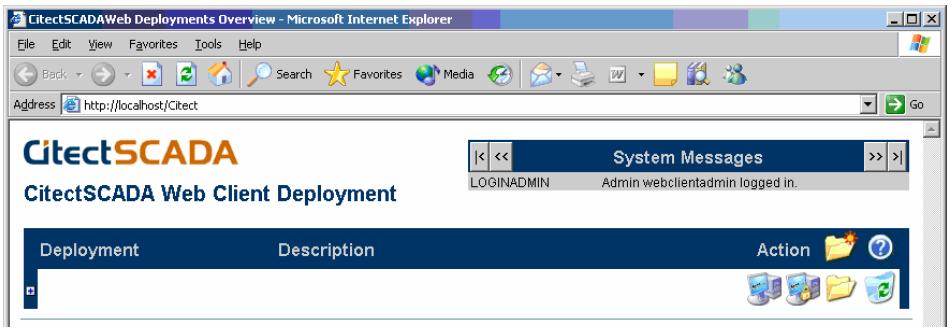
· Open up Internet Explorer and enter this url: http://<server>/Citect.
· <server> is either the: server PC name, server PC IP address, or localhost if the web client is running on the server PC.
· A login screen will appear, for each user created, enter the login details. The screen that is supposed to appear is shown below.
Username: webclientadmin Password: citect
Username: testdisplay Password: citect
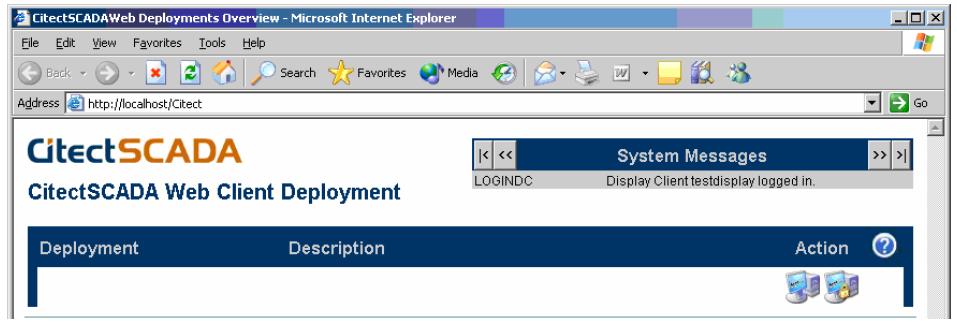
Username: testmanager Password: citect
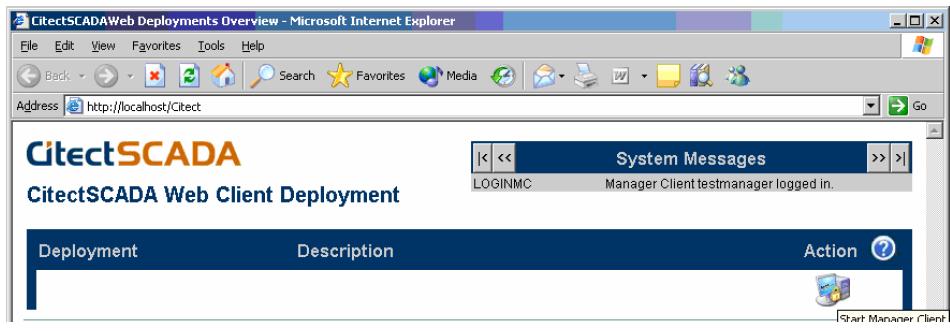
If you do not get these windows for each user, the setting up of user access rights from Section 3.3 has not been done correctly.
To create the project deployment, login as the webclientadmin user. Then select the Add New Deployment icon
 .
.
In the Deployment field enter the name to identify the deployment, in this case “TestExample”. Enter the project path of the Example project on the CitectSCADA server PC, and select the Client control from the list [there should be one available].
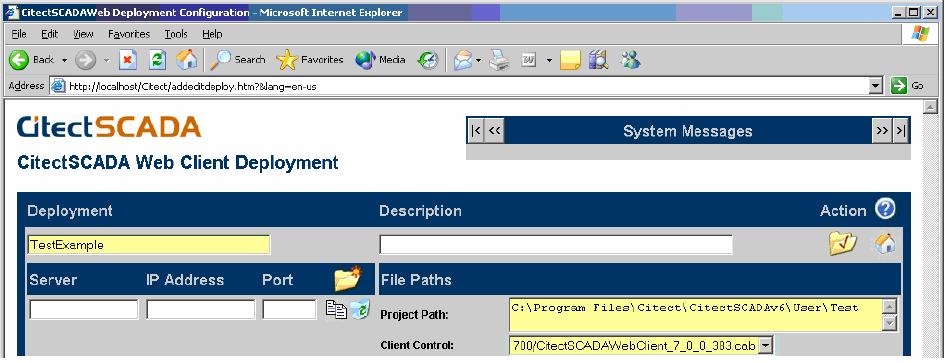
Select the Apply Changes button
 . A progress bar will be displayed as the project
deployment files are copied from the User\Example\webdeploy folder
to the WebServer\deploy\Test Example.
. A progress bar will be displayed as the project
deployment files are copied from the User\Example\webdeploy folder
to the WebServer\deploy\Test Example.

Note: When a project is deployed the project path and client control settings are first taken from the citect.ini file. If they cannot be found they are taken from the settings entered at this stage.
Select the Go to Deployment List button
 .
.
Before pressing the Start Display Client or Start Manager Client,
 .
.
If it is the first time you start the client, the required software is automatically downloaded and will prompt the user to install. When the windows security dialog appears click on Yes.
6. Connecting
You can display the list of connected clients on the Citect server at any time. Type “page table tran” in the main window of the kernel. The following window will appear:
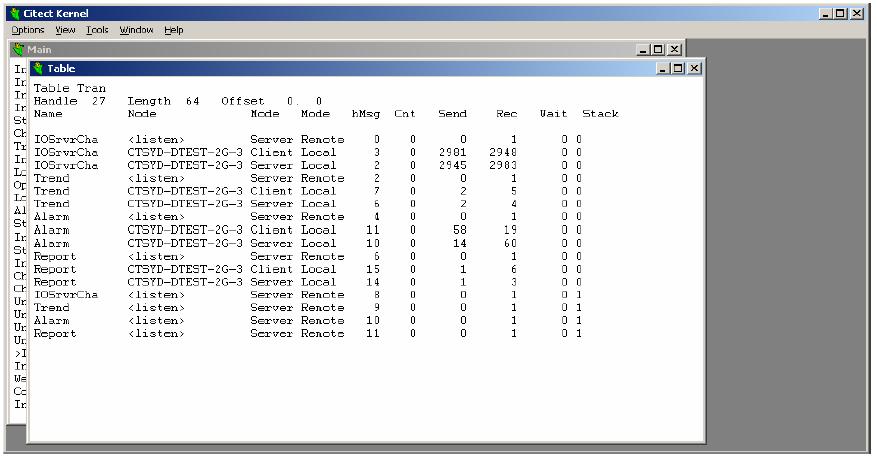
The following is a screenshot of the kernel table window after a web client located on another machine connects to this server.

7. Licensing
The Internet Display Client (IDC) license is used for the Web Client. You can see how many IDC licenses you have available on your dongle and how many of them are currently being used. Open the General window in the kernel:
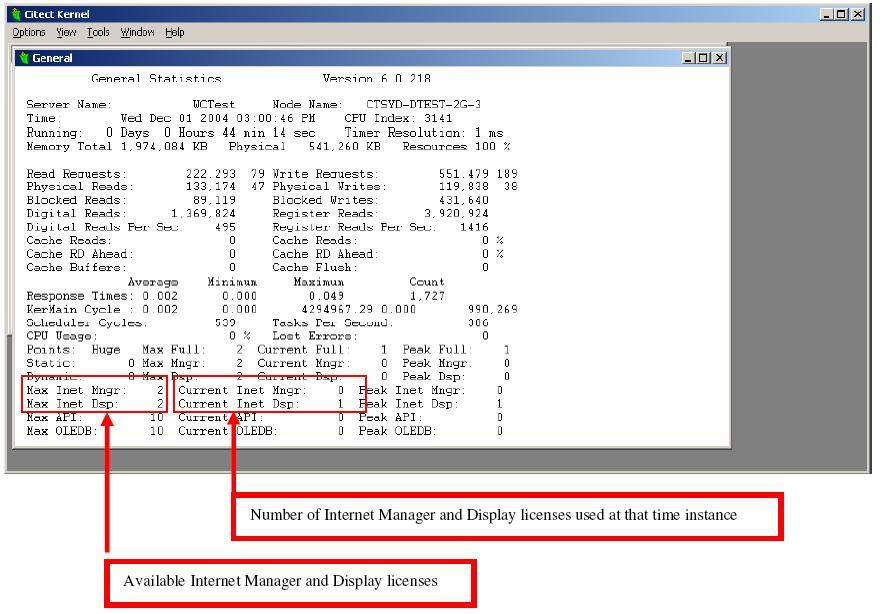
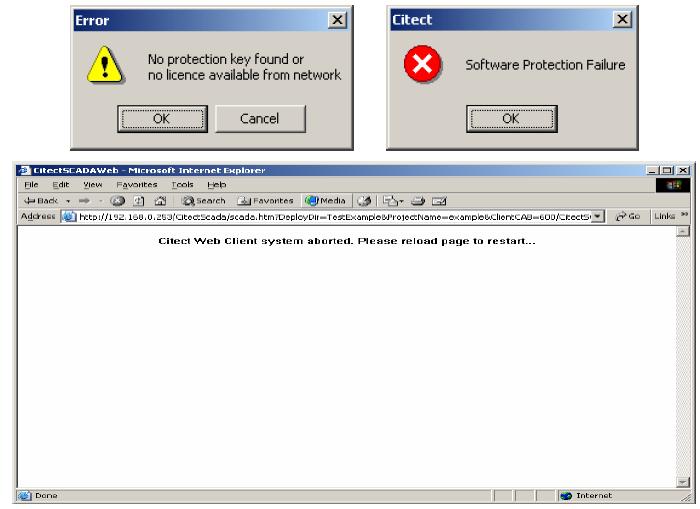
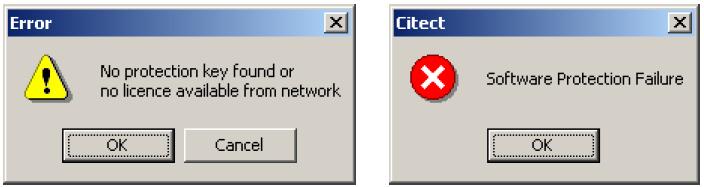
When a web client tries to connect to a server that does not have any IDC licenses left the following prompt windows will appear.
8. Checklist
 IIS installed and running
Citect virtual directory
created CitectSCADA configured as
networked (TCP/IP) in the Computer Setup Wizard Web/Internet Display Client
or Web/Internet Manager Client licenses available on
server Web deployment after
citect.ini has been modified Windows security on folder
\WebServer and \WebServer\deploy\#displayclient CitectSCADA server is running
and must be the IO server Firewall / Port
Settings
IIS installed and running
Citect virtual directory
created CitectSCADA configured as
networked (TCP/IP) in the Computer Setup Wizard Web/Internet Display Client
or Web/Internet Manager Client licenses available on
server Web deployment after
citect.ini has been modified Windows security on folder
\WebServer and \WebServer\deploy\#displayclient CitectSCADA server is running
and must be the IO server Firewall / Port
Settings
9. FAQ
- How do I set up my network so that both LAN and WAN PC’s can access my CitectSCADA and CitectWeb Servers?
Please refer to the Document “Running both LAN and WAN Citect Web Clients”.
- Where are the downloaded project files located on the Web Client?
The project files are downloaded to the location specified by the following Windows Environment Variable:
%TMP%\ Citect\<Project Name>
By default, on XP, %TMP% is equal to:
Document and Local Settings \ <Current user logon> \ Local Settings \ Temp
So by default, the project files are saved to:
Document and Local Settings \ <Current user logon> \ Local Settings \ Temp \ Citect \ <Project Name>
To get a fresh copy from the server simply delete this folder including its subfolders and contents. When you restart the web client, it will automatically re-download the project.
- Can I connect through web client to a Citect server running in demo mode?
No, on the web client side the project pages can be viewed but the tag values will display #COMS. You will also get the following prompts, and IE will be unresponsive for several minutes, as the WebClient quits:
If you deploy whilst in demo mode this copies a copy of citect.ini file to the deployment folder on the server with the network settings disabled. If you then obtain a license dongle, you will need to re-run Citect Explorer computer setup and redeploy on the server PC.
- What are the software requirements?
Web Server
Web Client
1. Windows 2000 Pro, XP Pro, 2000 Server, or 2003 Server
2. Microsoft Internet Information Services (IIS) (Version 5 or later)
3. Microsoft Internet Explorer (Version 6.0 or later)
4. NTFS file system
1. Windows 2000 Pro, XP Pro, 2000 Server, 2003 Server or NT 4 (Service Pack
2. Microsoft Internet Explorer (Version 6.0 or later)
Note: The target drive for the Web Server software must use an NTFS file system, otherwise you won’t have full access to the required Windows security settings - Folder Properties dialog will not have a Security tab. If you are currently using FAT32 system, ensure you convert the drive to NTFS before installation of the Web software.
The following trouble shooting issues are taken from the FAQ section (page 33 and onwards) of the Web Client user manual. This document contains only a subset of this but also include screenshots.
10. Internet Explorer and WinXP Security
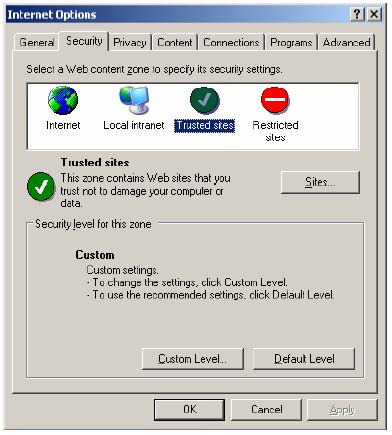
If the security settings are high within Internet Explorer on the client side PC you will need to add http://<webserver>/CitectSCADA as a trusted web site. Open Internet Explorer then select the Tools >> Internet Options menu item. Select the Security tab.
-
Click on the button.
 Click on the Sites… button.
o Enter the http://<webserver>/CitectSCADA address
o Deselect the “Require server verification” checkbox.
o Select the Add button.
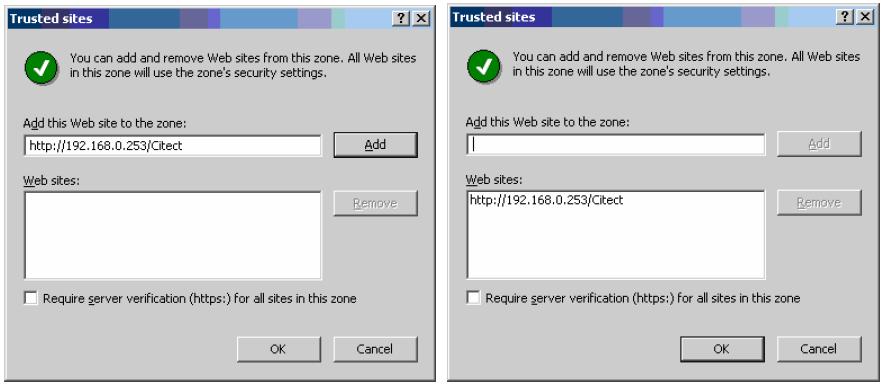
· Press Ok button.
Knowledgebase article Q3943 discusses the implication of Windows XP service pack 2 in terms of network security. Of particular importance are the firewall settings.
11. IIS
11.1 IIS v6.0 issues
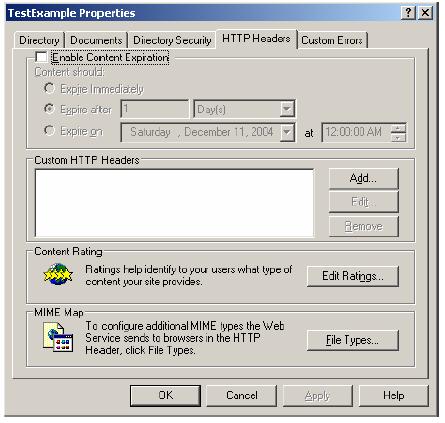
The following note applies if you are running IIS v6.x (included with Windows 2003 Server). If you start the Web Client and get the message “Starting Citect Web Client failed: Can not initialise Citect system”, and then the Web Client fails it is due to a MIME configuration problem. The initialisation files are not being recognised in Windows 2003 as registered file extensions. To correct this, you must add the correct MIME extension by doing the following:
- Run the IIS manager (Control Panel >> Administrative Tools >> Internet Information Services)
- Go to Web Sites | Default Web Site | CitectSCADA | deploy | <deployed directory>
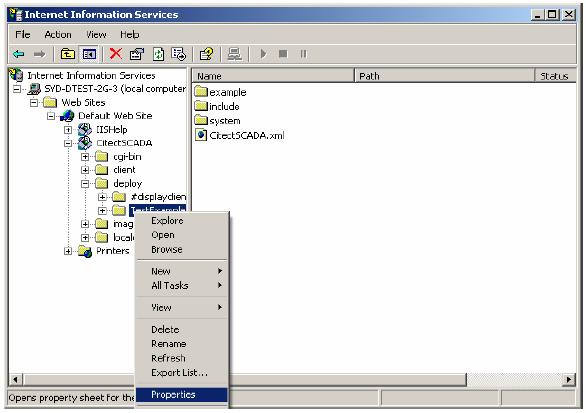
- Choose properties from the folder’s right-click menu
- Go to HTTP Headers | Mime Map and press the File Types button
- On the File Types form press the New Type button.
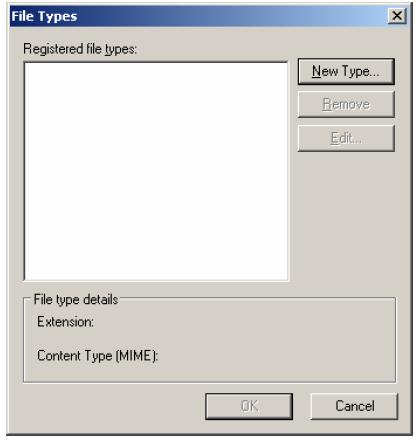
- Add the MIME type (File extension) .* and enter the Content type (MIME) as application/octect-stream.

-
Select Ok
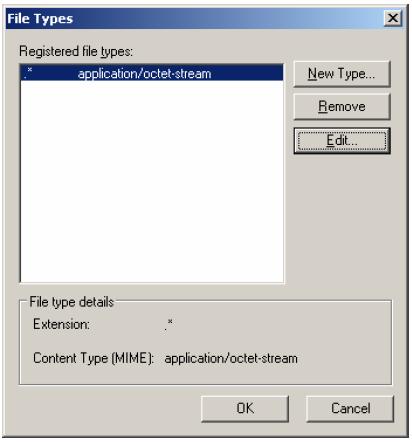
- Select Ok and restart your web server and client.
11.2 Security
Enter http://<server address>/CitectSCADA into the url of an Internet Explorer Screen. If you get “Page error 404 or 405” the application protection settings of IIS need to be changed. Open the IIS management console:
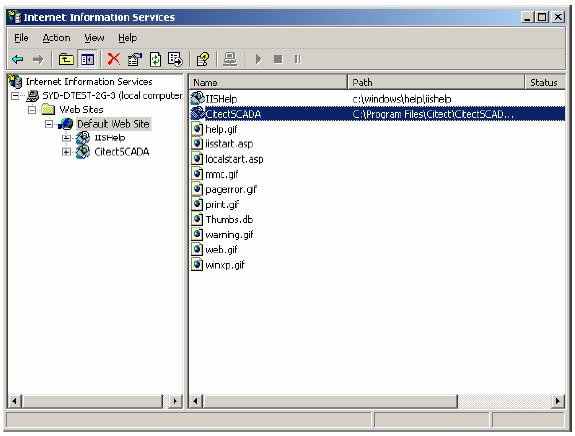
Right select the CitectSCADA virtual directory and select Properties. In the CitectSCADA virtual directory properties in screen below set the Application Protection to Low (IIS Process).
11.3 ASP.NET
The following is a Windows 2003 Server related issue. The Web Client deployment page may display incorrectly and the icons for Start Display Client, Delete Deployment and Edit Deployment are also missing. There are two problems that could be occurring here:
- On Windows 2003 Server, the
default setting is to have all web locations except localhost as an
untrusted site.
- Update the Trusted Sites settings as detailed in Chapter 9
- Enable ASP for IIS6 on
Windows 2003 Server. Follow these steps:
- Choose Control Panel >> Add Remove Programs >> Components
- In the Windows Components Wizard dialog box, select Application Server and select Details.
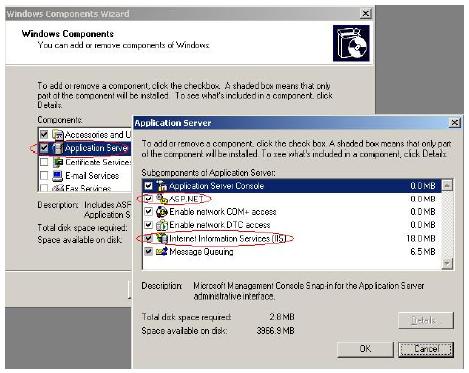
· Make sure that ASP.NET is selected.
· Also, open Control Panel >> Administrator Services >> Internet Information Services (IIS) Manager
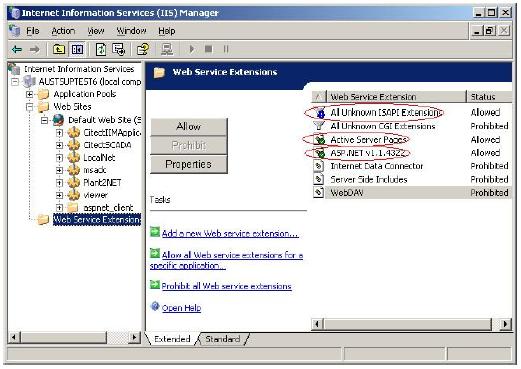
· On the local machine traverse to Web Sites | Web Service Extensions and make sure that All Unknown ISAPI Extensions, Active Server Pages and ASP.NET v1.1.4322 items have the status of Allowed.
11.4 CAB File Download and Installation
After configuring the Citect web server as per Web Client quick start guide, during project deployment, errors are experienced downloading cab file. The address of the webserver as a trust site however the problem still persists. The Server and Clients both use Internet explorer 6 and all Internet Explorer security levels have been set to the lowest level. Windows firewall is also disabled. What can be the problem?
Solution:
Usually when this occurs, Citect is looking for Microsoft Installer that has been corrupted due to previous Windows update. In order to remedy this problem you can get the latest update from Microsoft.
The problem of corrupted Microsoft Installer can be verified further by using CitectSCADA ver6.1. In CitectSCADA v6.1, you can install this CAB file manually to the client machine by double clicking the CAB file. If when installing the CAB file, Windows Installer error 1723 appears, you would then need to install the latest Microsoft Installer (iiscript.msi).
This installer can be downloaded from the Microsoft website or can be obtained from your IT staff.
12. References
Knowledge base articles:
Q3943 Implications for Citect and Microsoft Windows XP Service Pack 2
Q3010 Setting up a combined FTP Server/Proxi Server for a WAN
Q2751 What TCP/IP ports are used for the IDC client?
Q3742 Citect Internet Display Clients over a Firewall
Q3912 How can I use a Proxy I/O server in CitectHMI/SCADA?
User manuals:
CitectSCADA Web Client User Guide
CitectSCADA User Guide
Related Links