In this example, we will setup a DDE Share for WebAccess (the DDE Server), to use with the NetDDE connection in an EXCEL spreadsheet (the NetDDE Client) on a remote computer in the next section. This example works for Windows 2000 and Windows XP Professional.
On the WebAccess SCADA Node, setup the DDE Share:
1. Run the DDE Share program.
Start -> Run
Type DDESHARE in the text box.
Clicking OK ,the operating system will start the NetDDE Service.

2. From the DDE Share menu, select
Shares -> DDE Shares…
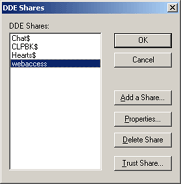
The DDE Shares sheet appears.

3. Click the Add a Share… button.
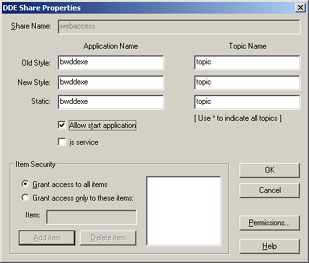
The Share Properties sheet opens.

Figure 14.2 - Net DDE Share for WebAccess bwddexe
4.
Enter the Share name.
In this example, type webaccess .
5.
Enter the Application Name.
For WebAccess, use the same entry for all three styles (Old, New
and Static): bwddexe .
Old Style: bwddexe
New Style: bwddexe
Static: bwddexe
6.
Enter the topic.
For WebAccess, use the same entry for all three styles (Old, New
and Static): topic.
Old Style: topic
New Style: topic
Static: topic
7. Allow start Application check box is checked. (Starting bwddexe alone will not work. The WebAccess kernel must be running. The kernel will start automatically if you set it up in Project Manager. Bwddexe will not start the SCADA Node (kernel).
8. The is service check box is unchecked.
9. In the Item Security section, select the grant access to all items radio button.
10. Select the Permissions… button. The DDE Share Name Permissions sheet appears.
11. Highlight Everyone in the Name box. (Or select those users that will connect as clients).
12. Select the Type of Access pull-down menu .
13. Select Full Control.
14. Click OK to return to the DDE Share Properties sheet.
15. Click OK again to get back to the main DDE Shares list where you should now see webaccess share listed.

16. Highlight the webaccess share by single-clicking on it.
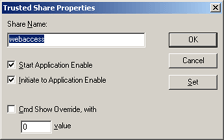
17. Select the Trust Share… button to bring up the Trusted Shares Properties sheet.

18. Select the Start Application Enable and Initiate to Application Enable check boxes.
19. Click Set.
20. Click OK.
21. Start or Restart WebAccess SCADA Node Kernel.
Note – it is sometimes necessary to restart the Windows 2000 or XP operating system
22. At this time you
should be able to access the WebAccess Tag data from across
the network using NetDDE using the following syntax:
’\\COMPUTERNAME\NDDE$’|webaccess!tagname
The computer name must be the Net BIOS name (i.e. the Microsoft computer name).