If you have not already done so, connect to the Project Node and Start WebAccess Configuration.

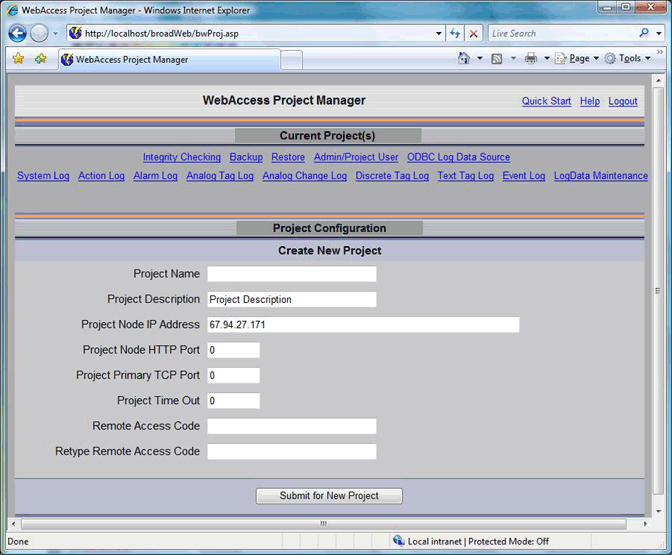
Figure 2-27 - WebAccess Project List empty - newly installed system (bwproj.asp)
1. Enter a Project Name for this project, in the Create New Project section in the WebAccess Project(s) List (Figure 2-27). This name can be any alphanumeric (but NO UNDERSCORES). This name will identify the project in the Project Manger. It also will appear on the caption bar in VIEW. Projects are typically named after the customer or facility.
Note - If you are using a standalone system, the Project Name with the SCADA node name appended to it will appear in ViewDAQ and DrawDAQ menu lists (ProjectName_NodeName)
2. Optionally, enter a Project Description to help identify your project. This will appear only in the Project Manager.
3. The Project Node IP Address should already appear by default. You can also use a URL or Computer Name.
4. If connecting through a Firewall, enter the Primary Port Number of a TCP port assigned by your system administrator.
If not using a Firewall, accept the default: 0. Note that 0 means the default primary port number (4592)
5. It is recommended to accept the default Project Time Out. 0 means the default value is used (15 seconds). Project Time out can range from 1 to 60 seconds. This is the time for normal communications between the Project Node and a SCADA node or the Project Node and the ASP Server.
6. The Access Code should appear by default. This is the Remote Access Code specified during the installation of the WebAccess Project Node Software. This Remote Access Code is to prevent unauthorized use of your project node.
7. Press Submit for New Project.