The OPC UA Client task/worksheet is to communicate with any system that implements the OPC UA Server protocol.
About OPC UA
The existing OPC COM based specifications have served the OPC Community well over the past 10 years, but as technology moves on so must our interoperability standards. Here are the factors that influenced the decision to create a new architecture:
- Microsoft has deemphasized COM in favor of cross-platform capable Web Services and SOA (Service Oriented Architecture)
- OPC Vendors want a single set of services to expose the OPC data models (DA, A&E, HDA ...)
- OPC Vendors want to implement OPC on non-Microsoft systems, including embedded devices
- Other collaborating organizations need a reliable, efficient way to move higher level structured data
In other words, OPC UA is intended to be a platform- and language-independent protocol that is also backwards-compatible with OPC "Classic" systems. For more information, go to http://www.opcfoundation.org/UA/.
Configuring a new OPC UA server connection
- Do one of the following:
- On the Insert tab of the ribbon, in the Communication group, click OPC Client and then select OPC UA Connection from the drop-down list; or
- In the Comm tab of the Project Explorer, right-click OPC UA Connections and then click Insert on the shortcut menu.
The UA Server Configuration dialog is displayed:Figure 1. UA Server Configuration dialog
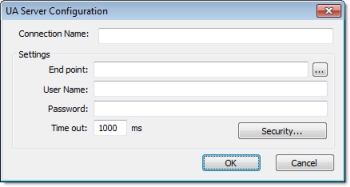
- In the Connection
Name box, type a name for the connection.
This name will be displayed in the OPC UA Connections folder in the Project Explorer, and it is the name you will look for when you configure the OPC UA Client worksheet.
- In the End point
box, type the URL of the OPC UA server to which you want to
connect.
If you don't know the URL, then click the browse button to the right of the box. The UA Discovery dialog is displayed:Figure 2. UA Discovery dialog

Use this dialog to find the discovery server, which publishes a list of OPC UA servers on the network, and then select the server to which you want to connect.
- In the User Name and Password boxes, type your login credentials for the OPC UA server.
- If the OPC UA server is configured to require a
secure connection, then you must take the extra steps of installing
the server certificate in your project and generating a client
certificate to be installed on the server:
- Get the server certificate and then save it in the Config sub-folder of your project folder (e.g., […]\My Documents\InduSoft Web Studio v7.0 Projects\project_name\Config\). The method for getting the server certificate depends on the server, so please consult the server vendor.
- In the UA Server Configuration dialog, click Security. The OPC UA Security dialog is displayed.
- In the Server Certificate list, select the server certificate. (All certificates saved in the Config sub-folder should be listed here.)
- In the Security Policy and Message Security Mode lists, select the appropriate options for how the OPC UA server is configured. Again, please consult the server vendor.
- Click Generate Certificate. The client certificate is generated and saved in the Config sub-folder.
- Click OK to close the OPC UA Security dialog.
- Install the client certificate on the OPC UA server. The method for doing this depends on the server, so again, please consult the server vendor.
For more information, download the white paper "The OPC UA Security Model for Administrators" from the OPC Foundation.
- Click OK. The connection is saved in the OPC UA Connections folder in the Project Explorer.
Configuring a new OPC UA Client worksheet
- Do one of the following:
- On the Insert tab of the ribbon, in the Communication group, click OPC Client and then select OPC UA Client from the drop-down list; or
- In the Comm tab of the Project Explorer, right-click OPC UA and then click Insert on the shortcut menu.
A new OPC UA Client worksheet is displayed:Figure 3. OPC UA Client worksheet
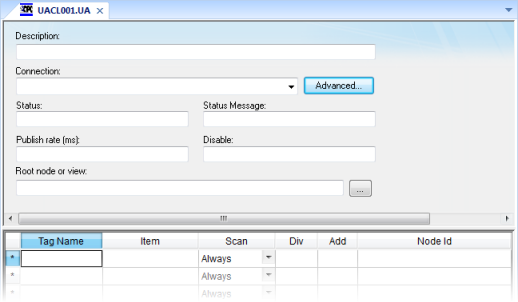
- In the Description box, type a description of the worksheet. This is for documentation purposes only and does not affect the execution of the worksheet.
- In the Connection list, select the OPC Server connection that you configured earlier.
- For more connection options, click Advanced.
The Advanced dialog is displayed:
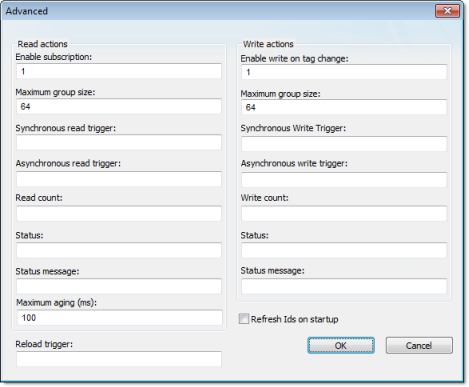
Review the options and configure as needed:Area / Element Description Read actions Enable subscription When this value is TRUE (non-zero), the client will constantly request updates from the server. Note: This is enabled by default. If it is disabled, then you must use read triggers (see below).Maximum group size The maximum number of tag reads that may be performed in a single read operation. For example, if you have 1000 items/rows configured in the worksheet and Maximum group size is set to 100, then 10 read operations will be performed during each scan of the worksheet.
Synchronous read trigger When the value of this tag/expression changes, the worksheet is scanned and all tag values are read from the server. The project waits for the scan to complete before continuing. Asynchronous read trigger When the value of this tag/expression changes, the worksheet is scanned and all tag values are read from the server. The project continues running without waiting for the scan to complete. Read count The name of a tag (Integer type) that will receive a count of the number of read operations performed since the project was run. Status The name of a tag (Integer type) that will receive a status code for the last read operation performed by a trigger. Status message The name of a tag (String type) that will receive the corresponding status message. Maximum aging The maximum age (in milliseconds) of values that will be accepted from the server's cache. If a value is older than this, then the server will be forced to get the latest value from the target device. Write actions Enable write on tag change When this value is TRUE (non-zero), a write will be automatically performed whenever the value of the project tag changes. Note: This is enabled by default. If it is disabled, then you must use write triggers (see below).Maximum group size The maximum number of tag writes to be performed in a single write operation. For example, if you have 1000 items/rows configured in the worksheet and Maximum group size is set to 100, then 10 write operations will be performed during each scan of the worksheet.
Synchronous write trigger When the value of this tag/expression changes, the worksheet is scanned and all tag values are written to the server. The project waits for the scan to complete before continuing. Asynchronous write trigger When the value of this tag/expression changes, the worksheet is scanned and all tag values are written to the server. The project continues running without waiting for the scan to complete. Write count The name of a tag (Integer type) that will receive a count of the number of write operations performed since the project was run. Status The name of a tag (Integer type) that will receive a status code for the last write operation performed by a trigger. Status message The name of a tag (String type) that will receive the corresponding status message. Reload trigger Indirect tags (e.g., {MyTag}) configured in the body of the worksheet will be reloaded only when the value of this tag/expression changes. Refresh IDs on startup When this option is selected, the node IDs in the worksheet will be refreshed from the specified item paths every time the project is run. Note: Refreshing IDs like this may cause the project to take longer to start up, so if you select this option, then you should also specify a root node (see below) to limit how much of the server's list of items must scanned.Note: IWS's OPC UA Client does not normally use the Triggering Mode that is defined the OPC UA protocol. Instead, it allows any change in any tag/expression to be used as a trigger. If you want to use Triggering Mode, configure one worksheet to read the trigger values and then configure another worksheet that specifies the read values as triggers. - Click OK to close the Advanced dialog and return to the worksheet.
- In the Status box, type the name of a tag (Integer type) that will receive connection status codes during project runtime.
- In the Status Message box, type the name of a tag (String type) that will receive the corresponding status messages.
- In the Publish Rate box, type the frequency (in milliseconds) at which the client will request updates from the server.
- In the Disable box, type a tag/expression. When the value is TRUE (non-zero), the worksheet will not be executed.
- In the Root node or view box, specify the server node that will serve as the root for all items in the worksheet body. Specifying a root node makes it easier to find items and improves runtime performance.
- For each row of the worksheet body, specify the
following:
- Tag Name: The name
of a project tag.
You may use indirect tags (e.g., {MyTag}), but if you do, then be sure to configure the Reload trigger option above.
- Item: The server
item with which the project tag should be associated.
To browse the server's list of items, right-click in this field and then click Browse on the shortcut menu.
- Scan: If Always, then the row is continuously scanned during runtime. If Screen, then the row is scanned only when a project screen that uses the specified tag is open.
- Div: For scaling — the value is divided by this number when reading from the server, and it is multiplied by this number when writing to the server.
- Add: For scaling — this number is added to the value when reading from the server, and it is subtracted from the value when writing to the server.
- Node ID: The node ID is automatically generated from the full path of the server item.
- Tag Name: The name
of a project tag.
- Save and close the worksheet.
Enabling the OPC UA Client task
- On the Home tab of the ribbon, in either the Local
Management or Remote Management group (depending on where the
project server will be), click Tasks.
The Execution Tasks dialog is displayed.
- In the list of tasks, select OPC UA Client.
- Click Startup.
The Startup dialog is displayed.
- Select Automatic, and then click OK.
- Click OK again to close the Execution Tasks dialog.