The OPC .NET Client task/worksheet is to communicate with any system that implements the OPC .NET Server protocol.
About OPC .NET
OPC .NET 3.0 (WCF) (formerly known as OPC Express Interface (Xi)) is the continued evolution of OPC Foundation native support for Microsoft platforms that previously included: the OPC Foundation Automation Wrapper for Visual Basic 6 and the OPC .NET 2.0 API for VB.NET and C#. It bridges the gap between Microsoft.NET and the world of OPC Classic.
In other words, OPC .NET is intended to be a new version of OPC that leverages Microsoft's latest technologies. For more information, go to the OPC Foundation website.
Configuring a new OPC .NET server connection
- Do one of the following:
- On the Insert tab of the ribbon, in the Communication group, click OPC Client and then select OPC .Net Connection from the drop-down list; or
- In the Comm tab of the Project Explorer, right-click OPC .Net Connections and then click Insert on the shortcut menu.
The OPC Server Connection dialog is displayed:Figure 1. OPC Server Connection dialog
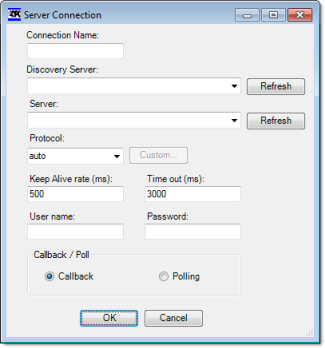
- In the Connection
Name box, type a name for the connection.
This name will be displayed in the OPC .Net Connections folder in the Project Explorer, and it is the name you will look for when you configure the OPC .Net Client worksheet.
- In the Discovery
Server list, type or select the URL of the discovery server
that publishes a list of OPC .NET servers on the network. If no
discovery server appears to be available, click Refresh to scan the network again.
Note: This feature requires that the Peer Name Resolution Protocol service be running on both the client station and and the discovery server. PNRP has been built into Microsoft Windows since Windows XP Service Pack 2, so this shouldn't be a problem in most situations.
- In the Server list, type or select the URL of the OPC .NET server to which you want to connect. If the server you want doesn't appear to be available, click Refresh the update the list from the discovery server.
- In the Protocol
list, select the network protocol to be used to connect to the
server. (For more information about the available protocols, please
refer to Microsoft's documentation for Windows Communication Foundation.)
Note: If your OPC .NET configuration has different servers/endpoints for each operation, then do the following:
- In the Protocol list, select custom. The Custom button becomes enabled.
- Click the Custom
button. The Endpoints dialog
is displayed.
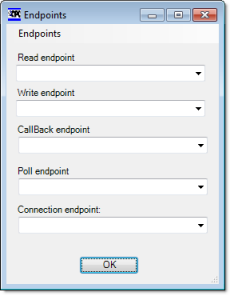
- Use the dialog to specify the server/endpoint for each operation.
- In the User Name
and Password boxes, type your
login credentials for the OPC .NET server.
Note: If the OPC .NET server is using Microsoft Active Directory, then User Name must be in the domain\username format.
- Select Callback to
have the server send values to the client only when the values
change, or select Polling to have
the client periodically request values from the server.
In most cases, you should select Polling to keep the connection active.
- Click OK. The connection is saved in the OPC .Net Connections folder in the Project Explorer.
Configuring a new OPC .Net Client worksheet
- Do one of the following:
- On the Insert tab of the ribbon, in the Communication group, click OPC Client and then select OPC .Net Client from the drop-down list; or
- In the Comm tab of the Project Explorer, right-click OPC .Net and then click Insert on the shortcut menu.
A new OPC .Net Client worksheet is displayed:Figure 2. OPC .Net Client worksheet
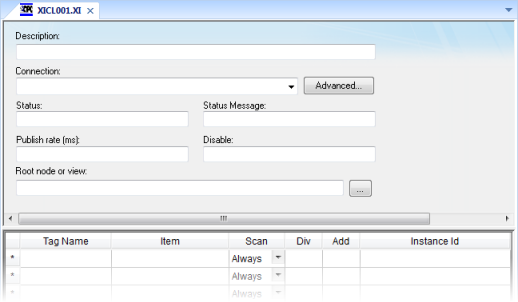
- In the Description box, type a description of the worksheet. This is for documentation purposes only and does not affect the execution of the worksheet.
- In the Connection list, select the OPC Server connection that you configured earlier.
- For more connection options, click Advanced.
The Advanced dialog is displayed:
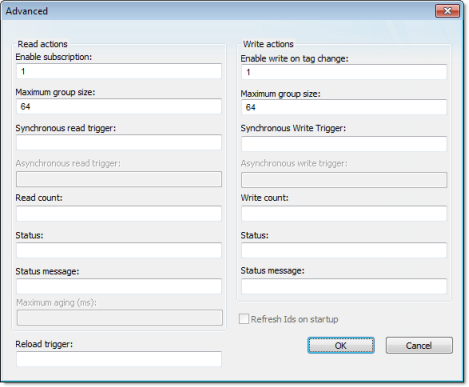
Review the options and configure as needed:Area / Element Description Read actions Enable subscription When this value is TRUE (non-zero), the client will constantly request updates from the server. Note: This is enabled by default. If it is disabled, then you must use a read trigger (see below).Maximum group size The maximum number of tag reads that may be performed in a single read operation. For example, if you have 1000 items/rows configured in the worksheet and Maximum group size is set to 100, then 10 read operations will be performed during each scan of the worksheet.
Synchronous read trigger When the value of this tag/expression changes, the worksheet is scanned and all tag values are read from the server. The project waits for the scan to complete before continuing. Asynchronous read trigger N/A for OPC .Net Client. Read count The name of a tag (Integer type) that will receive a count of the number of read operations performed since the project was run. Status The name of a tag (Integer type) that will receive a status code for the last read operation performed by a trigger. Status message The name of a tag (String type) that will receive the corresponding status message. Maximum aging N/A for OPC .Net Client. Write actions Enable write on tag change When this value is TRUE (non-zero), a write will be automatically performed whenever the value of the project tag changes. Note: This is enabled by default. If it is disabled, then you must use a write trigger (see below).Maximum group size The maximum number of tag writes to be performed in a single write operation. For example, if you have 1000 items/rows configured in the worksheet and Maximum group size is set to 100, then 10 write operations will be performed during each scan of the worksheet.
Synchronous write trigger When the value of this tag/expression changes, the worksheet is scanned and all tag values are written to the server. The project waits for the scan to complete before continuing. Asynchronous write trigger N/A for OPC .Net Client. Write count The name of a tag (Integer type) that will receive a count of the number of write operations performed since the project was run. Status The name of a tag (Integer type) that will receive a status code for the last write operation performed by a trigger. Status message The name of a tag (String type) that will receive the corresponding status message. Reload trigger Indirect tags (e.g., {MyTag}) configured in the body of the worksheet will be reloaded only when the value of this tag/expression changes. Refresh IDs on startup N/A for OPC .Net Client. - Click OK to close the Advanced dialog and return to the worksheet.
- In the Status box, type the name of a tag (Integer type) that will receive connection status codes during project runtime.
- In the Status Message box, type the name of a tag (String type) that will receive the corresponding status messages.
- In the Publish Rate box, type the frequency (in milliseconds) at which the client will request updates from the server.
- In the Disable box, type a tag/expression. When the value is TRUE (non-zero), the worksheet will not be executed.
- In the Root node or view box, specify the server node that will serve as the root for all items in the worksheet body. Specifying a root node makes it easier to find items and improves runtime performance.
- For each row of the worksheet body, specify the
following:
- Tag Name: The name
of a project tag.
You may use indirect tags (e.g., {MyTag}), but if you do, then be sure to configure the Reload trigger option above.
- Item: The server
item with which the project tag should be associated.
To browse the server's list of items, right-click in this field and then click Browse on the shortcut menu.
- Scan: If Always, then the row is continuously scanned during runtime. If Screen, then the row is scanned only when a project screen that uses the specified tag is open.
- Div: For scaling — the value is divided by this number when reading from the server, and it is multiplied by this number when writing to the server.
- Add: For scaling — this number is added to the value when reading from the server, and it is subtracted from the value when writing to the server.
- Instance ID: The instance ID is automatically generated from the full path of the server item.
- Tag Name: The name
of a project tag.
- Save and close the worksheet.
Enabling the OPC .Net Client task
- On the Home tab of the ribbon, in either the Local
Management or Remote Management group (depending on where the
project server will be), click Tasks.
The Execution Tasks dialog is displayed.
- In the list of tasks, select OPC .Net Client.
- Click Startup.
The Startup dialog is displayed.
- Select Automatic, and then click OK.
- Click OK again to close the Execution Tasks dialog.