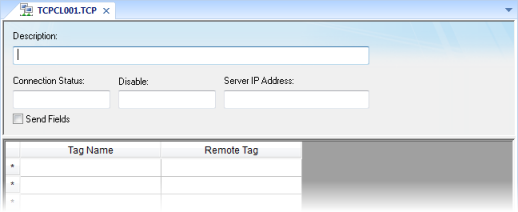
The TCP/IP Client task/worksheet is used to communicate with another IWS project server.
- To configure the server: You do not have to configure anything on the server itself. You just have to run the IWS TCP/IP Server task. You can choose to run it automatically on start up, or run the task manually by clicking Tasks (either local or remote) on the Home tab of the ribbon. After running this program, a small icon displays in your system tray.
- To close the IWS TCP/IP Server task: Right-click the TCP/IP Server icon in the system tray and click Exit.
- To configure the client: You must use the TCP/IP Client Configuration program to specify the
server IP address and the tags you want to share with the server on
the client system.
The TCP/IP Client Configuration program is located on the Comm tab and it uses the same commands as the Driver Configuration program.Figure 1. TCP/IP Client Worksheet Configuration

- Description field: Type a description of the TCP/IP Client worksheet, for documentation purposes only. The TCP/IP Client task ignores this information.
- Connection Status field: Type a tag name and the TCP/IP Client Configuration task will update this tag according to its connection status. A tag value of zero indicates the connection is okay. Any other tag value indicates an error code returned by the Windows Socket library.
- Disable: Type a tag name in this field. When this tag has any value other than 0, this TCP/IP worksheet will be disabled. Using this field, you can enable/disable the TCP/IP Client worksheet during runtime.
- Server IP Address
field: Type the IP address and Port (optional) of the target server
— for example, 169.254.182.158:123.
The Port should be the same on both the Client and Server stations.
You can also specify a String tag enclosed in curly brackets (e.g., {tagname}) if you want to dynamically change this address during runtime.
- Send Fields
checkbox:
- Disable this box and the TCP/IP Client/Server tasks exchange only the tag values, and their TimeStamp and Quality.
- Enable this box and the TCP/IP Client/Server tasks also exchange the Min, Max, Ack, Unit, LoLoLimit, LoLimit, HiLimit, HiHiLimit, RateLimit, DevSetPoint, DevpLimit, and DevenLimit tag fields.
Note: It is possible to add other fields to the TCP/IP communication or to disable any field individually. Contact your vendor for more information. - Tag Name field:
Type the tags you want to share with the server.
If the tag is an array or a class (or both), the project automatically enables every array position and class member for TCP/IP communication by default.
To configure a specific array position and/or a specific class member, type the array position and/or class member in square brackets following the tag name. For example,level[3].member.
- Remote Tag field (optional): Type the name of a tag to be linked with the tag you specified in the Tag Name field. If you leave this field blank, the project uses the same tag name used in the client and in the server.
You can run the TCP/IP Client task automatically on start up or run the program manually by clicking Tasks (either local or remote) on the Home tab of the ribbon. After running this program, a small icon displays in your system tray.
Only the Client task uses the ConnectionRetryTimeout parameter.