To create and maintain accounts for project users, click the Users button on the Security System dialog. (Alternately, to configure a user, open the Users folder located in the Security folder.)
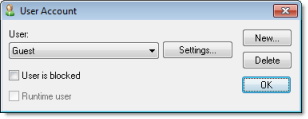
After the project initializes, if no users log on (or when the current user logs off), then the project automatically logs on the default user (Guest). In addition to the default Guest user, there is a Guest group, which has default privileges that enable all tasks. We recommend that you evaluate and edit the Guest group's privileges to specify a minimal amount of privileges for the start up procedure.
To create a new user, click New to open the New User Account dialog.
To delete a user, click the User combo-box button, select the user name from list, and then click Delete.
- Click the User combo-box button and select a user from the list.
- If necessary, click the User is blocked checkbox to block the
selected user.
Note: The Runtime user option indicates that a user was created during runtime using the CreateUser function. It cannot be selected for a user created using the procedure described here.
- Click the new Settings button to open the User Settings dialog:
Figure 2. User Settings dialog
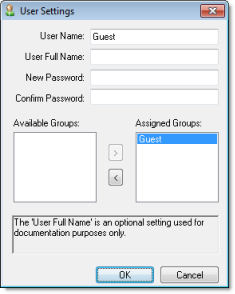
- Configure the parameters on this dialog as follows:
- User Full Name text box (optional): Type the user's full name.
- New Password text box: Type the user's password.
- Confirm Password text box: Re-type the user's password.
- In the Available Groups list, select the group(s) to which the user should be assigned, and then click > to move those group(s) to the Assigned Groups list.
- When you are finished, click OK to apply the changes and close the Settings dialog.