The Translation Table is used to manage the languages to which you want to translate your project. Adding a language to the table can be as simple as selecting it from a list and then automatically translating your project texts.
- Open the Translation Table
worksheet by doing one of the following.
- On the Insert tab of the ribbon, in the Global group, click Translation; or
- In the Global tab of the Project Explorer, double-click Translation.
Figure 1. Translation Table worksheet
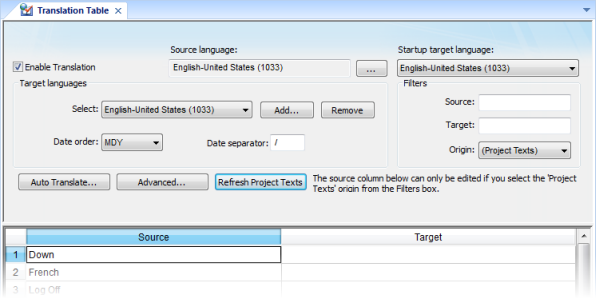
- Make sure the Enable Translation option is selected.
- In the Target languages area, click Add. The Languages dialog is displayed.
- In the Languages dialog, select the language to which you want to translate your project and then click OK. The language is added to the Select list.
- Configure Date order and Date separator as desired for the target language. For example, for English-United States (i.e., American English), Date order is typically MDY and Date separator is typically /, resulting in a date format of MM/DD/YYYY.
- Click Auto Translate. The Automatic Translation dialog is
displayed.
Figure 2. Automatic Translation dialog

- Confirm the source and target language codes. Language codes are defined by ISO 639-1.
- If you want to overwrite any previous translations, select Replace existent translations. Please note that this will overwrite both automatic translations and manual edits.
- Click OK. The application processes the Source column of the worksheet through Google Translate and then populates the Target column with the results.
- Review and manually edit the translation results as needed. Use the Filters to search the worksheet for a text string; as you type a few characters, the list is dynamically filtered to show only the strings that match.
- Save and close the worksheet.
Changes made to the Translation Table will not take effect until you either call the SetLanguage function or restart the runtime project.
Tip: The
Translation Table is saved as a tab-delimited text file in your
project folder, at […]\My Documents\InduSoft Web Studio v7.0
Projects\project_name\Web\Translation.trn.
You can open and directly edit this file with Microsoft Excel, if
you choose to do so.