After configuring the target system to receive data,
use the following steps to configure the development station to
send the project data:
- On the Home tab of the ribbon, in the Remote
Management group, click Connect.
The Remote Management dialog
is displayed:
Figure 1. Remote Management dialog
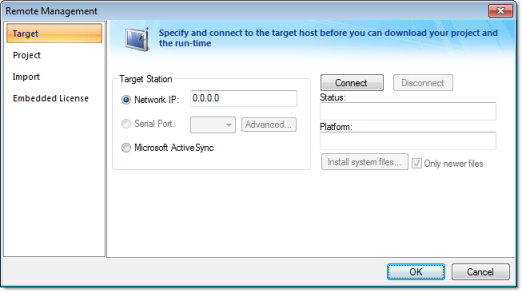
- Select the Target
tab and use the following options to specify the target system to
which you are going to connect.
- Network IP: Select this button and type the IP address of the target system into the text box if you specified a TCP/IP connection when you configured the target system.
- Serial Port: Select this button and select a port from the combo-box list if you specified a Serial Port connection when you configured the target system.
- Microsoft ActiveSync: Select this button to connect to devices on which ActiveSync is enabled.
- Click the Connect
button to connect to the target system.
If the target system is a Windows Embedded device, then you can click Install System Files to install the CEView runtime engine on the station.
- Select the Project tab.
- In the Target box,
verify the directory for the project files on the target system. If
the path is incorrect, then click the browse button to the right of
the Target field to select a new
directory. (Assuming you are properly connected to the target
system, you should be able to browse it like any network drive.)
Note: You can download the project files only to folders that are below where the CEServer is installed and running. For example, if CEServer is installed at \Storage Card\CEView\, then the project files should be installed at \Storage Card\CEView\project_name\.
- Click Send to
Target to download the entire project to the target system.
(Or click Send File to select an
individual file to send.)
CAUTION:When you send a project to the target system, the new project replaces the old one automatically and immediately, even if the old project is still running. Also, if you uncheck (disable) the Only newer files option, then the development application will delete all of the old files in the project folder before downloading the new files. As such, you may want to manually stop the old project (by clicking Stop) before you send the new one. That way, you can make sure it stops gracefully and doesn't disrupt any other processes.
It's not strictly necessary to stop the project, however, so if your project is robust enough to handle the switch then you can send new files whenever you need to.
Note:- Once you've initially configured the Remote Management settings, you can use Send project to target (on the Home tab of the ribbon) to send updated project files at any time without opening this dialog.
- You can compress the project files to make them download more quickly over a slow network connection. To do this, select the Enable File Compression check box in the Communication tab of the Project Settings dialog.
- If the download is interrupted, then the development application will request confirmation to continue and advise you that the project may not run properly.
- After the download is complete, click Run to start the project on the target system.