As we will see shortly, there is no one way to build a Thin client program. The following procedures allow you to develop a simple, unsecured Thin client program.
Procedure A: Thin Client using NTWebServer, Local Loopback
An easy way to initially develop and test a Thin client program is to use the light-weight Web server NTWebServer on your development PC, initiate the runtime project and use Microsoft Internet Explorer on the same PC to display the Web pages.
Step 1: Configure IWS Settings
- On the Project tab of the ribbon, in the Web group,
click Thin Client.
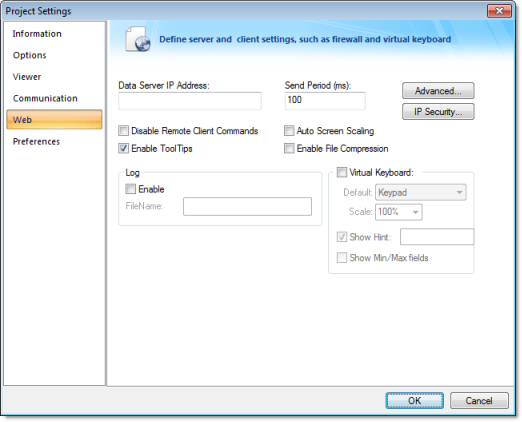
- In the Data Server IP Address field, enter 127.0.0.1
- Check the Auto Screen Scaling, Enable File Compression, and Enable Tooltips checkboxes are checked
- Click on the IP Security Button. Be sure then Enable checkbox is unchecked. Click OK.
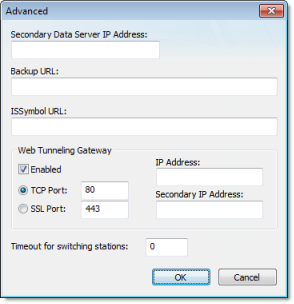
- Click on the Advanced
Button. Be sure the Web Tunneling
Gateway Enabled checkbox is unchecked. Click
OK.
- Open the Execution Tasks dialog (Tasks on the Home tab of the ribbon) and be sure the TCP/IP Server task is set to Automatic.
Step 2: Configure Database
- In the Development Environment, select the Global tab of the Project Explorer. Open the Project Tags folder.
- Be sure the project tags are properly set to either Server or Local. If the tags are to be exposed to the Web Client, then set them to Server, otherwise set to Local.
Step 3: Develop your Screens and create HTML screens
- Develop your project screen. Depending on your Thin Client screen size, you may want to develop a separate set of screens with a different resolution. Auto Screen scaling is supported (enabled in a prior step), but auto screen scaling naturally has limitations.
- Save and close all project screens.
- Be sure you have defined a Startup Screen (Viewer on the Project tab of the ribbon).
- You can save individual screens as HTML by selecting the Save as HTML or Save Screen Group as HTML options in the Application menu, or save all Screens and Screen Groups as HTML by selecting the Save All as HTML option.
- If you are just updating a Screen, and especially when you make any configuration changes to the Web settings, you should run the Verify Project tool (i.e., on the Home tab of the ribbon, in the Tools group, click Verify).
- The HTML (web) pages will be stored in the Web sub-folder of your project folder.
Step 4: Install NTWebServer
- NTWebServer is InduSoft's lightweight Web Server for Windows NT/XP/2000/Server 2003/Vista environments. NTWebServer.exe is found in […]\InduSoft Web Studio v7.0\Bin
- Copy NTWebServer.exe from the \Bin folder and paste it into the Web sub-folder of your project folder.
- From the Web sub-folder, double click on NTWebServer to start it.
- A new window should pop-up. At the bottom, there
should be a message indicating that NTWebServer is listening. If a
message appears that NTWebServer failed to open a socket, it is
most likely caused by Microsoft IIS (Web Server) running in a
background mode. If this is the case, you will need to stop IIS,
and then restart NTWebServer
Tip: A Web server typically operates on, or "listens to," a computer's TCP/IP port 80. Only one running process can listen to a given port, so if another process on your computer — for example, some third-party SCADA software — is already listening to port 80, then it and the Web server process may conflict with each other. You must either configure one of the processes to listen to a different port or use Task Manager to end the conflicting process. If you cannot identify the conflicting process, then in Windows, open Command Prompt and enter the following command to get a list of all networking processes:
netstat -a -o
Step 5: Start the runtime project
- On the Home tab of the ribbon, click Run.
Step 6: Launch Microsoft Internet Explorer and connect to the Web Server
- Click on the Start button (or Alt Tab) to access the Microsoft Internet Explorer program.
- Start Internet Explorer, and type the address of the starting (home webpage). E.g. http://127.0.0.1/startup.html
- Note that the startup.sg (or whatever your startup display or screen group name is) will have a HTML file extension on it when accessed from Internet Explorer.
- Sign on as Guest with no password, assuming no security has been enabled.
Procedure B: Thin Client using NTWebServer, Network IP
Once Procedure A has been completed, the next step is to enable network connected Thin Clients, instead of using the local loopback. You need to know the IP address of your PC, as seen from the network. You can get this information from the Network Settings in the Control Panel, or putting the function GetComputerIP() in a Rectangle Object on a screen and running the project.
Step 1: Configure IWS Settings
- Stop any active runtime project.
- On the Project tab of the ribbon, in the Web group, click Thin Client. In the Data Server IP Address field, enter the IP address of your PC (as viewed from the network). E.g. 192.168.1.100
- Run the Verify Project tool (Verify on the Home tab of the ribbon). This will set change the Data Server IP address in the web pages, so that the Thin Client will automatically exchange data with the correct Data Server.
Step 2: Start the runtime project
- On the Home tab of the ribbon, click Run.
- Be sure NTWebServer is still running.
Step 3: Launch Microsoft Internet Explorer and connect to the Web Server
- Click on the Start button (or Alt Tab) to access the Microsoft Internet Explorer program.
- Start Internet Explorer, and type the address of the starting (home webpage). E.g. http://192.168.1.100/startup.html
- Sign on as Guest with no password, assuming no security has been enabled.
Procedure C: Thin Client using IIS, Network IP
Once Procedure B has been completed, the next step is to enable IIS to become the Web Server for your Thin Clients instead of NTWebServer. The following are the basic steps to configuring IIS, although depending on your network and Operating System environment, additional settings may need to be configured such as user security.
Step 1: Configure IWS Settings
- Be sure NTWebServer is terminated.
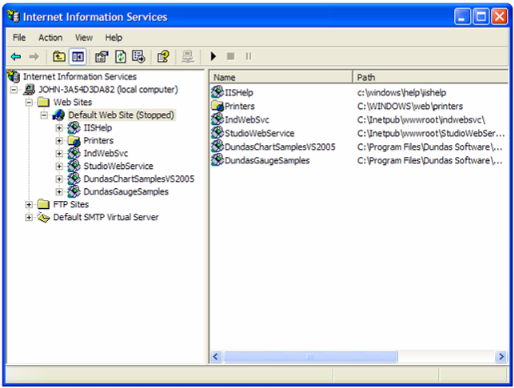
- Click the Start button, then .
- Select (click on) Internet Information Services.
- Expand the Web Sites
tree structure to see the Default Web
Site.
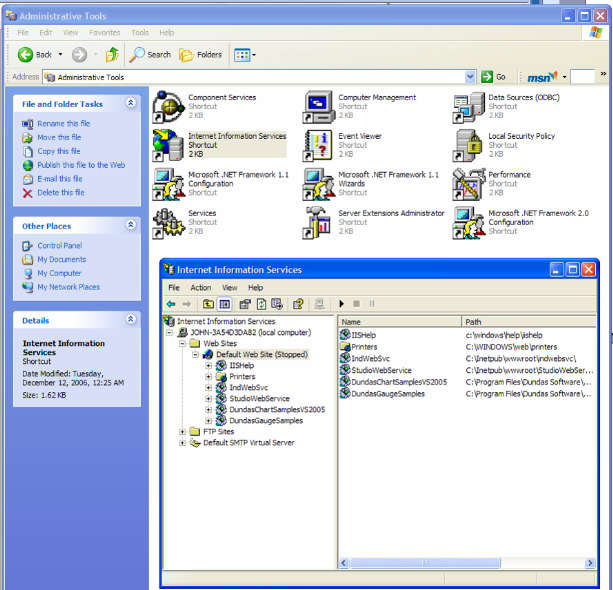
- Right click on the Default Web Site and select
Properties to get the Default Web
Site Properties dialog.
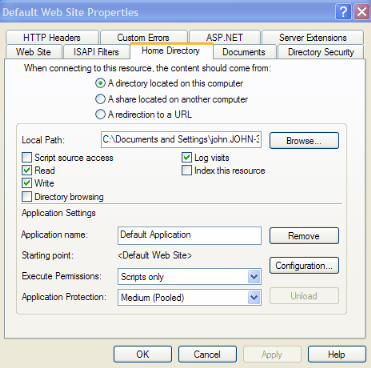
- Click on the Home Directory tab. Click on the Local Path Browse button and point to your project's Web subfolder.
- Click on the Web Site tab. Make sure the TCP port is set to 80. You can click the Advanced button to enable the IIS Web Server to respond to specific IP addresses and IP Port numbers.
- If your Web Server is behind a Proxy, be sure to
check the HTTP Keep-Alives Enabled checkbox. It does not hurt
anything if this is always checked.

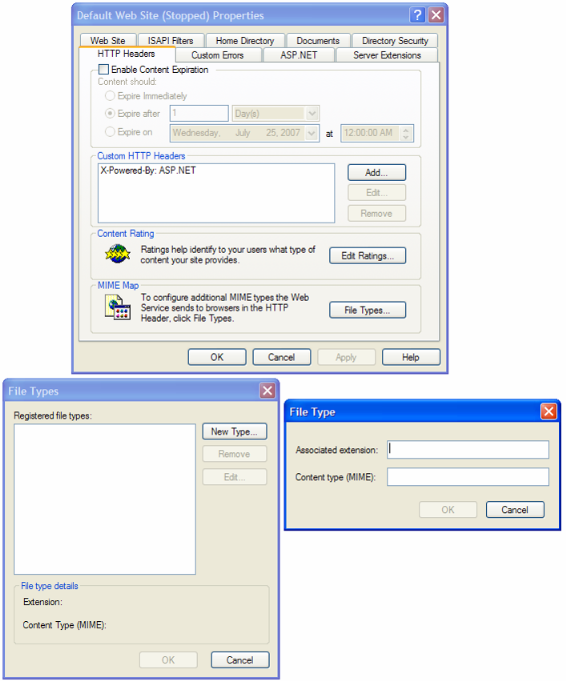
- Click on the HTTP
Headers tab. Click on the MIME Map
File Types button to open the File
Types dialog. Next, click on the New
Type button to add a new MIME type. Put the file extension
in the Associated Extension field. In
the Content type (MIME) field, put
MIME type followed by a / character,
followed by the file extension name (application/studio). E.g.
Associated Extension: .scc
Content Type: application/studio
- Click on the Directory Security tab. From this tab, you can change the settings for Anonymous User Access and Authentication Control as well as Secure Communications (i.e., using SSL 3.0).
- Click on the Anonymous User Access and Authentication Control Edit button to get the Authentication Methods dialog. Normally, you do not have to do anything in this dialog but depending on the Security system your network administrator has installed, you may need to adjust settings in this dialog.
- The Secure Communications
Server Certificate button opens a wizard that lets you
define a Certificate for support of secure communications using
SSL.

About MIMEs
- MIME, or Multipurpose Internet Mail Extensions,
types instruct a Web browser how to handle files received from a
server. For example, when a Web browser requests an item on a
server, it also requests the MIME type of the object. Some MIME
types, like graphics, can be displayed inside the browser. Others,
such as word processing documents, require an external helper
program to be displayed.
When IIS delivers a Web page to a client Web browser, it also sends the MIME type of the data it is sending. If there is an attached or embedded file in a specific format, IIS also tells the client program the MIME type of the embedded or attached file. The client program then knows how to process or display the data being received from IIS.
IIS serves only files with known extensions registered in the MIME types list or with the operating system. IIS allows you to configure additional MIME types and change or remove MIME types. Removing a MIME type in IIS does not block access to that MIME type by other programs if it is also registered with the operating system.
IIS is preconfigured to recognize a default set of global MIME types. These MIME types are recognized by all Web sites you create in IIS. MIME types can also be defined at the Web site and directory levels, independent of one another or the types defined globally. When you view MIME types at the Web site or directory level, only the types unique to that level are displayed, not all types inherited from the next level up.
- IIS returns a 404.3 error if a client request refers to a file name extension that is not defined in the MIME types
- MIME configuration is usually only required for Windows Server 2003, not Windows XP or Vista due to Windows 2003 default settings.
- MIME types should include all file extensions found
in the Web directory. These
include:
- .app
- .bin
- .csv
- .gis
- .html
- .ico
- .ini
- .lst
- .scc
- .sg
- .stmp
- .tra
- .txt
Step 2: Start IIS and start the IWS Project
- Be sure NTWebServer is terminated.
- Click on the IIS Start button.
- Run the project.
- If IIS is not installed on your PC, you can add it (to Windows XP Pro/Windows 2000 or Windows Server 2003) by opening the Control Panel, then selecting and checking the Internet Information Services (IIS) checkbox in the Windows Components Wizard. You can click on the Details button to select various components of IIS to install. Note that you may need to have your Windows installation disk.
- You can get more information on IIS by opening a browser and entering http://localhost/iishelp in the browser navigation address bar. Note that IIS must be running.
- NTWebServer is a Windows program, while IIS is a Windows service.
- It is STRONGLY SUGGESTED that you use IIS instead of NTWebServer in a runtime mode. It is more reliable and higher performance than NTWebServer.
- If you get a Cannot find Server error message,
- From the browser, ping the server IP address (primary and/or backup). You can ping using the IP address or use the NetBios name to ping the server (e.g., from a command prompt enter
- Ping 152.57.100.25 or Ping ServerName.
- Be sure IIS is running
- Be sure your project is running
- Make sure the TCP/IP Server (in the project's Tasks) is running
- Be sure IIS is set to the correct Home Page (root directory).
- Be sure the Port addresses are correct (HTTP – Port 80, HTTPS (SSL) – Port 443, Data – Port 1234)
- Make sure you firewall has these ports open
- If you are using a Windows Embedded device, be sure ISSymbol is properly loaded and registered
- Be sure your runtime license supports the Web Client configuration
- If you get a Page cannot be displayed error
message,
- From the browser, ping the server IP address
- Stop and restart IIS
- Be sure the MIME types are properly set
- Make sure you updated your web pages (i.e., Save as HTML) and use the Verify Project tool if you change any Web settings.
- Verify the Windows security settings are properly set
- Be sure that the Screen name (and Web Page name) do not have any spaces in the name
- If the web pages are incorrect:
- Be sure you are pointing to the correct primary URL
- Be sure your backup URL (if you use it) has the correct (updated) web pages