IWS has a couple dialoges that are used for configuration of the Data Server and the Web Server configuration to be used. This information is embedded in the HTML web pages that correspond the screens. The Data Server is part of the IWS runtime project and uses the TCP/IP Server module. There are three (3) basic steps to this configuration:
Step 1: Web Settings dialog configuration
- On the Project tab of the ribbon, in the Web group,
click Thin Client.
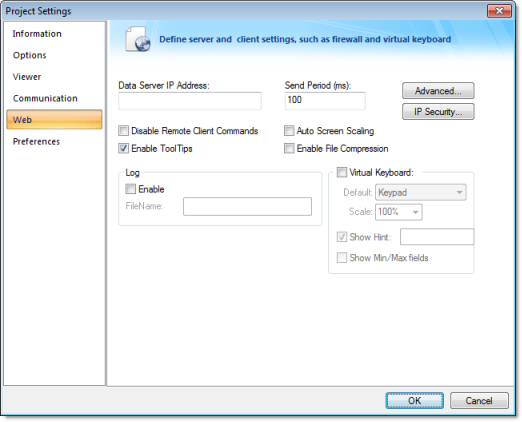
- In the Data Server IP Address field, type the IP address of the PC where the runtime project will reside.
- Check the checkboxes for Auto Screen Scaling, Enable File Compression and Enable Tooltips. If you want to disable the Web Client from issuing commands to the Server, check the Disable Remote Client Commands checkbox.
- If the Web Client is to use a Virtual Keyboard, check the Virtual Keyboard checkbox and any additional settings for the Virtual Keyboard at the Thin Client.
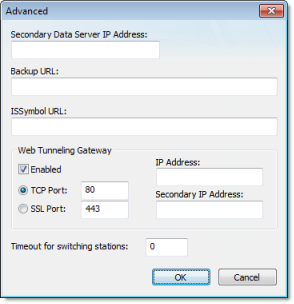
- By clicking on the Advanced button, you can define a backup URL (i.e.,
backup Website for web pages) and a Secondary Data Server IP
address. This is for a redundant Web Server and/or a redundant Data
Server, respectively. Web Tunneling can also be enabled in this
dialog. The URL for the ISSymbol OCX can also be defined if it is
not found on the Web Server.
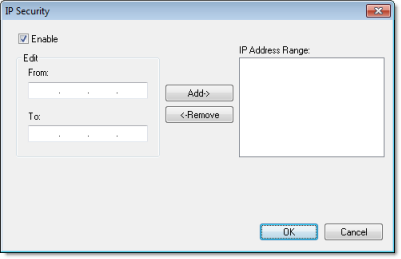
- By clicking on the IP
Security button, you can define a range of IP addresses
that will be accepted by the Data Server. If a request for data
comes from an IP address outside of the defined ranges, the request
will not be acknowledged. This is an Embedded Firewall function.
Step 2: Communication Settings dialog configuration
- On the Project tab of the ribbon, in the settings
group, click Communication.
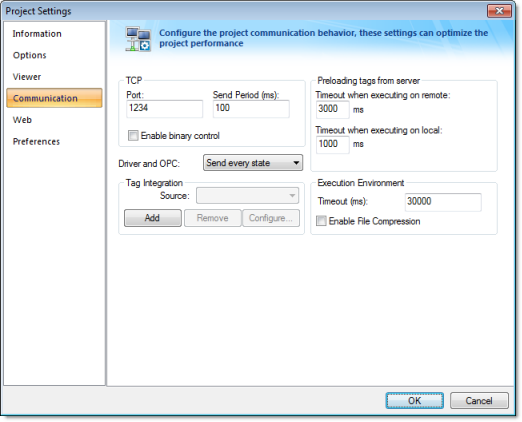
- Enter the Port number (1234 is the default) for the Data Server. You can also define the Data Send Period (i.e., time period for updated communication of data values to the Web Client).
- Optionally enable Binary Control of the data. It is more secure, but is slower. The default is disabled.
Step 3: Enable the TCP/IP task
- On the Home tab of the ribbon, click Tasks (local or remote, depending on the
project's target system).
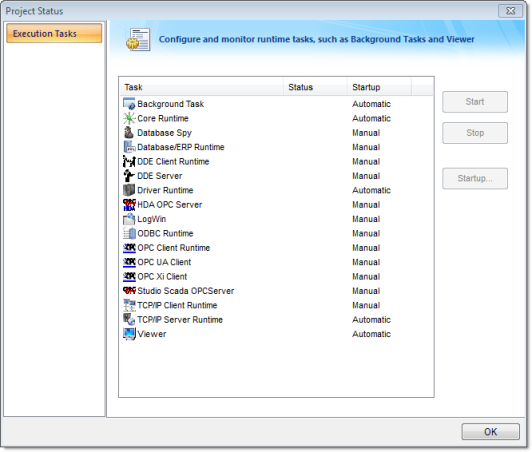
- Be sure the TCP/IP Server is set to Automatic. This should be the default state, but can be manually configured by selecting the Startup button.
- Be sure the TCP Port number is properly set (see Communication Settings above), otherwise the TCP/IP Server will start then stop.
- This configuration information (from Step 1 & 2) gets embedded in the Web Pages generated from the IWS development environment when you Save As HTML.
- If you change any of these settings, you MUST run the Verify Project tool.
Using the SetWebConfig Function
The SetWebConfig() built-in function allows the developer to programmatically configure the Data Server and Web Client configuration, and the resulting configuration settings are automatically updated in your project's HTML files (located in the Web sub-folder). This function always runs on the IWS Server, and works in both a Windows and Windows Embedded environment.
For more information, see SetWebConfig() function.
Configuring the Web Server to Support IE and Secure Viewer
IWS is capable of supporting both Interned Explorer (IE)-based browsers and Secure Viewer-based browser at the same time. To do this however, you need to take some care in how you configure your system.
From the Web-server side
- All HTML files go into the project Web sub-folder.
- Configure your Web Server (e.g., IIS) to have its root folder point to the project folder.
- Put ISSymbolVM.cab in the project folder if an Internet connection to InduSoft's Web site is not available and the ISSymbol ActiveX control is not installed on the IE-based Web Client.
From the Web-Client side
- The Secure Viewer-based browser should be configured to point to the .APP file in the project folder
- The IE-based browser should have as an initial URL
something like as follows:
http://192.168.1.100/Web/startup.html
…where startup.html is your startup web page.