Implementing Security for Web-based Applications

There are various methods for implementing security of Web-based applications. The approach that you require can depend on a number of factors, and may involve one or more methods of implementing Security.

Method 1: Password Protection

IWS provides the ability to create Groups of Users and individual Users within a Group. Each Group (e.g., Operators, Supervisors, Maintenance) can have different security levels and access different levels of functionality. Individual passwords can be configured for each User.
Figure 1. Security Groups and Users

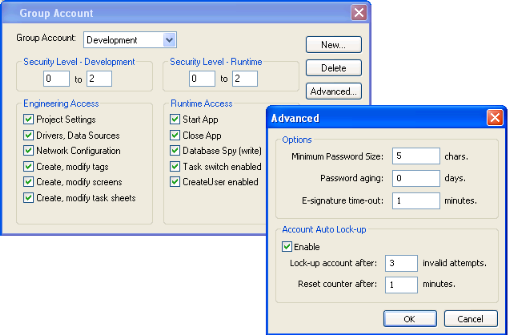
In addition, Groups can have advanced settings, allowing features like minimum password size, password aging, e-signature on Objects with Command animations, Account Auto-lockup (e.g., lock up after a number of invalid attempts to access), and User Account blocking (temporarily disable – e.g., when employee is on vacation).
Figure 2.

If System Security is enabled, these Password Protection features are also available at the Thin Client station. When a User at a Thin Client station attempts to connect to the Web Server, they will be prompted for a User Name and a Password. If either is invalid, the User will not be let on to the system.
Figure 3. Log On dialog

Within a project, the various screen objects and their animations, and Screen access can have a security level assigned to it. The current User logged on must have a access level range which matches the desired Object or Screen. The following is a representative method of assigning security access levels by Group.


For more information, see Security.

Method 2: Disabling Thin Client Commands

IWS allows bi-directional data exchange between the Thin Client and the Data Server. However, for security reasons it may be advantageous to only allow the Thin Client to view the process or machine data, and not send any data back to the Data Server.
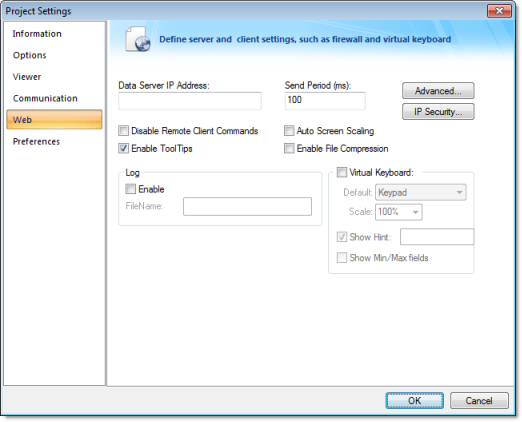
Selecting (checking) the Disable Remote Client Commands option in the project settings (Thin Client on the Project tab of the ribbon) ensures that all commands coming from a Thin Client station are blocked. The communication becomes unidirectional (from the Server to the Thin Clients):
Figure 4. Project Settings — Web tab

Method 3: Embedded Firewall

This feature allows the user to filter access to the project based on the Thin Clients IP Address. When a Thin Client attempts to connect to the Server station, the Server checks if the IP Address of the Thin Client station is authorized to access the project. The ranges of authorized IP Addresses can be configured in the Server station by clicking IP Security in the project settings (Thin Client on the Project tab of the ribbon):
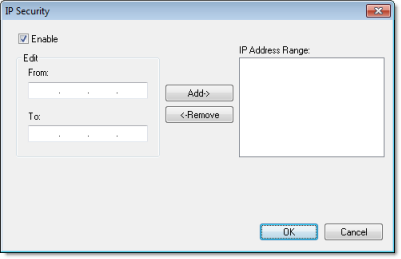
Figure 5. IP Security dialog

Figure 6. Access allowed by IP address

Method 4: Encrypted Communications (SSL)

By enabling the Web Tunneling Gateway (WTG), you can enable all communications between the Data Server + Web Server and the Thin Client to be encrypted using RC6, a highly-secure 128-bit encryption standard. To use SSL, you must do the following:
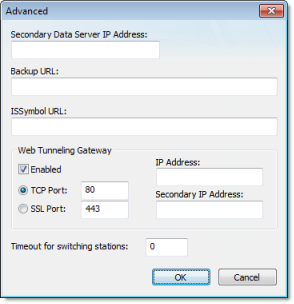
  1. Click Advanced in the project settings (Thin Client on the Project tab of the ribbon). Select (check) the Web Tunneling Gateway Enabled option. Click on the SSL radio button and be sure the SSL port is set to 443. Click OK.
    Figure 7. Project Settings — Web — Advanced dialog
  2. In your Web Server, be sure SSL capabilities are enabled and that a SSL Certificate of Authentication is present.
  3. Be sure SSL is enabled in the Web Client
  4. Set up all other Web configurations to support the WTG.

Method 5: VPN

A VPN is a Virtual Private Network. It is called virtual since it really uses the public Internet to transport data from one computer to another. But since this network is encrypted and uses other security mechanisms enabled by the ISP, is it a very secure Private Network. While VPN's are inherently secure, they are more costly that a simple public Internet connection.