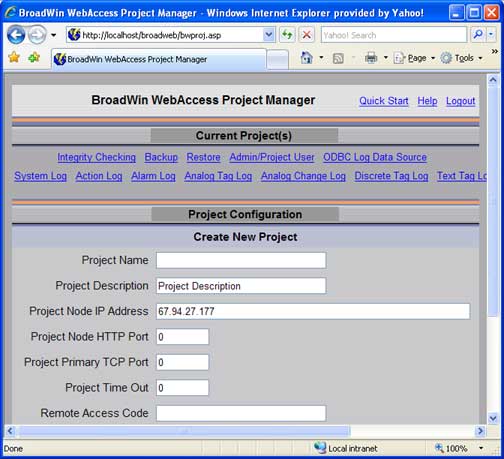
Project Configuration Page appears (figure B.1)

Figure B.1 - Create new Project - No Current Projects
1. Scroll to the bottom of the Project List Page (Figure B.1) to the section labeled Create New Project.
2.
Enter Project Name. ![]()
For Example: pName
3.
Accept the default IP address for the project database. ![]()
The default IP address that appears is of the WebAccess Project Node. We recommend that you can accept this default. If there is only one Node in your system, the PC where the Project Database is stored (the Project Node) and the SCADA Node are usually the same. The WebAccess Project Node software must be installed before you can configure a project (see Installation Guide to install software on the project node).
4. Enter a Description.
5.
Enter Primary TCP Port. ![]()
For Example: 0
The Primary Port
Number is a TCP through your firewall. This applies only
if you are using a firewall. See the Appendix for more
information.
6.
Enter Project Timeout. ![]()
For Example: 0
The Project Timeout is for Clients not using the ICMP protocol to detect a TCP/IP connection. This is the Time in increments of 50 milliseconds of inactivity before the connection is considered broken.
7.
Accept default Remote Access Code. ![]()
It is Blank if none configured during installation of SCADA node.
This Remote Access Code is set during Installation of the SCADA node software on the SCADA node. This code prevents unauthorized users from creating new projects or new nodes on your SCADA node.
8.
Press Submit Button. ![]()
9. Project Property Page appears (figure B.2)
Congratulations! You have created your first WebAccess Project.