![]() Note: The Add Project dialog box opens when you
modify an existing project's specifications. However, the Project
field is disabled.
Note: The Add Project dialog box opens when you
modify an existing project's specifications. However, the Project
field is disabled.
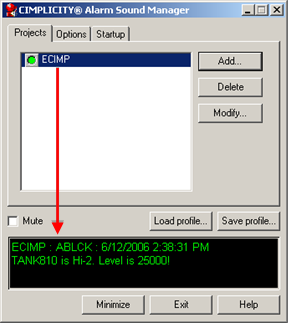
Select the Projects tab in the CIMPLICITY® Alarm Sound Manager dialog box..
Click Add.
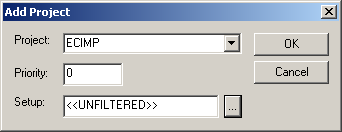
The Add Project dialog box opens.
Fill in the fields as follows.

|
Project |
|
|
Priority |
|
|
Setup |
|
A |
Select a project from the drop down menu.
Projects that are running and available (e.g. broadcast) are listed.
|
B |
A number equal to or greater than 0 in the Priority field to specify the project's priority relative to other projects.
0 is the highest priority.
The higher the number you enter, the lower the priority.
The list of projects on the Projects tab is sorted in the order of priority that you specify. The Alarm Sound Managers uses this project ordering to help determine which sound plays first at runtime.
|
C |
An alarm setup that will filter alarms that trigger a sound.
Either:
![]() Type a setup in the Setup field.
Type a setup in the Setup field.
![]() Click the button
Click the button ![]() to the right of the Setup field.
to the right of the Setup field.
An Alarm Setups dialog box opens.
Setups listed in the Alarm Setups dialog box were created in any of the following.
![]() Stand-alone Alarm Viewer
Stand-alone Alarm Viewer
![]() Alarm Viewer OCX
Alarm Viewer OCX
![]() Alarm Sound Manager
Alarm Sound Manager
![]() Notes
Notes
![]() You can create a new or modify an
existing setup to enter in the Setup field.
You can create a new or modify an
existing setup to enter in the Setup field.
![]() If you do not select a setup,
CIMPLICITY uses the <<Unfiltered>> setup, which will
trigger sound for any alarm in the project.
If you do not select a setup,
CIMPLICITY uses the <<Unfiltered>> setup, which will
trigger sound for any alarm in the project.
Click .
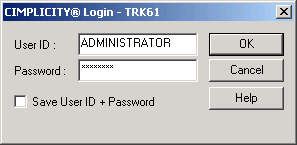
If you are not logged into CIMPLICITY, a CIMPLICITY® Login dialog box opens.
Enter your User ID and Password.

Once you are logged in, the project displays in the list of projects on the Projects tab in the CIMPLICITY® Alarm Sound Manager dialog box. If an alarm is generating a sound, a message provides the alarm's:
![]() Project
Project
![]() Class
Class
![]() Generation date/time
Generation date/time
![]() Message
Message

Repeat adding projects until all of the projects that should have sound for alarms appear in the Projects list.
![]() Note: Select a project in the list and
click Delete if you want to
remove it from the Alarm Sound Manager.
Note: Select a project in the list and
click Delete if you want to
remove it from the Alarm Sound Manager.
|
Step 3. Add projects to a sound manager profile. |