The Alarm Setup dialog box lets you filter the alarms to which the Event Manager will respond.
You can filter by:
![]() Resource ID
Resource ID
![]() Alarm Class ID.
Alarm Class ID.
You can also have the Event Manager respond to either or both;
![]() Alarm Log data
Alarm Log data
![]() Event Log data
Event Log data
![]() Important: You must enter information in the Setup dialog box in order to receive alarm and/or event
data.
Important: You must enter information in the Setup dialog box in order to receive alarm and/or event
data.
|
Open the Alarm Setup Dialog box. |
|
|
Setup options. |
|
|
Examples. |
Open the Alarm Setup Dialog box
Do one of the following to open the Alarm Setup dialog box.
Method 1
Open the Project Properties dialog box.
Select the Settings tab.
Select Event Editor.
Click .

Method 2
Right-click an Event ID in the CIMPLICITY Event Editor left pane
Select Alarm Filter from the pop-up menu.
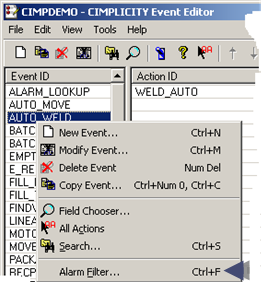
Method 3
Select Alarm Filter on the CIMPLICITY Event Editor Edit menu.
Method 4
Press Ctrl+Fin the CIMPLICITY Event Editor.
The Setup dialog box opens when you use any of these methods.
Setup Options
Setup options are as follows.
|
Option |
Description |
||
|
Resource ID for which the Event Manager can receive information. |
|||
|
|
|
Opens the Resource browser. |
|
|
|
|
Displays popup menu to create a new resource, browse for or edit an existing resource. |
|
|
Alarm Class for which the Event Manager can receive information. |
|||
|
|
|
Opens the Alarm Class browser. |
|
|
|
|
Displays popup menu to create a new alarm, browse for or edit an existing resource. |
|
|
Checked |
The Event Manager will receive Alarm Log data. |
||
|
|
Clear |
The Event Manager will not receive any Alarm Log data. |
|
|
Checked |
The Event Manager will receive Event Log data. |
||
|
|
Clear |
The Event Manager will not receive any Event Log data. |
|
|
Maximum Concurrent Scripts |
Specifies the maximum number of scripts that can execute concurrently within the Event Manager. When this limit is exceeded:
|
||
|
Example 1 |
|
|
Example 2 |
|
|
Example 3 |
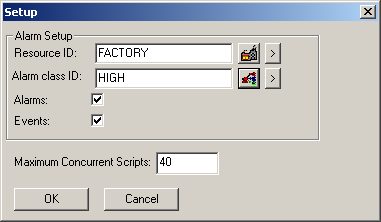
Enter and select the following to make the Event Manager receive all alarms and events.
|
|
Option |
Action |
|
|
Resource ID |
Leave blank. |
|
|
Alarm class ID |
Leave blank. |
|
A |
Alarms |
Check |
|
B |
Events |
Check |
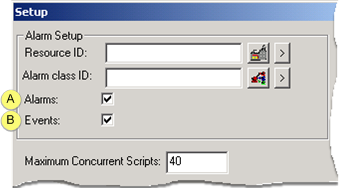
Enter and select the following to make the Event Manager receive only Event data for system resources.
|
|
Option |
Action |
|
A |
Resource ID |
Enter $SYSTEM |
|
|
Alarm class ID |
Leave blank. |
|
B |
Alarms |
Clear |
|
|
Events |
Check |
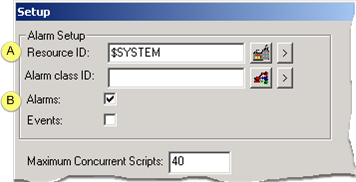
Enter the following to make the Event Manager:
![]() Receive event data from the
$SYSTEM resource.
Receive event data from the
$SYSTEM resource.
![]() Receive HIGH class alarm data only
from $SYSTEM resource.
Receive HIGH class alarm data only
from $SYSTEM resource.
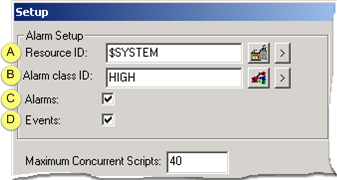
|
|
Option |
Action |
|
A |
Resource ID |
Enter $SYSTEM. |
|
B |
Alarm class ID |
Enter HIGH. |
|
C |
Alarms |
Check |
|
D |
Events |
Check |
|
|
Step 6. Work with existing events and actions. |