(Overlay action only)
![]() Notes
Notes
![]() If you dragged a screen to create
the node or selected the Overlay
action, the screen name is already entered.
If you dragged a screen to create
the node or selected the Overlay
action, the screen name is already entered.
If you had selected No action or Script as the action type and change it to an Overlay action, a screen must be selected.
![]() If a Script entry point was
entered for a Script action, the
Navigation Configuration Editor hides it, but does not lose it. If
you select a Script action again, the
hidden Script entry point will display.
If a Script entry point was
entered for a Script action, the
Navigation Configuration Editor hides it, but does not lose it. If
you select a Script action again, the
hidden Script entry point will display.
Do one of the following.
|
Enter a screen name and path in the Screen name field. |
|
|
Use the Screen name field button. |
|
|
Drag a screen into the Screen name field. |
Enter a Screen name and path in the Screen name field.
Double-click the Screen name field.
The field is enabled for entry.
Enter the screen name with its relative or absolute path.
![]() Note: The Navigation
Configuration Editor will do the following with the path type that
has been selected if it is different from the type you entered.
Note: The Navigation
Configuration Editor will do the following with the path type that
has been selected if it is different from the type you entered.
|
Path type Entered |
Path Type Selected |
Configuration Editor Action |
|
Relative |
Absolute |
Displays an error message that the: "...\<screen name> not found for overlay action in node "<node name>." |
|
Absolute |
Relative |
Changes the absolute path to a relative path. |
Use the Screen name field Browse button
Double-click the Screen name field.
A Browse button displays at the right of the field.
Click the button.
An Open dialog box opens.
Find and select the screen file (*.cim) that will be associated with the Overlay action.
Click .
Result: The Open dialog box closes; The Navigation Configuration Editor:
![]() Enters the selected screen
filename in the Screen name field.
Enters the selected screen
filename in the Screen name field.
![]() Automatically enters the path
type, absolute or relative, that has been selected.
Automatically enters the path
type, absolute or relative, that has been selected.
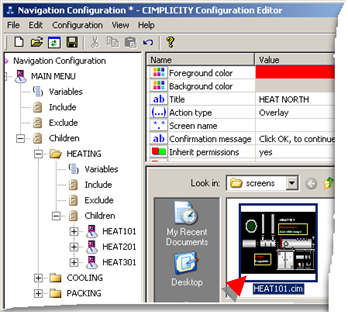
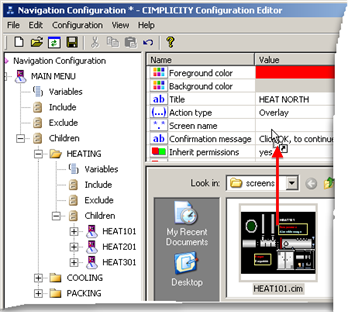
Drag a screen into the Screen name field
Select a screen in the Navigation Configuration window lower right pane.

Drag the screen to the Screen name field for the selected node.

Result: The Navigation Configuration Editor:
![]() Enters the selected screen
filename in the Screen name field.
Enters the selected screen
filename in the Screen name field.
![]() Automatically enters the path
type, absolute or relative, that has been selected.
Automatically enters the path
type, absolute or relative, that has been selected.
|
Step 2.2. Define the extended menu nodes. |