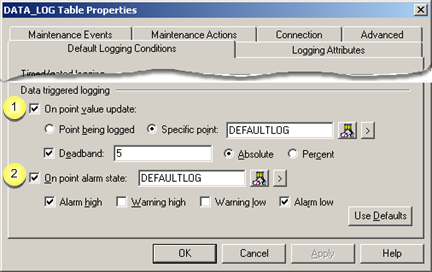
Options to configure data triggered logging are as follows.
|
On point value update |
On point value update logs values when a selected point is updates.
Configuration for the On point value update group includes:
|
Option |
Description |
||
|
Checkbox |
Enables On point value update option. |
||
|
Radio buttons |
Check one option to determine the conditions for when the values of all the points in the table will be logged. |
||
|
|
Point being logged |
Each point that was added to the table after Point being logged was checked (and does not have a customized logging condition) is logged when its value is updated. |
|
|
|
Specific point |
Selected point is updated. Enter a Point ID for this option.
|
|
|
Deadband |
filter out changes in the value of the selected point type before triggering a logging event–for either the point being logged or the specific point. Configuration in the Deadband group includes: |
||
|
|
Checkbox |
Checked enables deadband. |
|
|
|
Value |
Floating point number. Deadband value |
|
|
|
Radio buttons |
Check one to specify how to evaluate the entered value to trigger another logging event. |
|
|
|
|
Absolute |
Absolute value |
|
|
|
Percent |
Percent of the last value. |
|
|
The point's value must change more than the Deadband value before another logging event will be triggered. |
||
Deadband Example 1. Absolute Value
An Absolute Deadband value is 5.0.
|
Point Value |
Result |
|
200.0 |
First logging event |
|
201.3 |
No Logging event |
|
204.2 |
No Logging event |
|
205.1 |
Logging event triggered. |
Deadband Example 2. Percent Value
A Percentage Deadband value is 5.0
|
Point Value |
Result |
|
200.0 |
First logging event |
|
201.3 |
No Logging event |
|
204.2 |
No Logging event |
|
205.1 |
No Logging event |
|
210.2 |
Logging event triggered. |
![]() Note: An explicit
deadband of 0 specifies
that the point must have actually changed as opposed to having been
updated by the point manager.
Note: An explicit
deadband of 0 specifies
that the point must have actually changed as opposed to having been
updated by the point manager.
|
On point alarm state |
On point alarm state logs point values when a selected point goes into one or more selected alarm states.
Configuration for the On point alarm state group includes
|
Option |
|
Description |
|
|
Checkbox |
Enables the on point alarm state option. |
||
|
Field |
Entered the point to be evaluated. Aids to find the point include: |
||
|
|
|
Opens the Select a Point browser |
|
|
|
|
Displays a Popup menu with options for selecting a point. |
|
|
|
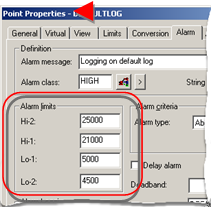
Important: For On point alarm state to work successfully, you must define alarm limits for the trigger point. For example, if you select a Point ID and choose its Alarm High state, logging in the table will occur each time the point enters the Alarm High state. |
||
|
Alarm limits |
One or more alarm states must be checked. The values for these alarm states is specified on the Alarm tab in the selected point's Properties dialog box. |
||
|
|
Alarm high |
|
|
|
|
Warning high |
||
|
|
Warning low |
||
|
|
Alarm low |
||
|
|
|
||
|
|
|
||
|
|
|
||
![]() Tip: Click Use Defaults to reset the Logging
Conditions to their default values. The default is to log data
periodically every 5 minutes.
Tip: Click Use Defaults to reset the Logging
Conditions to their default values. The default is to log data
periodically every 5 minutes.
|
Data triggered logging guidelines |
![]() You can combine
On point value update
logging with On point alarm
state logging.
You can combine
On point value update
logging with On point alarm
state logging.
![]() If you do not define any
logging conditions under Timed/Gated Logging, then data will only
be logged into the table when the trigger occurs.
If you do not define any
logging conditions under Timed/Gated Logging, then data will only
be logged into the table when the trigger occurs.
![]() You can combine triggers.
When you combine triggers, logging occurs when either of
the triggers occurs.
You can combine triggers.
When you combine triggers, logging occurs when either of
the triggers occurs.
Example
You want to log a set of points when POINT_A is updated or when POINT_B is in Alarm High state. Do the following.
Check the On point value update check box.
Enter POINT_A in the Point field.
Check the On point alarm state check box.
Check the Alarm High check box.
Enter POINT_B in the Point field.
|
|
Step 2.2. Configure default logging conditions for the Data Log table. |