Do one of the following:
Method 1
Click Edit on the Point Control Panel menu bar.
Select Add Points.
Method 2
Click the Add
Point ![]() button on the Point Control
Panel toolbar.
button on the Point Control
Panel toolbar.
Method 3
Press Ctrl+A on the keyboard.
Method 4
Right-click a point that displays in the Point Control Panel.
Select Add Points… from the popup menu.
The Select a Point Browser displays when you use any method. If more than one project is running, the that the project that was selected for connection when the Point Control Panel was opened displays in the Project field.
You can do any of the following to change the project selected for point browsing.
![]() Select any running project in the
drop-down list that grants you privileges to browse.
Select any running project in the
drop-down list that grants you privileges to browse.
![]() Enter any of the following.
Enter any of the following.
![]() Project name
Project name
![]() Server name
Server name
![]() IP address
IP address
![]() Cluster name
Cluster name
![]() Cluster IP address
Cluster IP address
Important: If cabling redundancy is configured on a server and you attempt to connect by cluster name or IP address, the connection will fail.
Select the Point IDs you want to display for the selected running project.
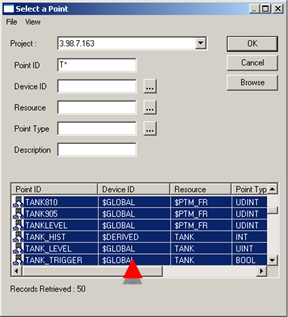
Click OK.
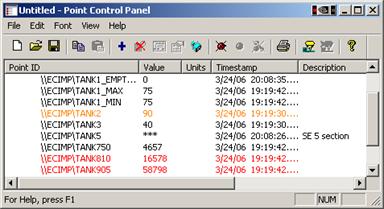
Result: The points appear in the Point Control Panel displaying their runtime values, units and timestamp. If a point is in an alarm condition, its text displays in the color associated with the alarm level.
|
|
1. Add points to the Point Control Panel. |