|
(New recipe) Review default recipe values. |
|
|
Modify recipe parameter values. |
|
|
Confirm recipe properties. |
|
|
Validate parameters. |
(New recipe) Review default recipe values
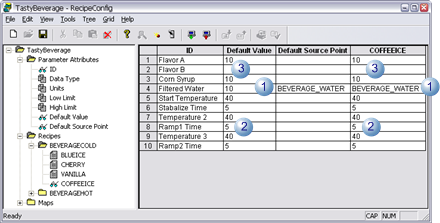
Display the values for a new recipe.
The column that displays in the grid default values for the new recipe in the following priority.

|
1 |
Default source points that are defined for the Parameter have top priority. |
|
2 |
A default value, when there is no default source point, is used as the recipe parameter's default value. |
|
3 |
When a parameter has no default value or source point, the recipe parameter default value is blank., |
Modify recipe parameter values
Display parameter values for any Recipe in the RecipeConfig window's grid.
Select the Parameter value you want to modify.
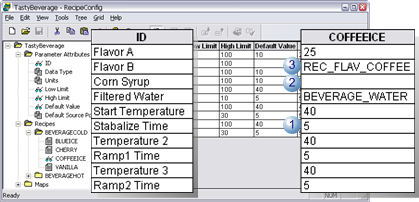
Change the value for the Parameter.
Possible values are:

|
1 |
Absolute value. |
|
2 |
Blank (no value). Important: The cell can only be blank if a default source point is specified for the parameter. |
|
3 |
Point ID |
|
|
Tip: There are several tools to help you select and enter point ID's. Select the field in the Recipe column that is on the same row as the ID. Do any of the following.
|
Confirm recipe properties
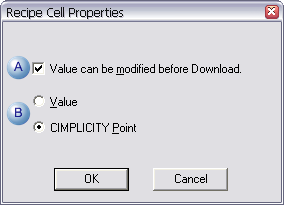
A Recipe Cell Properties dialog box is available to do a quick check for each Recipe entry.
Do one of the following.
![]() Click Edit>Properties on the
RecipeConfig menu bar.
Click Edit>Properties on the
RecipeConfig menu bar.
![]() Right-click the field; select
Properties on the Popup menu.
Right-click the field; select
Properties on the Popup menu.
A Recipe Cell Properties dialog box opens.
Options are as follows.

|
A |
Options for Value can be modified before Download are: |
|
|
|
Checked |
(Default) Allows the value to be read/write before download. |
|
|
Clear |
Makes the value read-only before download. |
|
B |
Options are: |
|
|
|
Value |
|
|
|
Checked |
The value in the cell is downloaded to the corresponding Map point. |
|
|
|
Checked by default if one of the following happens.
|
|
|
CIMPLICITY Point |
(Checked) Contents of the CIMPLICITY Point ID are downloaded to the corresponding Map point. Checked by default if a point ID is entered that is available in the project. |
Validate parameters
The following validations are performed in Parameter columns:
|
High/Low Limits |
|
|
Default Value |
|
|
Default Source Point |
![]() High/Low
Limits
High/Low
Limits
The following validations are performed for the High Limit and Low Limit columns:
![]() If the cell is blank, no
validation is performed.
If the cell is blank, no
validation is performed.
![]() If the cell is not blank, the
Data Type of the row must be numeric.
If the cell is not blank, the
Data Type of the row must be numeric.
![]() When validating the Low Limit
column, each Low Limit must be less than its corresponding High
Limit.
When validating the Low Limit
column, each Low Limit must be less than its corresponding High
Limit.
![]() When validating the High Limit
column, each High Limit must be greater than its corresponding Low
Limit.
When validating the High Limit
column, each High Limit must be greater than its corresponding Low
Limit.
![]() Default Value
Default Value
The following validations are performed for the Default Value column:
![]() Cell can only be blank if a
Default Source Point is filled in for the row.
Cell can only be blank if a
Default Source Point is filled in for the row.
![]() If the Data Type for the row is
numeric, the cell can contain only a numeric value.
If the Data Type for the row is
numeric, the cell can contain only a numeric value.
![]() If the Data Type for the row is
digital, the cell can contain only 0 or 1.
If the Data Type for the row is
digital, the cell can contain only 0 or 1.
![]() If the Data Type for the row is
text, the cell can contain anything.
If the Data Type for the row is
text, the cell can contain anything.
![]() If the Data Type for the row is
numeric, and Default High/Low limits are defined, the Default Value
is verified to be within those limits.
If the Data Type for the row is
numeric, and Default High/Low limits are defined, the Default Value
is verified to be within those limits.
![]() Default Source Point
Default Source Point
The following validations are performed for the Default Source Point column:
![]() If the cell is blank, no
validation is performed.
If the cell is blank, no
validation is performed.
![]() The Point Type for the Default
Source Point must match the Data Type of the row.
The Point Type for the Default
Source Point must match the Data Type of the row.
![]() If the Default Source Point is an
array element, it must be within the array bounds.
If the Default Source Point is an
array element, it must be within the array bounds.
![]() The point must be Enabled.
The point must be Enabled.
|
Step 3. Configure recipes. |